🧢 Beautiful ✨ Detailed πŸ’ Adorable

Vintage Style Teddy Bear Amigurumi Pattern

Vintage Style Teddy Bear Amigurumi Pattern
4.3β˜…Rating
8-10 HoursTime Needed
3.4KMade This
βœ‚οΈ

Intermediate Level

Ideal for those with basic crocheting experience, featuring slightly more advanced stitches and techniques to expand your skills.

⏱️

All-Day Adventure

Requires 8-10 hours, ideal for a full day of immersive crocheting.

πŸ₯

Charming Critter

Delightful animal designs with sweet details that capture the essence of your favorite woodland and farmyard friends.

About This Vintage Style Teddy Bear Amigurumi Pattern

Vintage Style Teddy Bear Amigurumi Pattern crochet pattern - detailed view

This pattern makes a beautiful handmade gift β€” thoughtful enough for someone special, like a new baby or a collector, but classic enough to fit into any nursery decor or toy box.

Why You'll Love This Vintage Style Teddy Bear Amigurumi Pattern

I'm a sucker for details, and the needle sculpting on this muzzle is just so satisfying to do. It transforms a simple sphere into a face with so much character! I also love that we use household plastic for the foot insolesβ€”it's such a clever way to make sure your bear can actually stand on his own two feet.

Vintage Style Teddy Bear Amigurumi Pattern step 1 Vintage Style Teddy Bear Amigurumi Pattern step 2 Vintage Style Teddy Bear Amigurumi Pattern step 3 Vintage Style Teddy Bear Amigurumi Pattern step 4

Switch Things Up

I remember the first time I tried a cotter pin jointβ€”I was so nervous I'd mess up the head alignment! But honestly, once you see that head spin 360 degrees, you'll never want to go back to static necks. This bear is inspired by those old-fashioned mohair teddies we all remember from childhood. I chose a sport weight yarn because it gives such a crisp definition to the stitches, especially around the muzzle.

One tip I've learned over the years: when you're doing the thread jointing for the legs, use a really long doll needle if you have one. It makes going through the entire body so much easier. And don't be afraid to pull that thread tight! You want the legs to be snug against the body so he can stand tall. I love seeing him in different colors tooβ€”a dusty blue or a soft sage green would look absolutely stunning for a modern nursery vibe. He’s a bit of a labor of love, but every minute spent on those tiny details is worth it when you see him sitting there looking back at you.

Common Mistakes & How to Fix Them

βœ— When inserting the cotter pin between Rounds 15 and 16 of the head, make sure it's perfectly centered; otherwise, your bear's head will sit lopsided on the body.βœ— If you skip the plastic insoles in the feet, the bottom of the legs will bulge out from the stuffing, and the bear won't be able to stand upright.βœ— The needle sculpting for the eyes requires quite a bit of tensionβ€”if you don't pull the threads tightly enough, the eyes won't 'sink' into the face, and he'll lose that soulful expression.βœ— When joining the arms in Round 8 of the body, ensure the wire ends are well-taped; if the tape slips, the wire can poke through your stitches over time.

Vintage Style Teddy Bear Amigurumi Pattern

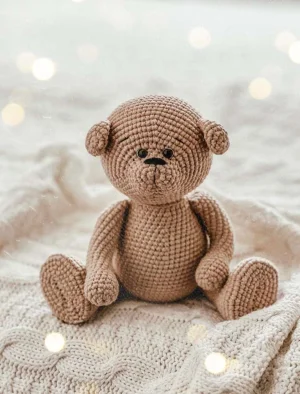
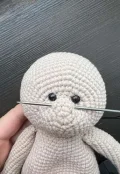
You're going to love bringing this classic little bear to life. There's something so nostalgic about a jointed teddy, and this pattern uses a cotter pin for the head to give it that authentic vintage feel. I've designed him with long, slender limbs and a sweet, expressive face that really comes together during the needle sculpting phase. It's the kind of project where you can really see the personality emerge with every stitch.

Intermediate 8-10 Hours

Materials Needed for Vintage Style Teddy Bear Amigurumi Pattern

β€” Main Fabric

  • 01
    One 50g skein of Sport weight yarn in a classic beige or tan shade
  • 02
    Small amount of white thread for adding highlights to the eyes
  • 03
    Fine black or dark brown embroidery thread for the nose and brow details
  • 04
    Strong nylon or cotton thread for the leg jointing

β€” Tools Required

  • 01
    2.0mm crochet hook
  • 02
    Tapestry needle for assembly
  • 03
    6mm plastic safety eyes
  • 04
    Fiberfill stuffing
  • 05
    Firm plastic from a container lid for foot insoles and discs
  • 06
    10cm of craft wire for the arms
  • 07
    25mm attachment discs for the neck joint
  • 08
    One 25mm cotter pin
  • 09
    Pliers for bending the cotter pin
  • 10
    Medical tape or plaster to wrap wire ends

Progress Tracker

0% Complete

β€” 1. Head :

Info :

Work in tight, X-shaped stitches (yarn under) for the best finish.

Round 1 :

Start with 6 x 1sc into a MR (6)

Round 2 :

6 x 1inc (12)

Round 3 :

6 x (1sc, 1inc) (18)

Round 4 :

18 x 1sc into every st (18)

Round 5 :

6 x (2sc, 1inc) (24)

Round 6 :

24 x 1sc into every st (24)

Round 7 :

6 x (3sc, 1inc) (30)

Round 8 :

15 x 1inc, 5 x 1sc, 3 x 1dec, 4 x 1sc (42)

Round 9 :

6 x (6sc, 1inc) (48)

Round 10 :

6 x (7sc, 1inc) (54)

Round 11 :

6 x (8sc, 1inc) (60)

Round 12 :

6 x (9sc, 1inc) (66)

Round 13-23 :

11 rnds of 66 x 1sc into every st (66)

Info :

If using safety eyes, place them between Rounds 6 and 7, leaving a gap of 4 or 5 stitches.

Round 24 :

6 x (9sc, 1dec) (60)

Round 25 :

6 x (8sc, 1dec) (54)

Round 26 :

6 x (7sc, 1dec) (48)

Round 27 :

6 x (6sc, 1dec) (42)

Round 28 :

6 x (5sc, 1dec) (36)

Round 29 :

6 x (4sc, 1dec) (30)

Info :

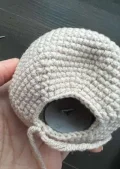
Insert the neck disc and cotter pin inside the head between Rounds 15 and 16 now.

Round 30 :

6 x (3sc, 1dec) (24)

Round 31 :

6 x (2sc, 1dec) (18)

Info :

Stuff the head firmly, ensuring the shape is smooth.

Round 32 :

6 x (1sc, 1dec) (12)

Round 33 :

6 x 1dec (6)

Info :

Fasten off and use a needle to weave through the remaining stitches to close the gap.

β€” 2. Arms β€” Make 2 :

Round 1 :

Start with 6 x 1sc into a MR (6)

Round 2 :

6 x 1inc (12)

Round 3 :

4 x (2sc, 1inc) (16)

Round 4-8 :

5 rnds of 16 x 1sc into every st (16)

Round 9 :

4 x (2sc, 1dec) (12)

Round 10-28 :

19 rnds of 12 x 1sc into every st (12)

Info :

Insert your taped wire if using. Stuff the arm firmly, but leave the top 3 rounds empty.

Final Step :

Fold the top opening flat and work 3 x 1dec through both layers to seal the arm. Fasten off.

β€” 3. Ears β€” Make 2 :

Round 1 :

Start with 6 x 1sc into a MR (6)

Round 2 :

6 x 1inc (12)

Round 3 :

6 x (1sc, 1inc) (18)

Round 4 :

18 x 1sc into every st (18)

Round 5 :

6 x (2sc, 1inc) (24)

Round 6 :

6 x (2sc, 1dec) (18)

Round 7 :

18 x 1sc into every st (18)

Info :

Fasten off, leaving a long tail for sewing to the head.

β€” 4. Body :

Round 1 :

Start with 6 x 1sc into a MR (6)

Round 2 :

6 x 1inc (12)

Round 3 :

6 x (1sc, 1inc) (18)

Round 4 :

6 x (2sc, 1inc) (24)

Round 5 :

6 x (3sc, 1inc) (30)

Round 6 :

Work 30 x 1sc into the BLO (30)

Round 7 :

30 x 1sc into every st (30)

Round 8 :

6 x (4sc, 1inc) (36)

Round 9 :

15 x 1sc, join first arm with 3 x 1sc through both pieces, 15 x 1sc, join second arm with 3 x 1sc through both pieces (36)

Round 10 :

6 x (5sc, 1inc) (42)

Round 11 :

42 x 1sc into every st (42)

Round 12 :

6 x (6sc, 1inc) (48)

Round 13 :

48 x 1sc into every st (48)

Round 14 :

6 x (7sc, 1inc) (54)

Round 15 :

54 x 1sc into every st (54)

Round 16 :

6 x (8sc, 1inc) (60)

Round 17 :

60 x 1sc into every st (60)

Round 18-31 :

14 rnds of 60 x 1sc into every st (60)

Note :

Source indicates 19 rounds for this section, but round numbering suggests 14; verify length against your bear's proportions.

Round 32 :

6 x (8sc, 1dec) (54)

Round 33 :

6 x (7sc, 1dec) (48)

Round 34 :

6 x (6sc, 1dec) (42)

Round 35 :

6 x (5sc, 1dec) (36)

Round 36 :

6 x (4sc, 1dec) (30)

Round 37 :

6 x (3sc, 1dec) (24)

Round 38 :

6 x (2sc, 1dec) (18)

Info :

Stuff the body very firmly.

Round 39 :

6 x (1sc, 1dec) (12)

Round 40 :

6 x 1dec (6)

Info :

Fasten off and weave in the end.

β€” 5. Legs β€” Make 2 :

Round 1 :

ch8, starting in 2nd ch from hook: 1inc, 5 x 1sc, 5sc in the last ch, work along other side of foundation: 5 x 1sc, 1inc (18)

Note :

Stitch count for Round 1 appears to be 19 based on instructions, though source indicates 18; adjust for symmetry as needed.

Round 2 :

1inc, 6 x 1sc, 4 x 1inc, 6 x 1sc, 1inc (24)

Round 3 :

1inc, 9 x 1sc, 1inc, 2 x 1sc, 1inc, 9 x 1sc, 1inc (28)

Round 4 :

7 x (3sc, 1inc) (35)

Round 5 :

35 x 1sc into every st (35)

Round 6 :

7 x (4sc, 1inc) (42)

Round 7-9 :

3 rnds of 42 x 1sc into every st (42)

Round 10 :

7 x (4sc, 1dec) (35)

Round 11 :

35 x 1sc into every st (35)

Round 12 :

7 x (3sc, 1dec) (28)

Info :

Insert your plastic insole into the bottom of the foot.

Round 13 :

10 x 1sc, 4 x 1dec, 10 x 1sc (24)

Round 14 :

9 x 1sc, 3 x 1dec, 9 x 1sc (21)

Round 15 :

8 x 1sc, 2 x 1dec, 9 x 1sc (19)

Round 16-26 :

11 rnds of 19 x 1sc into every st (19)

Round 27 :

Work decreases around until closed. Stuff very firmly before finishing.

Assembly Instructions

  • Insert the 6mm safety eyes between Rounds 6 and 7 of the head, leaving about 5 stitches between them.
  • Place the neck disc and cotter pin inside the head between Rounds 15 and 16 before finishing the head decreases.
  • Perform needle sculpting by threading yarn from the muzzle base up to the eyes and back, pulling tight to create eye sockets.
  • Embroider the nose between Rounds 2 and 3 of the head using horizontal stitches, then add a vertical line for the mouth.
  • Fold the ears and sew them onto the head across Rounds 14 and 15, keeping about 18 stitches of space between them.
  • Connect the head to the body by passing the cotter pin through the body's neck disc and using pliers to curl the pin ends outward.
  • Thread-joint the legs to the sides of the body between Rounds 30 and 31, pulling the thread tightly so the bear can sit or stand.

Important Notes

  • πŸ’‘Use a very tight tension and X-shaped stitches (yarn under) to ensure the stuffing doesn't show through the fabric.
  • πŸ’‘When stuffing the arms, leave the top 3 rounds empty so they can be folded flat and joined easily to the body.
  • πŸ’‘Always wrap the ends of your arm wires with medical tape to prevent them from snagging the yarn or poking the user.
  • πŸ’‘If you don't have pre-made discs, you can cut your own from sturdy plastic container lids to match your bear's neck size.
  • πŸ’‘For the most expressive face, wait until the head is fully stuffed before finalizing the needle sculpting tension.

I really hope you enjoy the process of making this little guy as much as I did. There's something so magical about that moment when the needle sculpting finally gives him a 'soul.' Whether he's destined to be a cherished gift or a new addition to your own shelf, he’s sure to bring a bit of handmade warmth wherever he goes. Don't forget to take your time with the jointingβ€”it's what gives him that wonderful vintage movement. Happy stitching, and I can't wait to see your finished bears! 🧢 ✨

You ask,

we answer.

FAQs

Can I use velvet or chenille yarn for this bear?

You can, but the needle sculpting and cotter pin joints work best with a firm cotton or acrylic blend like the sport weight suggested. Fuzzy yarns might hide the facial details.

What if I can't find a cotter pin?

You can sew the head directly to the body, but you'll lose the 360-degree rotation. Alternatively, a large plastic safety joint would also work well.

Is the wire in the arms mandatory?

Not at all! The wire just allows you to pose the arms. If this is for a very young child, I actually recommend leaving the wire out for safety.

How do I make the X-shaped stitches mentioned?

Instead of wrapping the yarn over your hook, try 'yarning under' for the first loop. It creates a tighter, more square-shaped stitch that's perfect for amigurumi.