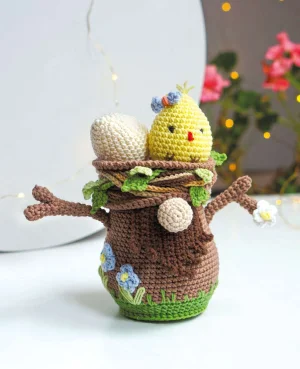
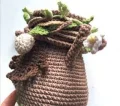
Bring a touch of the forest indoors with this whimsical tree gnome! You'll love watching this little guy come to life, from his textured bark-like body to the sweet little nest perched right on top of his head. It's such a fun project for anyone who loves nature-inspired decor or unique amigurumi. You'll find the process of building his little world — from the tiny chick to the winding vines — absolutely delightful.
Progress Tracker
0% Complete
— 1. Hat (Nest Base) :
Round 1 :
Using light brown, create a magic ring and work 6 sc into it, then pull the ring tight (6)
Round 2 :
Work 1 inc into every stitch around (12)
Round 3 :
Repeat (1 sc, 1 inc) 6 times (18)
Round 4 :
Repeat (1 sc, 1 inc, 1 sc) 6 times (24)
Round 5 :
Repeat (3 sc, 1 inc) 6 times (30)
Round 6 :
Repeat (2 sc, 1 inc, 2 sc) 6 times (36)
Round 7 :
Repeat (5 sc, 1 inc) 6 times (42)
Round 8 :
Repeat (3 sc, 1 inc, 3 sc) 6 times (48)
Info :
Mark the very last stitch of the previous round to help with the body placement later.
Round 9 :
Work 1 BPsc into every stitch around the circle (48)
Round 10 :
Work 1 sc into every stitch around (48)
Round 11 :
Work 1 sc into every stitch around (48)
Round 12 :
Work 1 sc into every stitch around (48)
Round 13 :
Work 1 sc into every stitch around (48)
Round 14 :
Repeat (7 sc, 1 inc) 6 times (54)
Round 15 :
Work 1 sc into every stitch around (54)
Round 16 :
Work 1 sc into every stitch around (54)
Round 17 :
Repeat (ch 1, sl st in the next stitch) all the way around, then fasten off (54)
— 2. Body :
Info :
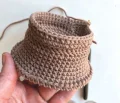
Flip your nest base upside down. You will be working into the BLO of the first round of the hat base.
Round 1 :
Using light brown, work 1 sc into the BLO of every stitch around (48)
Round 2 :
Work 1 sc into the BLO of every stitch around (48)
Round 3 :
Work 19 sc, then 10 sc into the BLO only, then finish with 19 sc (48)
Round 4 :
Work 1 sc into every stitch around (48)
Round 5 :
Work 1 sc into every stitch around (48)
Round 6 :
Work 1 sc into every stitch around (48)
Round 7 :
Work 11 sc, 3 sc into the BLO, 20 sc, 3 sc into the BLO, then 11 sc (48)
Round 8 :
Work 1 sc into every stitch around (48)
Round 9 :
Repeat (7 sc, 1 inc) 6 times (54)
Round 10 :
Work 1 sc into every stitch around (54)
Round 11 :
Work 1 sc into every stitch around (54)
Round 12 :
Repeat (4 sc, 1 inc, 4 sc) 6 times (60)
Round 13 :
Work 1 sc into every stitch around (60)
Round 14 :
Repeat (7 sc, 1 inc, 7 sc) 4 times (64)
Round 15 :
Work 1 sc into every stitch around (64)
Round 16 :
Work 1 sc into every stitch around (64)
Round 17 :
Work 1 sc into every stitch around (64)
Round 18 :
Repeat (3 sc, 1 sc2tog, 3 sc) 8 times (56)
Round 19 :
Work 1 sc into every stitch around (56)
Round 20 :
Work 1 sc into every stitch around, switching to grass green on the final stitch (56)
Round 21 :
Using green, work sc around while varying the stitch depth and angle to create a messy grass effect (56)
Round 22 :
Repeat (5 sc, 1 sc2tog) 8 times (48)
Round 23 :
Work 1 sc into every stitch around (48)
Round 24 :
Work 1 sc into every stitch around (48)
Round 25 :
Work 1 sc into the BLO of every stitch around (48)
Round 26 :
Repeat (2 sc, 1 sc2tog, 2 sc) 8 times (40)
Info :
Begin stuffing the body firmly now.
Round 27 :
Repeat (3 sc, 1 sc2tog) 8 times (32)
Round 28 :
Repeat (1 sc, 1 sc2tog, 1 sc) 8 times (24)
Round 29 :
Repeat (1 sc, 1 sc2tog) 8 times (16)
Round 30 :
Work 8 sc2tog, then fasten off and sew the bottom closed (8)
— 3. Hat Brim :
Info :
Hold the gnome upside down and join light brown yarn to the FLO of Round 1 of the body.
Round 1 :
Repeat (11 sc into the FLO, 1 inc into the FLO) 4 times (52)
Round 2 :
Repeat (6 sc, 1 inc, 6 sc) 4 times (56)
Round 3 :
Repeat (13 sc, 1 inc) 4 times, then fasten off (60)
— 4. Grass Stand :
Round 1 :
Join green yarn to the FLO of Round 24 of the body and sc in every stitch around, then fasten off.
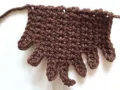
— 5. Beard :
Row 1 :
Using dark brown, ch 10. Start in 2nd ch from hook: 9 sc, ch 1, turn (9)
Row 2 :
6 sc, ch 6, turn (12)
Row 3 :
Start in 2nd ch from hook: 11 sc, ch 1, turn (11)
Row 4 :
7 sc, ch 6, turn (13)
Row 5 :
Start in 2nd ch from hook: 12 sc, ch 1, turn (12)
Row 6 :
8 sc, ch 7, turn (15)
Row 7 :
Start in 2nd ch from hook: 14 sc, ch 1, turn (14)
Row 8 :
8 sc, ch 5, turn (13)
Row 9 :
Start in 2nd ch from hook: 12 sc, ch 1, turn (12)
Row 10 :
7 sc, ch 5, turn (12)
Row 11 :
Start in 2nd ch from hook: 11 sc, ch 1, turn (11)
Row 12 :
6 sc, ch 5, turn (11)
Row 13 :
Start in 2nd ch from hook: 10 sc, then fasten off leaving a long tail for sewing (10)
— 6. Nose :
Round 1 :
Using wheat yarn, work 6 sc into a magic ring (6)
Round 2 :
Work 1 inc into every stitch (12)
Round 3 :
Repeat (1 sc, 1 inc) 6 times (18)
Round 4 :
Work 1 sc in every stitch around (18)
Round 5 :
Work 1 sc in every stitch around (18)
Round 6 :
Repeat (1 sc, 1 sc2tog) 6 times, then fasten off leaving a sewing tail (12)
— 7. Arms - Long Stick :
Round 1 :
Using light brown, work 6 sc into a magic ring (6)
Round 2-6 :
Work 1 sc into every stitch around (6)
Round 7 :
Work 1 sc into every stitch, sl st to join, then fasten off (6)
— 8. Arms - Short Stick :
Round 1 :
Using light brown, work 6 sc into a magic ring (6)
Round 2-3 :
Work 1 sc into every stitch around, but do not cut the yarn (6)
— 9. Arms - Joining & Finishing :
Info :
Hold the short stick and long stick together.
Round 1 :
Work 1 sc through both the short and long stick for the next 3 stitches to join them.
Round 2 :
Work 3 sc across the unworked stitches of the top stick and 6 sc around the remaining edge (9)
Round 3-12 :
Work 1 sc in every stitch around for 10 rounds (Arm 1) or 12 rounds (Arm 2), then fasten off.
— 10. Egg :
Round 1 :
Using off-white, work 6 sc into a magic ring (6)
Round 3 :
Repeat (1 sc, 1 inc) 6 times (18)
Round 4 :
Work 1 sc in every stitch around (18)
Round 5 :
Repeat (1 sc, 1 inc, 1 sc) 6 times (24)
Round 6-7 :
Work 1 sc in every stitch around (24)
Round 8 :
Repeat (3 sc, 1 inc) 6 times (30)
Round 9-14 :
Work 1 sc in every stitch around (30)
Round 15 :
Repeat (3 sc, 1 sc2tog) 6 times (24)
Info :
Stuff the egg firmly.
Round 17 :
Repeat (1 sc, 1 sc2tog, 1 sc) 6 times (18)
Round 18 :
Repeat (1 sc, 1 sc2tog) 6 times, then cinch the opening closed (12)
— 11. Chick :
Info :
Repeat the entire egg pattern using light yellow yarn. Embroider eyes in dark brown, legs in light brown, and a beak in red.
Bow Row 1 :
Using blue, ch 6. Start in 2nd ch from hook: 5 sc, ch 1, turn (5)
Bow Row 2 :
Work 5 sc, then fasten off. Tie the center to form a bow and attach to the chick's head (5)
— 12. Flower :
Round 1 :
In a magic ring: *(ch 2, 3 dc, ch 2, sl st) repeat 5 times. Fasten off and add a bullion knot in the center.
— 13. Decorative Vines :
Info :
Create simple chains in various lengths (30cm and 60cm) using Dark Brown, Light Brown, Wheat, Honey Caramel, and Beige.
Leaf Vine :
*Ch 15, then work a leaf into the 5th ch from hook: (2 unfinished dc, yarn over and pull through all loops, ch 2, sl st in 2nd ch, ch 3, sl st in same ch as dc). Repeat 7-10 times.
I hope you have as much fun making this woodland friend as I did! There's something so satisfying about seeing all those little details — the tiny bow, the messy grass, and the twiggy arms — all come together into one magical piece. It’s the perfect project for a cozy weekend in when you just want to get lost in your stitches. Whether you keep him for yourself or give him away as a special handmade gift, he's bound to bring a smile to anyone's face. Happy hooking, and I can't wait to see your finished gnomes! 🧶✨