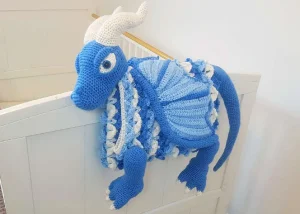
You are going to love creating this magical ice dragon that doubles as a cozy, textured blanket! It is the perfect project for when you want to make something truly special that a little one can play with during the day and snuggle under at night. The combination of amigurumi techniques and rhythmic blanket rows makes the process so engaging. Your finished dragon will have a wonderful personality, and the thick, leafy texture of the blanket part is just so satisfying to work up.
Progress Tracker
0% Complete
— 1. The Head :
Info :
Using Turquoise yarn and a 4mm hook. Work in continuous rounds without joining.
Round 1 :
ch6, 3sc in 2nd ch from hook, sc in next 3ch, 3sc in last ch. Rotate to work on other side of chain: sc in next 3ch (12)
Round 2 :
inc in next 3 sts, sc in next 3 sts, inc in next 3 sts, sc in next 3 sts (18)
Round 3 :
(sc, inc) x 3, sc in next 3 sts, (inc, sc) x 3, sc in next 3 sts (24)
Round 4 :
(sc in next 2 sts, inc) x 3, sc in next 3 sts, (sc in next 2 sts, inc) x 3, sc in next 3 sts (30)
Round 5 :
(sc in next 3 sts, inc) x 3, sc in next 3 sts, (sc in next 3 sts, inc) x 3, sc in next 3 sts (36)
Round 6 :
sc in next 31 sts, 1 bo, sc in next 4 sts (36)
Round 7 :
sc in next 4 sts, 1 bo, sc in next 31 sts (36)
Round 8-19 :
sc in each st around (36)
Round 20 :
inc in next 5 sts, sc in next 31 sts (41)
Round 21 :
(sc, inc) x 5, sc in next 31 sts (46)
Round 22 :
inc, sc in next 13 sts, inc, sc in next 31 sts (48)
Round 23 :
sc in next 2 sts, inc, sc in next 6 sts, inc, sc in next 6 sts, inc, sc in next 31 sts (51)
Round 24 :
(inc, sc in next 16 sts) x 3 (54)
Round 25 :
(inc, sc in next 17 sts) x 3 (57)
Round 26-33 :
sc in each st around (57)
Round 34 :
(dec, sc in next 17 sts) x 3 (54)
Round 35 :
(dec, sc in next 7 sts) x 6 (48)
Round 36 :
(dec, sc in next 6 sts) x 6 (42)
Round 37 :
(dec, sc in next 5 sts) x 6 (36)
Round 38 :
(dec, sc in next 4 sts) x 6 (30)
Round 39 :
(dec, sc in next 3 sts) x 6 (24)
Round 40 :
(dec, sc in next 2 sts) x 6 (18)
Round 41 :
(dec, sc in next st) x 6 (12)
Info :
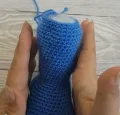
Fasten off, stuff firmly, and weave in the tail to close the opening.
— 2. The Lower Lids :
Info :
Make 2 using Turquoise yarn and 3.5mm hook. Work in rounds.
Round 1 :
4sc into a MR (4)
Round 2-3 :
sc in each st around (4)
Round 4 :
(inc, sc) x 2 (6)
Round 5-6 :
sc in each st around (6)
Round 7 :
(inc, sc in next 2 sts) x 2 (8)
Round 8-12 :
sc in each st around (8)
Round 13 :
(dec, sc in next 2 sts) x 2 (6)
Round 14-15 :
sc in each st around (6)
Info :
Fasten off and leave a long tail. Do not stuff.
— 3. The Upper Lids :
Info :
Make 2 using Turquoise yarn and 3.5mm hook.
Row 1 :
ch15, sc in 2nd ch from hook and in every ch across (14)
Info :
Fasten off and leave a long tail for sewing.
— 4. The Eye Whites :
Info :
Make 2 using White yarn and 3.5mm hook. These are worked in rows.
Row 1 :
ch2, 3sc in 2nd ch from hook, turn (3)
Row 2 :
sc in each of the 3 sts, turn (3)
Row 3 :
inc, sc, inc, turn (5)
Row 4 :
sc in each st across, turn (5)
Row 5 :
inc, sc in next 3 sts, inc, turn (7)
Row 6-8 :
sc in each st across, turn (7)
Row 9 :
dec, sc in next 3 sts, dec, turn (5)
Row 10 :
sc in each st across, turn (5)
Row 11 :
dec, sc, dec, turn (3)
Info :
Fasten off and leave a long tail.
— 5. The Horns :
Info :
Make 2 using White yarn and 4mm hook. Use a marker for short rows.
Round 1 :
Create a MR and work 4sc into it (4)
Round 2 :
(sc, inc) x 2 (6)
Round 3 :
sc in each st around (6)
Round 4 :
(sc in next 2 sts, inc) x 2 (8)
Round 5 :
sc in each st around (8)
Round 6 :
(sc in next 3 sts, inc) x 2 (10)
Round 7-8 :
sc in each st around (10)
Row 9 :
RS: sc in next 5 sts, turn (5)
Row 10 :
WS: sc in next 5 sts, turn (5)
Round 11 :
sc in the 5 sts of the short row, then sc in the 5 unworked sts from Round 8 (10)
Round 12 :
sc in each st around (10)
Round 13 :
(sc in next 4 sts, inc) x 2 (12)
Round 14 :
sc in each st around (12)
Round 15 :
(sc in next 5 sts, inc) x 2 (14)
Round 16 :
sc in each st around (14)
Round 17 :
(sc in next 6 sts, inc) x 2 (16)
Round 18 :
sc in each st around (16)
Round 19 :
sc in next 16 sts, then work 9 more sc to move the round start (16)
Row 20 :
RS: sc in next 8 sts, turn (8)
Row 21 :
WS: sc in next 8 sts, turn (8)
Round 22 :
sc in 8 sts of short row, then sc in 8 unworked sts from Round 19 (16)
Round 23 :
(sc in next 7 sts, inc) x 2 (18)
Round 24 :
sc in each st around (18)
Row 25 :
RS: sc in next 9 sts, turn (9)
Row 26 :
WS: sc in next 9 sts, turn (9)
Round 27 :
sc in 9 sts of short row, then sc in 9 unworked sts from Round 24 (18)
Round 28 :
(sc in next 8 sts, inc) x 2 (20)
Row 29 :
RS: sc in next 10 sts, turn (10)
Row 30 :
WS: sc in next 10 sts, turn (10)
Round 31 :
sc in 10 sts of short row, then sc in 10 unworked sts from Round 28 (20)
Round 32 :
(sc in next 9 sts, inc) x 2 (22)
Round 33 :
sc in each st around (22)
Row 34 :
RS: sc in next 11 sts, turn (11)
Row 35 :
WS: sc in next 11 sts, turn (11)
Round 36 :
sc in 11 sts of short row, then sc in 11 unworked sts from Round 33 (22)
Round 37 :
(sc in next 10 sts, inc) x 2 (24)
Round 38-39 :
sc in each st around (24)
Info :
Fasten off, leave a long tail, and stuff firmly.
— 6. The Legs :
Info :
Make 4. Start by making 3 toes for each leg using a 3.5mm hook.
Toe Round 1 :
With White: 4sc into a MR (4)
Toe Round 2 :
inc, sc in next 3 sts (5)
Toe Round 3 :
inc, sc in next 4 sts (6)
Toe Round 4 :
inc, sc in next 5 sts (7)
Toe Round 5 :
Switch to Turquoise: inc, sc in next 6 sts (8)
Toe Round 6 :
(inc, sc in next 3 sts) x 2 (10)
Toe Round 7 :
(inc, sc in next 4 sts) x 2 (12)
Toe Round 8 :
(inc, sc in next 5 sts) x 2 (14)
Info :
Fasten off first 2 toes. Keep yarn attached to 3rd toe to begin joining.
Round 9 :
sc across 7 sts of Toe 1, sc across 14 sts of Toe 2, sc across 7 sts of Toe 1, sc across 14 sts of Toe 3 (42)
Round 10 :
(dec, sc in next 19 sts) x 2 (40)
Round 11 :
(dec, sc in next 18 sts) x 2 (38)
Round 12 :
(dec, sc in next 17 sts) x 2 (36)
Round 13 :
(dec, sc in next 16 sts) x 2 (34)
Round 14 :
sc in next 12 sts, then work Short Rows 14A-14E (16 sc each) to create the heel (34)
Round 15 :
sc in next 11 sts, sc4tog along heel edge, sc in next 22 sts (34)
Round 16 :
sc in each st around (34)
Round 17 :
sc in next 13 sts, then work Short Rows 17A-17E (17 sc each) (34)
Round 18 :
sc in next 12 sts, sc4tog along heel edge, sc in next 21 sts (34)
Round 19 :
sc in next 13 sts, (dec, sc in next 3 sts) x 4, sc (30)
Round 20 :
sc in each st around (30)
Round 21 :
(dec, sc in next 3 sts) x 6 (24)
Round 22 :
(inc, sc in next 11 sts) x 2 (26)
Round 23 :
(inc, sc in next 12 sts) x 2 (28)
Round 24 :
(inc, sc in next 13 sts) x 2 (30)
Round 25-26 :
sc in each st around (30)
Round 27 :
inc, sc in next 29 sts (31)
Round 28-29 :
sc in each st around (31)
Round 30 :
sc in next 15 sts, inc, sc in next 15 sts (32)
Round 31-32 :
sc in each st around (32)
Round 33 :
inc, sc in next 31 sts (33)
Round 34-35 :
sc in each st around (33)
Round 36 :
sc in next 16 sts, inc, sc in next 16 sts (34)
Round 37-38 :
sc in each st around (34)
Round 39 :
(dec, sc in next 15 sts) x 2 (32)
Round 40 :
(dec, sc in next 6 sts) x 4 (28)
Round 41 :
(dec, sc in next 5 sts) x 4 (24)
Round 42 :
(dec, sc in next 2 sts) x 6 (18)
Round 43 :
(dec, sc) x 6 (12)
Info :
Fasten off, stuff the foot and leg lightly, and flatten the top.
— 7. The Tail :
Info :
Use Turquoise yarn and a 3.5mm hook. Work in rounds.
Round 1 :
4sc into a MR (4)
Round 2 :
inc, sc in next 3 sts (5)
Round 3-4 :
sc in each st around (5)
Round 5 :
inc, sc in next 4 sts (6)
Round 6-7 :
sc in each st around (6)
Round 8 :
inc, sc in next 5 sts (7)
Round 9-10 :
sc in each st around (7)
Round 11 :
inc, sc in next 6 sts (8)
Round 12-13 :
sc in each st around (8)
Round 14 :
inc, sc in next 7 sts (9)
Round 15-16 :
sc in each st around (9)
Round 17 :
inc, sc in next 8 sts (10)
Round 18-19 :
sc in each st around (10)
Round 20 :
inc, sc in next 9 sts (11)
Round 21-22 :
sc in each st around (11)
Round 23 :
inc, sc in next 10 sts (12)
Round 24-25 :
sc in each st around (12)
Round 26 :
inc, sc in next 11 sts (13)
Round 27-28 :
sc in each st around (13)
Round 29 :
inc, sc in next 12 sts (14)
Round 30-31 :
sc in each st around (14)
Round 32 :
inc, sc in next 13 sts (15)
Round 33-34 :
sc in each st around (15)
Round 35 :
inc, sc in next 14 sts (16)
Round 36-38 :
sc in each st around (16)
Round 39 :
inc, sc in next 15 sts (17)
Round 40-42 :
sc in each st around (17)
Round 43 :
inc, sc in next 16 sts (18)
Round 44-46 :
sc in each st around (18)
Round 47 :
inc, sc in next 17 sts (19)
Round 48-50 :
sc in each st around (19)
Round 51 :
inc, sc in next 18 sts (20)
Round 52-54 :
sc in each st around (20)
Round 55 :
inc, sc in next 19 sts (21)
Round 56-57 :
sc in each st around (21)
Round 58 :
inc, sc in next 20 sts (22)
Round 59-60 :
sc in each st around (22)
Round 61 :
inc, sc in next 21 sts (23)
Round 62-63 :
sc in each st around (23)
Round 64 :
inc, sc in next 22 sts (24)
Round 65-66 :
sc in each st around (24)
Round 67 :
inc, sc in next 23 sts (25)
Round 68 :
sc in each st around (25)
Round 69 :
inc, sc in next 24 sts (26)
Round 70 :
sc in each st around (26)
Round 71 :
inc, sc in next 25 sts (27)
Round 72 :
sc in each st around (27)
Round 73 :
inc, sc in next 26 sts (28)
Round 74 :
sc in each st around (28)
Round 75 :
inc, sc in next 27 sts (29)
Round 76 :
sc in each st around (29)
Round 77 :
inc, sc in next 28 sts (30)
Round 78 :
sc in each st around (30)
Round 79 :
inc, sc in next 29 sts (31)
Round 80 :
sc in each st around (31)
Info :
Fasten off and leave a long tail for assembly.
— 8. The Wings :
Info :
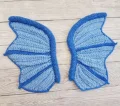
Make 2. Work in rows using a 4mm hook and BLO for all rows from Row 2 onwards.
Row 1 :
With Pale Blue: ch15, sc in 2nd ch, sc, hdc, dc in next 11 chs, turn (14)
Row 2 :
(2dc in next st) x 2, dc in next 9 sts, hdc, sc in last 2 sts, ch1, turn (16)
Row 3 :
sc in next 2 sts, hdc, dc in next 11 sts, (2dc in next st) x 2, turn (18)
Row 4 :
(2dc in next st) x 2, dc in next 13 sts, hdc, sc in last 2 sts, ch1, turn (20)
Row 5 :
sc in next 2 sts, hdc, dc in next 15 sts, (2dc in next st) x 2, turn (22)
Colour Change :
Switch to Turquoise but do not cut Pale Blue yarn.
Row 6 :
ch1, sc in all 22 sts, ch1, turn (22)
Row 7 :
sc in next 2 sts, hdc in next 20 sts, turn (22)
Colour Change :
Switch back to Pale Blue and cut Turquoise.
Row 8 :
dc2tog x 2, dc in next 15 sts, hdc, sc in last 2 sts, ch1, turn (20)
Row 9 :
sc in next 2 sts, hdc, dc in next 13 sts, dc2tog x 2, turn (18)
Row 10 :
dc2tog x 2, dc in next 11 sts, hdc, sc in last 2 sts, ch1, turn (16)
Row 11 :
sc in next 2 sts, hdc, dc in next 9 sts, dc2tog x 2, turn (14)
Row 12 :
3dc in next st, 2dc in next st, dc in next 9 sts, hdc, sc in last 2 sts, ch1, turn (17)
Row 13 :
sc in next 2 sts, hdc, dc in next 12 sts, 2dc in next st, 3dc in last st, turn (20)
Row 14 :
3dc in next st, 2dc in next st, dc in next 15 sts, hdc, sc in last 2 sts, ch1, turn (23)
Row 15 :
sc in next 2 sts, hdc, dc in next 18 sts, 2dc in next st, 3dc in last st, turn (26)
Colour Change :
Switch to Turquoise.
Row 16 :
ch1, sc in all 26 sts, ch1, turn (26)
Row 17 :
sc in next 2 sts, hdc in next 24 sts, turn (26)
Colour Change :
Switch to Pale Blue and cut Turquoise.
Row 18 :
dc2tog x 2, dc in next 19 sts, hdc, sc in last 2 sts, ch1, turn (24)
Row 19 :
sc in next 2 sts, hdc, dc in next 17 sts, dc2tog x 2, turn (22)
Row 20 :
dc2tog x 2, dc in next 15 sts, hdc, sc in last 2 sts, ch1, turn (20)
Row 21 :
sc in next 2 sts, hdc, dc in next 13 sts, dc2tog x 2, turn (18)
Row 22 :
(2dc in next st) x 2, dc in next 13 sts, hdc, sc in last 2 sts, ch1, turn (20)
Row 23 :
sc in next 2 sts, hdc, dc in next 15 sts, (2dc in next st) x 2, turn (22)
Row 24 :
(2dc in next st) x 2, dc in next 17 sts, hdc, sc in last 2 sts, ch1, turn (24)
Row 25 :
sc in next 2 sts, hdc, dc in next 19 sts, (2dc in next st) x 2, turn (26)
Info :
Fasten off and crochet a single crochet border around the entire membrane using Turquoise.
— 9. The Wing Bones :
Info :
Make 2 using Turquoise and 4mm hook. Work in rounds.
Round 1 :
8sc into a MR (8)
Round 2-71 :
sc in each st around (8)
Info :
Fasten off and stuff firmly as you go.
— 10. The Blanket :
Info :
Use a 5mm hook. Start with Pale Blue yarn.
Row 1 :
ch103, 2dc in 5th ch from hook, *ch1, skip 2 chs, 2dc in next ch*, repeat until 2 chs remain, skip 1, dc in last ch.
Row 2 :
ch1, turn, sc in first st. Working into the clusters: *make a pointy leaf around the 2dc posts, sl st in next cluster*, repeat across, finish with dc in last st.
Colour Change :
Switch to Turquoise.
Row 3 :
ch4, 2dc in space between first two clusters, *ch2, 2dc in next space*, repeat across, dc in last st.
Row 4 :
ch1, turn, sc in first st, ch1, sl st between first cluster. Repeat leaf pattern across clusters, finish with dc in last st.
Colour Change :
Switch to White.
Info :
Repeat Rows 3-6, alternating colors every 2 rows, until blanket is 90cm long.
— 11. The Border :
Info :
Use White yarn and 5mm hook.
Round 1 :
sc around the entire blanket, working 3sc in each corner to turn.
Round 2 :
hdc in each st around, with 3hdc in each corner. Fasten off.
— 12. Buttons and Loops :
Info :
Make 3 of each using White yarn and 3.5mm hook.
Button :
Work 8hdc into a MR, sl st to join and fasten off.
Loop :
Join yarn to blanket edge, ch5, sl st into next st, fasten off.
Your 3in1 Ice Dragon is now ready to bring a little magic into the world! Whether it's sitting proudly on a nursery shelf as a decorative toy or spread out for a cozy afternoon nap, this project is sure to be a showstopper. I hope you enjoyed every bobble and leaf stitch along the way. There's nothing quite like the feeling of finishing such a detailed piece and seeing it all come together. Don't forget to share your photos with our community—I'd love to see the colors you chose for your dragon! Happy crafting and enjoy your new dragon friend! 🧶✨🐉