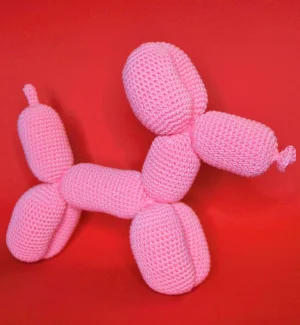
Capture the magic of the carnival with this clever crochet take on a classic balloon animal. Instead of air and latex, you'll be using soft cotton yarn to create a piece that never pops or deflates. It's a fun, rhythmic project where you'll watch a long sausage of crochet transform into a playful pup right before your eyes. Standing about 20 cm tall, this quirky companion is sure to be the star of your shelf.
Progress Tracker
0% Complete
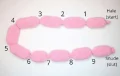
— 1. Tail Segment :
Round 1 :
Work 6 sc into a mr (6)
Round 2-6 :
Work 1 sc in every stitch around (6)
Round 7 :
Work 1 sc inc in every stitch around (12)
Round 8 :
Repeat a sequence of 1 sc and 1 sc inc a total of 6 times (18)
Round 9 :
Repeat a sequence of 2 sc and 1 sc inc a total of 6 times (24)
Round 10 :
Repeat a sequence of 3 sc and 1 sc inc a total of 6 times (30)
Round 11-25 :
Work 1 sc in every stitch around (30)
Round 26 :
Repeat a sequence of 3 sc and 1 sc dec a total of 6 times (24)
Round 27 :
Repeat a sequence of 2 sc and 1 sc dec a total of 6 times (18)
Info :
Add stuffing firmly into the tail segment now.
Round 28 :
Repeat a sequence of 1 sc and 1 sc dec a total of 6 times (12)
Round 29 :
Work 1 sc dec in every stitch around (6)
Round 30 :
Work 1 sc in every stitch around (6)
— 2. First Leg Segment :
Round 31 :
Work 1 sc inc in every stitch around (12)
Round 32 :
Repeat a sequence of 1 sc and 1 sc inc a total of 6 times (18)
Round 33 :
Repeat a sequence of 2 sc and 1 sc inc a total of 6 times (24)
Round 34 :
Repeat a sequence of 3 sc and 1 sc inc a total of 6 times (30)
Round 35-51 :
Work 1 sc in every stitch around (30)
Round 52 :
Repeat a sequence of 3 sc and 1 sc dec a total of 6 times (24)
Round 53 :
Repeat a sequence of 2 sc and 1 sc dec a total of 6 times (18)
Round 54 :
Repeat a sequence of 1 sc and 1 sc dec a total of 6 times (12)
Round 55 :
Work 1 sc dec in every stitch around (6)
Round 56 :
Work 1 sc in every stitch around (6)
Round 57 :
Work 1 sc inc in every stitch around (12)
Round 58 :
Repeat a sequence of 1 sc and 1 sc inc a total of 6 times (18)
Round 59 :
Repeat a sequence of 2 sc and 1 sc inc a total of 6 times (24)
Round 60 :
Repeat a sequence of 3 sc and 1 sc inc a total of 6 times (30)
— 3. Second Leg Segment :
Round 61-77 :
Work 1 sc in every stitch around (30)
Round 78 :
Repeat a sequence of 3 sc and 1 sc dec a total of 6 times (24)
Round 79 :
Repeat a sequence of 2 sc and 1 sc dec a total of 6 times (18)
Round 80 :
Repeat a sequence of 1 sc and 1 sc dec a total of 6 times (12)
Round 81 :
Work 1 sc dec in every stitch around (6)
Round 82 :
Work 1 sc in every stitch around (6)
Round 83 :
Work 1 sc inc in every stitch around (12)
Round 84 :
Repeat a sequence of 1 sc and 1 sc inc a total of 6 times (18)
Round 85 :
Repeat a sequence of 2 sc and 1 sc inc a total of 6 times (24)
Round 86 :
Repeat a sequence of 3 sc and 1 sc inc a total of 6 times (30)
— 4. Body Segment :
Round 87-106 :
Work 1 sc in every stitch around (30)
Round 107 :
Repeat a sequence of 3 sc and 1 sc dec a total of 6 times (24)
Round 108 :
Repeat a sequence of 2 sc and 1 sc dec a total of 6 times (18)
Round 109 :
Repeat a sequence of 1 sc and 1 sc dec a total of 6 times (12)
Round 110 :
Work 1 sc dec in every stitch around (6)
Round 111 :
Work 1 sc in every stitch around (6)
Round 112 :
Work 1 sc inc in every stitch around (12)
Round 113 :
Repeat a sequence of 1 sc and 1 sc inc a total of 6 times (18)
Round 114 :
Repeat a sequence of 2 sc and 1 sc inc a total of 6 times (24)
Round 115 :
Repeat a sequence of 3 sc and 1 sc inc a total of 6 times (30)
— 5. Third Leg Segment :
Round 116-132 :
Work 1 sc in every stitch around (30)
Round 133 :
Repeat a sequence of 3 sc and 1 sc dec a total of 6 times (24)
Round 134 :
Repeat a sequence of 2 sc and 1 sc dec a total of 6 times (18)
Round 135 :
Repeat a sequence of 1 sc and 1 sc dec a total of 6 times (12)
Round 136 :
Work 1 sc dec in every stitch around (6)
Round 137 :
Work 1 sc in every stitch around (6)
Round 138 :
Work 1 sc inc in every stitch around (12)
Round 139 :
Repeat a sequence of 1 sc and 1 sc inc a total of 6 times (18)
Round 140 :
Repeat a sequence of 2 sc and 1 sc inc a total of 6 times (24)
Round 141 :
Repeat a sequence of 3 sc and 1 sc inc a total of 6 times (30)
— 6. Fourth Leg Segment :
Round 142-158 :
Work 1 sc in every stitch around (30)
Round 159 :
Repeat a sequence of 3 sc and 1 sc dec a total of 6 times (24)
Round 160 :
Repeat a sequence of 2 sc and 1 sc dec a total of 6 times (18)
Round 161 :
Repeat a sequence of 1 sc and 1 sc dec a total of 6 times (12)
Round 162 :
Work 1 sc dec in every stitch around (6)
Round 163 :
Work 1 sc in every stitch around (6)
Round 164 :
Work 1 sc inc in every stitch around (12)
Round 165 :
Repeat a sequence of 1 sc and 1 sc inc a total of 6 times (18)
Round 166 :
Repeat a sequence of 2 sc and 1 sc inc a total of 6 times (24)
Round 167 :
Repeat a sequence of 3 sc and 1 sc inc a total of 6 times (30)
— 7. Neck Segment :
Round 168-179 :
Work 1 sc in every stitch around (30)
Round 180 :
Repeat a sequence of 3 sc and 1 sc dec a total of 6 times (24)
Round 181 :
Repeat a sequence of 2 sc and 1 sc dec a total of 6 times (18)
Round 182 :
Repeat a sequence of 1 sc and 1 sc dec a total of 6 times (12)
Round 183 :
Work 1 sc dec in every stitch around (6)
Round 184 :
Work 1 sc in every stitch around (6)
Round 185 :
Work 1 sc inc in every stitch around (12)
Round 186 :
Repeat a sequence of 1 sc and 1 sc inc a total of 6 times (18)
Round 187 :
Repeat a sequence of 2 sc and 1 sc inc a total of 6 times (24)
Round 188 :
Repeat a sequence of 3 sc and 1 sc inc a total of 6 times (30)
— 8. First Ear Segment :
Round 189-203 :
Work 1 sc in every stitch around (30)
Round 204 :
Repeat a sequence of 3 sc and 1 sc dec a total of 6 times (24)
Round 205 :
Repeat a sequence of 2 sc and 1 sc dec a total of 6 times (18)
Round 206 :
Repeat a sequence of 1 sc and 1 sc dec a total of 6 times (12)
Round 207 :
Work 1 sc dec in every stitch around (6)
Round 208 :
Work 1 sc in every stitch around (6)
Round 209 :
Work 1 sc inc in every stitch around (12)
Round 210 :
Repeat a sequence of 1 sc and 1 sc inc a total of 6 times (18)
Round 211 :
Repeat a sequence of 2 sc and 1 sc inc a total of 6 times (24)
Round 212 :
Repeat a sequence of 3 sc and 1 sc inc a total of 6 times (30)
— 9. Second Ear Segment :
Round 213-227 :
Work 1 sc in every stitch around (30)
Round 228 :
Repeat a sequence of 3 sc and 1 sc dec a total of 6 times (24)
Round 229 :
Repeat a sequence of 2 sc and 1 sc dec a total of 6 times (18)
Round 230 :
Repeat a sequence of 1 sc and 1 sc dec a total of 6 times (12)
Round 231 :
Work 1 sc dec in every stitch around (6)
Round 232 :
Work 1 sc in every stitch around (6)
Round 233 :
Work 1 sc inc in every stitch around (12)
Round 234 :
Repeat a sequence of 1 sc and 1 sc inc a total of 6 times (18)
Round 235 :
Repeat a sequence of 2 sc and 1 sc inc a total of 6 times (24)
Round 236 :
Repeat a sequence of 3 sc and 1 sc inc a total of 6 times (30)
— 10. Nose & Flare Finish :
Round 237-249 :
Work 1 sc in every stitch around (30)
Round 250 :
Repeat a sequence of 3 sc and 1 sc dec a total of 6 times (24)
Round 251 :
Repeat a sequence of 2 sc and 1 sc dec a total of 6 times (18)
Info :
Ensure all segments are fully and firmly stuffed before completing the final rounds.
Round 252 :
Repeat a sequence of 1 sc and 1 sc dec a total of 6 times (12)
Round 253 :
Work 1 sc dec in every stitch around (6)
Round 254 :
Work 1 sc in every stitch around (6)
Round 255 :
Work 1 sc inc in every stitch around (12)
Round 256 :
Repeat a sequence of 1 sc and 1 sc inc a total of 6 times (18)
Info :
Fasten off with a sl st in the next stitch. Cut the yarn, pull it through, and weave in your ends.
I really hope you enjoy the process of bringing this balloon pup to life! It’s such a quirky, modern project that always brings a smile to people's faces. Whether you keep it as a colorful companion for your shelf or gift it to a friend, it’s sure to be a hit. Don't forget to play around with colors—a neon yellow or a classic red would look just as stunning as the pink! I can't wait to see your finished dogs standing proud. Happy crafting, and may your stitches always be as bouncy as a real balloon! 🧶✨🐶