About This Adorable Striped Sweater Panda Amigurumi Pattern
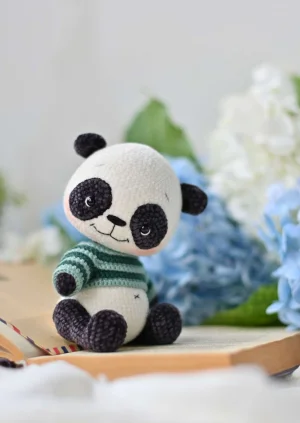
A wonderful gift for a nursery or a collector who appreciates the articulated limbs. He’s a timeless piece that looks professional but feels purely handmade.
Ideal for those with basic crocheting experience, featuring slightly more advanced stitches and techniques to expand your skills.
Takes 5-7 hours, making it an enjoyable project to finish over a couple of days.
Playful characters full of personality, designed to spark imagination and become cherished playtime favorites.
A wonderful gift for a nursery or a collector who appreciates the articulated limbs. He’s a timeless piece that looks professional but feels purely handmade.
I love how the joints give him so much personality—you can actually pose him! Plus, the sweater is made separately, so you can play around with different colors for every season.
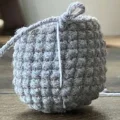
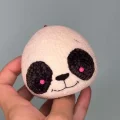
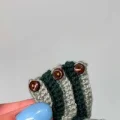
I remember the first time I tried working with velvet yarn—it felt like crocheting a cloud, but keeping track of stitches was a nightmare! My best advice for this panda is to feel for the stitches with your fingers rather than just relying on your eyes. This little guy is such a joy because of those articulated limbs. There’s something so rewarding about a toy that can actually 'sit' on your desk and look back at you.
When you get to the sweater, don't be afraid to swap out the greens for something more festive or even a classic yellow. I actually made a version in a soft lavender that looked absolutely darling. If you find the sweater is a bit snug, just jump up a hook size for that section. The wire frame is optional, but if you want him to have that 'curious' tilted-head look in photos, it's worth the extra five minutes of prep. I can't wait to see the personalities you all give your pandas—tag me in your photos so I can see those rosy cheeks!
You're going to fall head over heels for this little panda! There's something so satisfying about watching those classic black and white patches come together, and that tiny striped sweater is just the icing on the cake. I've designed this to be a sturdy, jointed friend that sits perfectly on a shelf or stays tucked under an arm. Grab your velvet yarn and let's make a new best friend together.
Using cream yarn, stuff the head as you work through the rounds.
6sc in a MR (6)
6inc (12)
(1sc, inc)*6 (18)
1sc, inc, (2sc, inc)*5, 1sc (24)
(3sc, inc)*6 (30)
2sc, inc, (4sc, inc)*5, 2sc (36)
(5sc, inc)*6 (42)
3sc, inc, (6sc, inc)*5, 3sc (48)
(7sc, inc)*6 (54)
4sc, inc, (8sc, inc)*5, 4sc (60)
(9sc, inc)*6 (66)
66sc (66)
(21sc, inc)*3 (69)
69sc (69)
11sc, inc, (22sc, inc)*2, 11sc (72)
72sc (72)
(23sc, inc)*3 (75)
75sc (75)
12sc, inc, (24sc, inc)*2, 12sc (78)
78sc (78)
(11sc, dec)*6 (72)
5sc, dec, (10sc, dec)*5, 5sc (66)
(9sc, dec)*6 (60)
4sc, dec, (8sc, dec)*5, 4sc (54)
(7sc, dec)*6 (48)
2sc, dec, (4sc, dec)*7, 2sc (40)
(3sc, dec)*8 (32)
(2sc, dec)*8 (24)
(1sc, dec)*8 (16)
Fasten off and leave a long tail for assembly.
Make two spots using black yarn.
ch6
Starting in 2nd ch from hook: 4sc, 3sc inc in last ch, rotate to work other side of ch: 3sc, inc (12)
inc, 3sc, 3inc, 3sc, 2inc (18)
1sc, inc, 3sc, (1sc, inc)*3, 3sc, (1sc, inc)*2 (24)
2sc, inc, 3sc, (2sc, inc)*3, 3sc, (2sc, inc)*2 (30)
Fasten off and leave a tail for sewing.
Make two using black yarn. Do not stuff.
6sc in a MR (6)
6inc (12)
(2sc, inc)*4 (16)
16sc (16)
Flatten the ear and sc 8 through both layers to close. Fasten off with a sewing tail.
Make two using black yarn. Keep the round marker centered on the back of the leg.
6sc in a MR (6)
(1sc, inc)*3 (9)
(2sc, inc)*3 (12)
12sc (12)
6sc, inc, 5sc (13)
13sc (13)
6sc, inc, 6sc (14)
14sc (14)
7sc, inc, 6sc (15)
7sc, inc, 7sc (16)
16sc (16)
Stuff the bottom part firmly and the top lightly.
Round 14: 11sc, ch2, skip 2sc, 3sc (16)
Round 15: 11sc, 2sc on the ch, 3sc (16)
Round 14: 3sc, ch2, skip 2sc, 11sc (16)
Round 15: 3sc, 2sc on the ch, 11sc (16)
If using cotter pins instead of plastic joints, skip the ch2 hole steps and simply sc 16 for Rounds 14-15.
(2sc, dec)*4 (12)
6dec (6)
Fasten off and pull the hole closed.
Make two using black yarn.
ch5
Starting in 2nd ch from hook: 3sc, 4sc in last ch, rotate to work other side: 2sc, inc (11)
inc, 2sc, 3sc inc, 2sc, 3sc inc, 2sc, 2inc (18)
1sc, inc, 3sc, 3sc inc, 4sc, 3sc inc, 3sc, (1sc, inc)*2 (25)
25sc (25)
24sc (this is a short round to align the marker to the heel) (24)
8sl st, 9sc, 8sl st (25)
5sc, (1sc, dec)*5, 5sc (20)
5sc, 5dec, 5sc (15)
6sc, sc3tog, 6sc (13)
6sc, inc, 6sc (14)
14sc (14)
7sc, inc, 6sc (15)
15sc (15)
7sc, inc, 7sc (16)
(7sc, inc)*2 (18)
(8sc, inc)*2 (20)
20sc (20)
Round 18: 12sc, ch2, skip 2sc, 6sc (20)
Round 19: 12sc, 2sc on the ch, 6sc (20)
Round 18: 6sc, ch2, skip 2sc, 12sc (20)
Round 19: 6sc, 2sc on the ch, 12sc (20)
If using cotter pins, skip ch2 steps and sc 20 for Rounds 18-19. Stuff foot firmly and top lightly.
20sc (20)
(8sc, dec)*2 (18)
(1sc, dec)*6 (12)
6dec (6)
Fasten off and hide the tail.
Start with cream yarn. Marker stays centered on the back.
7sc in a MR (7)
7inc (14)
(1sc, inc)*7 (21)
1sc, inc, (2sc, inc)*6, 1sc (28)
(3sc, inc)*7 (35)
2sc, inc, (4sc, inc)*6, 2sc (42)
(5sc, inc)*7 (49)
3sc, inc, (6sc, inc)*6, 3sc (56)
56sc (56)
12sc, ch2, skip 2sc, 28sc, ch2, skip 2sc, 12sc (56)
12sc, 2sc on the ch, 28sc, 2sc on the ch, 12sc (56)
If using cotter pins, Round 11-12 is 56sc each. Mark between stitches 13/14 and 43/44 for pin placement.
56sc (56)
13sc, dec, 26sc, dec, 13sc (54)
54sc (54)
Secure the hind legs into the body holes or marked points now.
18sc, dec, 3sc, dec, 4sc, dec, 3sc, dec, 18sc (50)
50sc (50)
22sc, dec, 2sc, dec, 22sc (48)
7sc, dec, (14sc, dec)*2, 7sc (45)
Switch to black yarn and cut the cream.
10sc, ch2, skip 2sc, 21sc, ch2, skip 2sc, 10sc (45)
10sc, 2sc on the ch, 1sc, dec, 13sc, dec, 3sc, 2sc on the ch, 8sc, dec (42)
If using cotter pins, Round 23 is 45sc. Mark between 11/12 and 34/35 for pins. Round 24 is (13sc, dec)*3.
42sc (42)
6sc, dec, (12sc, dec)*2, 6sc (39)
(11sc, dec)*2 (36)
Secure forelegs and begin stuffing the body firmly.
2sc, dec, (4sc, dec)*5, 2sc (30)
(3sc, dec)*6 (24)
(2sc, dec)*6 (18)
(7sc, dec)*2 (16)
Fasten off and tuck in the ends.
Use cream yarn.
6sc in a MR (6)
6inc (12)
12sc (12)
(1sc, dec)*4 (8)
Fasten off and leave a tail for sewing.
Work in rows using mint green yarn. Change hook if needed for fit.
ch37
Starting in 2nd ch: 36sc, t-ch, turn (36)
4sc, inc, (8sc, inc)*3, 4sc, t-ch, turn (40)
Switch to dark green.
BLO: (6sc, 3sc inc)*2, 6sc, inc, 5sc, (3sc inc, 6sc)*2, t-ch, turn (49)
3sc, inc, 41sc, inc, 3sc, t-ch, turn (51)
Switch to mint green.
BLO: (8sc, 3sc inc)*2, 15sc, (3sc inc, 8sc)*2, t-ch, turn (59)
3sc, inc, 51sc, inc, 3sc, t-ch, turn (61)
Switch to dark green.
BLO: (10sc, 3sc inc)*2, 17sc, (3sc inc, 10sc)*2, t-ch, turn (69)
11sc, ch6, skip 14sc, 9sc, inc, 9sc, ch6, skip 14sc, 11sc, t-ch, turn (54)
Switch to mint green.
BLO: 11sc, (3sc, inc, 2sc) on the ch, 20sc, (2sc, inc, 3sc) on the ch, 11sc, t-ch, turn (56)
56sc (56)
Create button loops along the side: 1sc, ch4, 1sc in mint green, then 2sc in dark green. Repeat to neckline.
Attach dark green yarn to the unused front loop of Row 7 on the sweater.
14sc, 6sc on the ch of Row 8 (20)
Switch to mint green.
BLO: 20sc (20)
20sc (20)
Switch to dark green.
BLO: 20sc (20)
20sc (20)
Switch to mint green.
BLO: 20sc (20)
20sc (20)
Fasten off and weave in ends. Repeat for second sleeve.
Your panda is finally ready to meet the world! Whether he's sitting on your bookshelf or being gifted to a loved one, he's sure to bring a smile to anyone who sees him. I hope you enjoyed the process of working with the velvet yarn and the tiny sweater details as much as I did. Don't forget to give him a little squeeze and maybe even a name! Happy crafting, and I can't wait to see your finished creations. 🧶 ✨
Amigurumi tends to lean as you spiral; the shift stitch is just an extra sc at the end of a round to pull the marker back to the center line so your shaping stays symmetrical.
You definitely can! Just be aware that the velvet yarn creates a bulkier, plushier look. Standard 4-ply cotton or acrylic might result in a slightly smaller panda.
Don't over-tighten the disks on the cotter pins. They should be snug enough to hold the limb's position but loose enough to rotate without straining the fabric.
Not at all! It's great for posing the head, but if you stuff the neck area very firmly, he will still be quite sturdy without it.
