About This Festive Velvet & Macrame Wine Tote Pattern
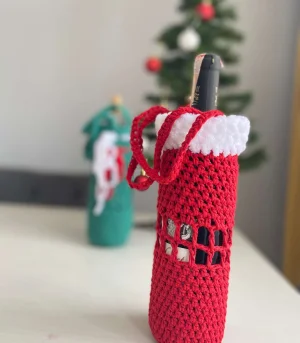
This tote is a game-changer for holiday parties or housewarming gifts. It turns a simple bottle of wine into a thoughtful, reusable keepsake that looks amazing on any table.
Ideal for those with basic crocheting experience, featuring slightly more advanced stitches and techniques to expand your skills.
Fits nicely into a free afternoon — 2 to 5 hours of focused, enjoyable crocheting.
A warm touch for your space that transforms ordinary corners into inviting nooks filled with handmade charm.
This tote is a game-changer for holiday parties or housewarming gifts. It turns a simple bottle of wine into a thoughtful, reusable keepsake that looks amazing on any table.
I honestly adore this project because it solves the 'stretchy bag' problem. By using macrame yarn, the tote stays the perfect shape even with a heavy bottle inside. Plus, adding that velvet yarn at the end is like putting a cozy little sweater on your wine—it is just so satisfying to touch!
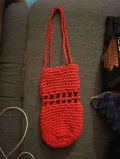
There’s something so satisfying about gifting a bottle of wine, but handing it over in a store-bought paper bag always feels a bit... unfinished, you know? I started making these totes last year for my neighbors, and they were a total hit. The macrame yarn is the real MVP here—it’s sturdy enough that the bottle doesn't stretch the bag into some weird, long tube, which is a common struggle with softer cottons.
When you get to that velvet trim at the top, don't let it intimidate you! I know it’s hard to see your stitches in that fluffy yarn, so I usually just 'feel' for the next space with my fingers. It doesn't have to be mathematically perfect; the fluff hides a multitude of sins. If you’re feeling extra festive, try weaving a bit of that velvet yarn through the mesh section we made in the middle. It adds such a high-end look for very little extra effort. I’ve even added a little wooden bead to the handles before for a boho vibe. Happy stitching, friends!
There is nothing quite like showing up to a dinner party with a bottle of wine wrapped in something handmade. This tote combines the rustic, sturdy feel of macrame yarn with a plush velvet trim that feels so high-end. You are going to love how quickly this works up, making it my absolute favorite last-minute gift for the holidays or a housewarming surprise.
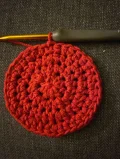
Start by making ch 6 and join with a sl st to the first ch to create a center ring. Work 10 hdc into this ring, then sl st into the first hdc to close.
ch 2 to begin the next level. Work 2 hdc into every stitch around, giving you a total of 20 hdc. Finish by joining with a sl st to the top of your starting hdc.
ch 3 to move up. Work 1 hdc into the base of your chain, then 1 hdc in the next stitch. Repeat the pattern of (2 hdc in one stitch, 1 hdc in the next) all the way around for a total of 30 hdc. Join with a sl st.
ch 2 to start. Work 1 hdc in each of the first two stitches, then 2 hdc in the third stitch. Continue this (2 hdc single, 1 hdc double) pattern until the end to reach 40 hdc. Join with a sl st.
ch 2. To create a crisp edge for the bottle to sit on, work 1 hdc in each stitch around but only through the back loop or the edge line. This will cause the work to curl upward. Join with a sl st.
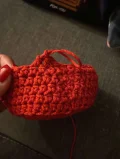
ch 1. For the next 10 rounds, work 1 hdc into every stitch around. This builds the solid base of the tote. Always join each round with a sl st and ch 1 to move up.
ch 4 (this counts as your first dc and a ch-1 space). Skip the next stitch, then work 1 dc into the following stitch. Continue the pattern of (ch 2, skip 1, 1 dc) around. Join with a sl st to the third chain of your starting group.
ch 4. Work 1 dc directly into the top of the dc from the previous row, then ch 2. Repeat this (1 dc on dc, ch 2) pattern to create the square mesh look. Join with a sl st to the third chain.
We are heading back to solid rows. Work 2 hdc into every ch-2 space from the mesh row below. Keep your tension relaxed here so the bag doesn't pinch. Join with a sl st.
ch 1. For this and the next 7 rounds, work 1 hdc into every stitch around for a total of 8 solid rows. Join each round with a sl st.
ch 40 (or your preferred handle length). Skip 8 stitches on the bag rim and join with a tight sl st to the 9th stitch. Turn and work 1 hdc back into every chain of the strap. Secure to the start, cut yarn, and tie off firmly.
Count 4 stitches over from where the first strap ended and join your yarn. ch 40, skip 8 stitches, and join tightly to the 9th stitch. Work 1 hdc back along the chain, secure at the start, and knot tightly.
Switch to your white velvet yarn. Join at the top rim, making sure the straps stay tucked inside the velvet rounds. Work 1 hdc in every stitch around. Use your fingers to feel for the stitches if the fluff makes them hard to see.
Work one final round of 1 hdc in every stitch with the velvet yarn. Join with a sl st, fasten off, and weave in all remaining ends securely.
I really hope you enjoy making this wine tote as much as I do! There’s something so relaxing about the rhythm of the hdc stitches and seeing that velvet trim pop against the macrame. Once you finish your first one, you’ll probably find yourself making a whole rainbow of them for every occasion. Don't forget to tie a little handwritten note to the mesh section for that extra special touch. Happy crocheting, and I can't wait to see your finished bags! 🧶✨
I wouldn't recommend it for this specific design. Standard cotton is much stretchier, and the weight of a wine bottle would cause the bag to elongate significantly. Macrame yarn provides the structural integrity needed.
This is a common velvet struggle! Try to feel for the 'v' or the gap between stitches with your non-hook fingers. Since it is so fluffy, even if you are off by a stitch or two, it won't show in the final look.
Simply increase the starting chain for the straps from 40 to about 100 or 120. Just remember that even macrame has a tiny bit of give, so make it slightly shorter than you think you need.
Check your Round 4 stitch count. You should have 40 stitches. If your tension is naturally very tight, you might want to move up to a 5.0mm hook for the body of the bag.
