About This Alice the Doll Amigurumi Pattern
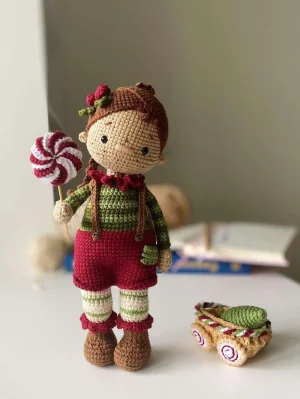
This doll makes an heirloom-quality gift for a special child or a beautiful addition to a collector's shelf. Her detailed outfit and sweet features make her a joy to display.
Designed for experienced crocheters, these patterns involve intricate designs and complex techniques to challenge and inspire.
Requires 8-10 hours, ideal for a full day of immersive crocheting.
Playful characters full of personality, designed to spark imagination and become cherished playtime favorites.
This doll makes an heirloom-quality gift for a special child or a beautiful addition to a collector's shelf. Her detailed outfit and sweet features make her a joy to display.
I absolutely love how Alice's personality shines through once you add those tiny freckles and the little berries in her hair. The mix of colors and textures keeps the project engaging from start to finish, and the posable wire frame makes her feel so much more lifelike.
I remember the first time I tried to make a doll with a wire armature. I was so nervous about it being too pokey, but once I saw how Alice could actually hold a little lollipop or strike a pose, I was hooked! There's something so special about a doll that feels alive like that.
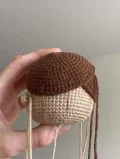
When I was designing her hair, I spent ages trying to get the braids just right—I wanted them to have that thick, classic look. My favorite part, though, has to be the tiny berries. They are such a small detail, but they really pull the whole woodland friend vibe together.
If you're feeling adventurous, try changing the jumpsuit color to a soft mustard or a forest green; it completely changes her personality! Alice is definitely a labor of love, but seeing her finished, sitting on a shelf with those big curious eyes, makes every single stitch worth it. I really hope you enjoy the process of bringing her to life as much as I did. It is a wonderful way to spend a quiet weekend.
Meet Alice, a whimsical little friend with a vintage-inspired look and the cutest red jumpsuit. You'll love the textural details, from her striped sweater and dainty collar to the tiny berries in her hair. She's the kind of project that makes you smile as each little piece comes together. Whether she's sitting on a nursery shelf or becoming a child's favorite companion, Alice brings a touch of handmade magic to any home.
Using beige yarn, work 6 sc into a MR (6)
Complete 6 inc around (12)
Work a sequence of (1 sc, inc) 6 times (18)
1 sc, 1 inc, then repeat (2 sc, inc) 5 times, finishing with 1 sc (24)
Repeat (3 sc, inc) 6 times (30)
2 sc, 1 inc, then repeat (4 sc, inc) 5 times, finishing with 2 sc (36)
Repeat (5 sc, inc) 6 times (42)
3 sc, 1 inc, then repeat (6 sc, inc) 5 times, finishing with 3 sc (48)
Repeat (7 sc, inc) 6 times (54)
4 sc, 1 inc, then repeat (8 sc, inc) 5 times, finishing with 4 sc (60)
Work 9 identical rounds of 60 sc (60)
Work 30 sc, place a stitch marker for center alignment, then work 30 sc (60)
20 sc, 1 inc, 2 sc, 1 inc, 12 sc, 1 inc, 2 sc, 1 inc, 20 sc (64)
Work 4 identical rounds of 64 sc (64)
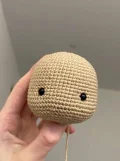
Place safety eyes between Rounds 19 and 20. Count 6 stitches away from your center marker in both directions to ensure even placement.
Repeat (14 sc, dec) 4 times (60)
4 sc, 1 dec, then repeat (8 sc, dec) 5 times, finishing with 4 sc (54)
Repeat (7 sc, dec) 6 times (48)
3 sc, 1 dec, then repeat (6 sc, dec) 5 times, finishing with 3 sc (42)
Repeat (5 sc, dec) 6 times (36)
2 sc, 1 dec, then repeat (4 sc, dec) 5 times, finishing with 2 sc (30)
Repeat (3 sc, dec) 6 times (24)
1 sc, 1 dec, then repeat (2 sc, dec) 5 times, finishing with 1 sc (18)
Repeat (4 sc, dec) 3 times (15)
Fasten off and stuff the head firmly with fiberfill.
Using brown yarn, work 6 sc into a MR (6)
Complete 6 inc around (12)
Repeat (1 sc, inc) 6 times (18)
1 sc, 1 inc, then repeat (2 sc, inc) 5 times, finishing with 1 sc (24)
Repeat (3 sc, inc) 6 times (30)
2 sc, 1 inc, then repeat (4 sc, inc) 5 times, finishing with 2 sc (36)
Repeat (5 sc, inc) 6 times (42)
3 sc, 1 inc, then repeat (6 sc, inc) 5 times, finishing with 3 sc (48)
Repeat (7 sc, inc) 6 times (54)
4 sc, 1 inc, then repeat (8 sc, inc) 5 times, finishing with 4 sc (60)
Work 4 identical rounds of 60 sc (60)
Fasten off, leaving a long tail for sewing. Create a second identical piece.
Using brown yarn, ch 37. Starting in the 2nd ch from hook, 36 sc. Connect to the hairstyle edge with 1 sc, skip 1 st. Repeat this 3 times to create 3 strands for a braid.
ch 5, starting in 2nd ch from hook, 4 sc. Fasten off with a sewing tail.
ch 7, starting in 2nd ch from hook, 6 sc. Fasten off with a sewing tail.
ch 4, 3 sc from 2nd ch; ch 5, 4 sc from 2nd ch; ch 3, 2 sc from 2nd ch. Join these elements with a needle as shown in the photos.
Using beige, work 6 sc into a MR. Fasten off, leaving a tail for attachment. Make two.
Using beige, work 6 sc into a MR (6)
Complete 6 inc around (12)
Work 2 rounds of 12 sc (12)
Work a 3 dc cluster (joined at the top) for the thumb, then 11 sc (12)
2 dec, 8 sc (10)
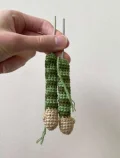
Switch to dark green yarn for the sweater sleeve.
Work 10 sc in blo (10)
Work 10 sc (10)
Switch colors and work 2 rounds of 10 sc (10)
Switch colors and work 2 rounds of 10 sc (10)
Switch colors and work 2 rounds of 10 sc (10)
Switch colors and work 2 rounds of 10 sc (10)
Switch colors and work 2 rounds of 10 sc (10)
Switch colors and work 2 rounds of 10 sc (10)
Switch colors and work 2 rounds of 10 sc (10)
Switch colors and work 2 rounds of 10 sc (10)
Switch colors and work 2 rounds of 10 sc (10)
In the flo of Round 6, work green sl st all the way around, then sew this round down for extra detail.
With brown yarn, ch 7. Starting in 2nd ch: 1 inc, 4 sc, 3 sc in last ch. On other side: 5 sc (14)
2 inc, 4 sc, 3 inc, 4 sc, 1 inc (20)
(1 inc, 1 sc) x 2, 4 sc, (1 inc, 1 sc) x 3, 4 sc, 1 inc, 1 sc (26)
(1 inc, 2 sc) x 2, 4 sc, (1 inc, 2 sc) x 3, 4 sc, 1 inc, 2 sc (32)
Work 32 sc in blo (32)
Work 2 rounds of 32 sc (32)
Insert your cardboard insoles into the boots now.
8 sc, (1 dec, 1 sc) x 5, 1 dec, 7 sc (26)
7 sc, 6 dec, 7 sc (20)
7 sc, 3 dec, 7 sc (17)
Work 5 rounds of 17 sc (17)
Change to milky color, work 17 sc in blo (17)
Work 17 sc (17)
1 sc, 1 inc, 6 sc, 1 inc, 8 sc (19)
Change to green, work 8 sc, 4 inc, 7 sc (23)
Change to milky, work 23 sc (23)
8 sc, 4 dec, 7 sc (19)
Work 19 sc (19)
Change to green, work 1 inc, 18 sc (20)
Change to milky, work 1 inc, 19 sc (21)
Work 2 rounds of 21 sc (21)
Change to green, work 21 sc (21)
Change to milky, work 4 rounds of 21 sc (21)
Attach red yarn to flo of Round 15. Repeat (2 ch, 3 hdc in same st, 1 sl st along boot) 8 times, then 2 ch, 3 hdc in last st.
Join legs: 20 sc on first leg, 1 ch, 21 sc on second leg, 1 inc in ch, 21 sc on first leg (45)
(2 sc, inc) x 2, 7 sc, (inc, 3 sc) x 4, 1 inc, 8 sc, 1 inc, (2 sc, inc) x 2 (55)
Work 5 rounds of 55 sc (55)
Using green, (12 sc, dec) x 3, 13 sc (52)
Work 52 sc (52)
Switch green shades, work 2 rounds of 52 sc (52)
Switch colors, (15 sc, dec) x 3, 1 sc (49)
Work 49 sc (49)
Switch colors, 7 sc, 1 dec, (14 sc, dec) x 2, 7 sc (46)
Work 2 rounds of 46 sc (46)
Switch colors, (13 sc, dec) x 3, 1 sc (43)
Work 2 rounds of 43 sc (43)
Switch colors, 6 sc, 1 dec, (12 sc, dec) x 2, 7 sc (40)
Work 40 sc (40)
Switch colors, (8 sc, dec) x 4 (36)
(10 sc, dec) x 3 (33)
Attach arms: 7 sc on body, 5 sc through arm and body, 11 sc on body, 5 sc through other arm and body, 5 sc on body (33)
Repeat the same stitch counts as Round 24 to fully secure the arms (33)
1 dec, (4 sc, dec) x 5, 1 sc (27)
(2 sc, dec) x 6, 1 sc, 1 dec (20)
Change to beige, work (8 sc, dec) x 2 in blo (18)
Repeat (4 sc, dec) 3 times (15)
Work 15 sc (15)
Attach red yarn to flo of Round 27. Repeat 10 times: 2 sc on body, 3 ch, then in the same base stitch work (1 tr, 1 pico, 1 tr, 3 ch, 1 sc). Sew down the petals.
Using red, ch 54 and join in a circle. Work 2 rounds of 54 sc (54)
Repeat (17 sc, inc) 3 times (57)
Work 14 rounds of 57 sc (57)
Flatten the piece and sew through the center to create two leg openings.
Using brown, ch 38. Starting in 2nd ch, work 37 sc. Make two.
Using light green, ch 8. Starting in 2nd ch, work 4 rows of 7 sc. ch 1 and turn at the end of each row.
With red, 5 sc in MR. Round 2: (inc, 1 sc) x 2, inc (8). Round 3: 8 sc. Close the opening with a needle without stuffing. Make three.
With dark green, ch 5. In 2nd ch, 2 sl st, 1 hdc inc. Then work in one stitch: (1 dc inc, 1 sl st, 1 dc inc, 1 sl st). Finish with 1 dc inc, 1 sl st, 1 hdc inc, 1 sl st. Make two.
Alice is finally ready to join your family! There is something so rewarding about finishing a project with this much detail—from the tiny buttons on her straps to the way her braids curl. I hope she brings a touch of magic to your home or makes someone very happy as a gift. Don't forget to take a photo of your finished Alice and share it with the community; we'd all love to see your unique color choices! Happy crafting! 🧶✨❤️
Yes, you can certainly skip the wire, but Alice won't be posable and her neck might need extra firm stuffing to stay upright.
You can easily substitute the buttons with small French knots embroidered in a contrasting yarn color.
You can, but it will give her a more 'cartoonish' look; 6 mm keeps her features delicate and vintage-style.
Check the fit on the doll's body after round 5 of the jumpsuit; if it's too tight, you may need to use a slightly larger hook for the clothing.
