About This Anatomical Heart Amigurumi Pattern
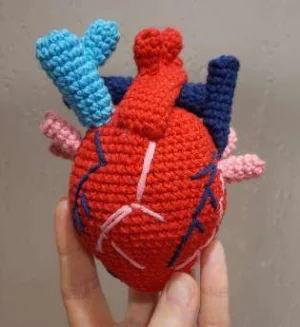
Whether you're making this as a study aid for a student or a thoughtful recovery gift, the finished heart is a palm-sized treasure that looks incredible on a bookshelf or desk.
Ideal for those with basic crocheting experience, featuring slightly more advanced stitches and techniques to expand your skills.
Fits nicely into a free afternoon — 2 to 5 hours of focused, enjoyable crocheting.
Small, sweet, and gift-worthy creations that fit perfectly in the palm of your hand with detailed charm.
Whether you're making this as a study aid for a student or a thoughtful recovery gift, the finished heart is a palm-sized treasure that looks incredible on a bookshelf or desk.
I really enjoy how this pattern breaks down a complex organ into simple, manageable sections. There's something so rewarding about seeing the heart take shape as you add each vessel, and the final embroidery is where you can really let your creativity shine!
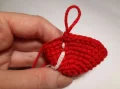
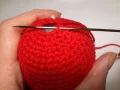
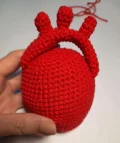
I remember the first time I saw an anatomical heart pattern; I was so intimidated by all the little bits and pieces! But honestly, once you get going, it’s such a blast. I found that using a slightly darker, oxblood red for the main body really gives it a sophisticated look, while the bright blue and navy vessels pop beautifully against it.
One little trick I learned while making this: when you're sewing the vessels on, use plenty of pins first. It looks like a pincushion for a minute, but it's the only way to make sure everything stays symmetrical. If you're feeling extra creative, you could even add a little loop to the top and turn it into a quirky bag charm or a car mirror ornament.
I also love the idea of using variegated yarn for the embroidered veins on the surface. It adds a bit of depth and makes the heart look even more detailed without any extra effort. Just take your time with the assembly—that's where the magic really happens and the personality of your heart comes through. Happy crafting!
This project is such a fascinating way to blend science with craft. You'll create a realistic, three-dimensional heart complete with all its major vessels, making it a standout piece in any collection. I love how the different textures and colors come together to make something so complex feel approachable and fun to stitch. It's the perfect gift for the medical professional or biology enthusiast in your life!
We'll be working in a continuous spiral for the main heart, so don't join your rounds with a slip stitch unless mentioned. Keep adding stuffing as you work to maintain a nice shape.
Start with 6 sc into a MR. Pull the yarn tail firmly to close the center. (6)
Work 1 inc into every stitch around. (12)
Repeat (1 sc, 1 inc) 6 times. (18)
Repeat (2 sc, 1 inc) 6 times. (24)
Repeat (3 sc, 1 inc) 6 times. (30)
Work 1 sc in every stitch for these two rounds. (30)
Repeat (4 sc, 1 inc) 6 times. (36)
Work 1 sc in every stitch around. (36)
Repeat (5 sc, 1 inc) 6 times. (42)
Work 1 sc in every stitch around. (42)
Repeat (6 sc, 1 inc) 6 times. (48)
Work 1 sc in every stitch around. (48)
Repeat (7 sc, 1 inc) 6 times. (54)
Work 1 sc in every stitch for these four rounds. (54)
Repeat (7 sc, 1 dec) 6 times. (48)
Work 1 sc in every stitch for these three rounds. (48)
Repeat (6 sc, 1 dec) 6 times. (42)
Work 1 sc in every stitch for these two rounds. (42)
Repeat (4 sc, 1 dec) 7 times. (35)
Work 1 sc in every stitch around. (35)
Repeat (3 sc, 1 dec) 7 times. (28)
Repeat (3 sc, 1 dec) 5 times, then work 3 sc. (23)
Repeat (1 sc, 1 dec) 7 times, then work 2 sc. (16)
Repeat (1 sc, 1 dec) until the end of the round. Use a needle to weave through the front loops only of the remaining stitches and pull tight to close. Fasten off and hide the tail. (11)
Work 12 sc into a MR. Do not pull the center closed; we want a hollow tube. (12)
Work 1 sc in every stitch around. Finish with 1 ss. Leave a long tail for sewing. (12)
Work 6 sc into a MR and pull the tail tight to close the center. (6)
Work 1 sc in every stitch around. Finish with 1 ss. Leave a tail for sewing. (6)
Sew these three small pieces onto the big aortic arch before attaching the arch to the heart.
Work 10 sc into a MR. Pull the tail but do not join the round. (10)
Work 1 sc in every stitch around. Finish with 1 ss. Fasten off. (10)
Work 8 sc into a MR. Do not pull the center tail closed. (8)
Work 1 sc in every stitch around. Finish with 1 ss. (8)
Sew this smaller branch to the center of the navy main artery piece.
Work 12 sc into a MR. Do not pull the tail closed. (12)
Work 1 sc in every stitch around. Finish with 1 ss. (12)
Work 6 sc into a MR. Pull the tail tight and don't join the round. (6)
Work 1 sc in every stitch around. Finish with 1 ss. (6)
Attach this small branch to the main blue vena cava piece.
Work 6 sc into a MR. Do not pull the center hole closed. (6)
Work 1 sc in every stitch around. Finish with 1 ss. (6)
I hope you had as much fun making this anatomical heart as I did! It’s such a rewarding project that combines technical shaping with creative finishing touches. Whether you’re keeping it for your own collection or gifting it to a heart warrior, it’s a piece made with literal love. Don't forget to share your finished photos — I'd love to see the colors you chose! Happy stitching and enjoy your new handmade treasure. 🧶 ❤️ ✨
You definitely can, but cotton or cotton-blend yarns tend to hold the anatomical shape better and show off the stitch definition for the vessels more clearly.
The easiest way is to use a thicker yarn like worsted weight and a larger hook (like 3.5mm or 4.0mm). This will scale the whole project up naturally.
The smaller vessels usually hold their shape without stuffing, but you might want to add a tiny bit to the larger aortic arch to keep it from collapsing.
Because the heart is an organic shape, being off by a single stitch in the final rounds won't be noticeable. Just add an extra decrease to get back on track.
