🧶 Beautiful ✨ Detailed 💝 Adorable

Angry Toilet Paper Roll Christmas Ornament Crochet Pattern

Angry Toilet Paper Roll Christmas Ornament Crochet Pattern
4.9★Rating
2-3 HoursTime Needed
4.1KMade This
✂️

Beginner Friendly Level

Perfect for those just starting their crocheting journey, with clear instructions and simple techniques

⏱️

Quick Craft

Fits nicely into a free afternoon — 2 to 5 hours of focused, enjoyable crocheting.

🎄

Holiday Cheer

Festive fun for the season, bringing handmade magic to celebrations and creating new family traditions.

About This Angry Toilet Paper Roll Christmas Ornament Crochet Pattern

Angry Toilet Paper Roll Christmas Ornament Crochet Pattern crochet pattern - detailed view

This makes an absolutely unforgettable handmade gift — slip it into someone's stocking or hang it on a white elephant exchange tree and watch it become the most-talked-about ornament in the room.

Why You'll Love This Angry Toilet Paper Roll Christmas Ornament Crochet Pattern

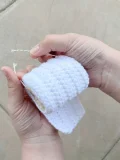
I'll be honest — I laughed out loud the first time I finished one of these. There's something deeply satisfying about making something this absurd and having it turn out so perfectly cute. The construction is clever too: two flat rectangles, a bit of hot glue, and suddenly you've got a three-dimensional roll with actual structure. I love patterns that surprise you mid-make, and this one absolutely did.

Angry Toilet Paper Roll Christmas Ornament Crochet Pattern step 1 Angry Toilet Paper Roll Christmas Ornament Crochet Pattern step 2 Angry Toilet Paper Roll Christmas Ornament Crochet Pattern step 3 Angry Toilet Paper Roll Christmas Ornament Crochet Pattern step 4

Switch Things Up

I'll be upfront: when I first saw a crocheted toilet paper ornament, I thought it was absolutely unhinged. And then I made one. And then I made four more.

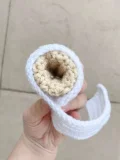
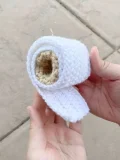
The thing that gets me about this pattern is how deceptively simple the construction is. Two flat rectangles of HDC. That's it. No shaping, no increases, no joining in the round. But the way the tan tube piece wraps into itself and the white sheet coils around it — suddenly you've got something that genuinely looks like a tiny roll of toilet paper hanging from a branch, and it's the funniest thing I've ever put on a Christmas tree.

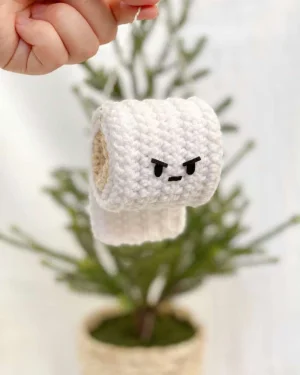
I made my first batch in an evening while watching a movie. They're genuinely that quick. And because the face is cut from felt rather than embroidered, you don't need any embroidery experience — just sharp scissors and a steady hand. I've made the face angrier on some (deep V brows, tight flat mouth) and more beleaguered on others (drooping brows, wavy mouth). Each one ends up with its own personality.

One thing I'd suggest: cut several face options before committing to gluing. Lay them on the finished roll and audition expressions. Sometimes the slightly wonky cut reads funnier than the precise one. Lean into it.

Color-wise, you could swap the tan for a soft grey to get a more modern cardboard look, or go full chaos and make the outer sheet in a pale pink for a novelty twist. But honestly? Classic white and tan is the move. It's instantly recognizable, and that recognition is half the joke.

Common Mistakes & How to Fix Them

✗ When wrapping the white toilet paper piece around the tan tube, it's easy to start at an angle — make sure the bottom edges are perfectly aligned before pressing it into the hot glue, or the roll will sit crooked.✗ The tan roll piece needs its first and last rows sewn together to form a tube, but if you sew on the wrong side, the seam shows on the outside — always check which face will be visible before joining.✗ Hot glue sets very fast, so if you try to reposition the white sheet after pressing it against the tube, you'll distort the fabric — dry-fit and plan your wrap direction before applying any glue.✗ Cutting the felt faces too large means they'll overlap onto the white paper section and look off-center once the roll is assembled — cut small, test placement first, then trim further if needed.✗ If you don't tuck the ornament string knot fully inside the hollow of the tube, it slips to the side and the ornament hangs at a tilted angle — push the knot deep into the center before letting it settle.✗ Skipping the step of folding the outer edges of the tan tube inward means the roll won't hold its cylindrical shape properly — those folded edges are what give the finished ornament its structured, tidy look.

Angry Toilet Paper Roll Christmas Ornament Crochet Pattern

You know those ornaments that make everyone stop and ask, 'wait, is that a toilet paper roll on your tree?' — this is exactly that. This little guy has serious attitude and honestly, same. Crocheted in two pieces using simple half double crochet rows, the whole thing comes together faster than you'd think. It's the kind of quick, satisfying make that's perfect for a cozy evening with a mug of something warm. Your tree — or a friend's tree — deserves this tiny grumpy legend.

Beginner Friendly 2-3 Hours

Materials Needed for Angry Toilet Paper Roll Christmas Ornament Crochet Pattern

— Main Fabric

  • 01
    Medium worsted weight yarn in white — used for the main toilet paper sheet piece
  • 02
    Medium worsted weight yarn in tan — used for the cardboard tube center of the roll

— Tools Required

  • 01
    3.75mm crochet hook
  • 02
    Yarn needle for sewing the tan tube seam
  • 03
    Hot glue gun and glue sticks
  • 04
    Scissors
  • 05
    Black felt sheet for cutting the facial features
  • 06
    Ornament hanging string or twine

Progress Tracker

0% Complete

— 1. Toilet Paper Sheet (White Yarn) :

Row 1 :

CH 61. Beginning in the second CH from the hook, work 1 HDC into each CH across. (60)

Row 2 :

CH 1, turn. HDC across all stitches. (60)

Row 3 :

CH 1, turn. HDC across all stitches. (60)

Row 4 :

CH 1, turn. HDC across all stitches. (60)

Row 5 :

CH 1, turn. HDC across all stitches. (60)

Row 6 :

CH 1, turn. HDC across all stitches. (60)

Row 7 :

CH 1, turn. HDC across all stitches. (60)

Row 8 :

CH 1, turn. HDC across all stitches. (60)

Row 9 :

CH 1, turn. HDC across all stitches. (60)

Row 10 :

CH 1, turn. HDC across all stitches. (60)

Info :

Fasten off. No long tail needed — just weave in your end and set this piece aside.

— 2. Cardboard Roll (Tan Yarn) :

Row 1 :

CH 26. Beginning in the second CH from the hook, work 1 HDC into each CH across. (25)

Row 2 :

CH 1, turn. HDC across all stitches. (25)

Row 3 :

CH 1, turn. HDC across all stitches. (25)

Row 4 :

CH 1, turn. HDC across all stitches. (25)

Row 5 :

CH 1, turn. HDC across all stitches. (25)

Row 6 :

CH 1, turn. HDC across all stitches. (25)

Row 7 :

CH 1, turn. HDC across all stitches. (25)

Row 8 :

CH 1, turn. HDC across all stitches. (25)

Row 9 :

CH 1, turn. HDC across all stitches. (25)

Row 10 :

CH 1, turn. HDC across all stitches. (25)

Row 11 :

CH 1, turn. HDC across all stitches. (25)

Row 12 :

CH 1, turn. HDC across all stitches. (25)

Info :

Leave a generous yarn tail for seaming. Fasten off, then use your yarn needle to sew the final row to the starting row, forming a hollow tube. This becomes the cardboard roll center.

Assembly Instructions

  • Take the tan tube and fold both of its long outer edges inward so they tuck toward the center — this firms up the cylinder and makes it match the width of the white toilet paper sheet.
  • Apply a generous coat of hot glue over the outside surface of the tan tube, working quickly so it doesn't set before the next step.
  • Wrap the white toilet paper sheet around the glued tube, keeping the bottom edges flush and the sheet evenly centered as you press it into place.
  • Cut two small angry faces — furrowed brows, a flat mouth — from black felt. Glue the first face onto the front of the assembled roll while it's still rolled up.
  • Carefully unroll the white sheet and glue the second felt face onto the flat surface of the paper, so there's a hidden expression waiting inside.
  • Cut a length of ornament string and tie it snugly around the tube section. Tuck the knot inside the hollow center of the roll so it's hidden from view.
  • Roll the paper back up around the tube — your ornament is complete and ready to hang.

Important Notes

  • 💡Black felt is used for the face instead of embroidery thread or safety eyes — this is intentional, because anything stitched through the white piece would show on the back when the paper is unrolled.
  • 💡You're cutting two separate faces from the felt: one goes on the front of the rolled ornament, and a second hidden one goes on the inside of the unrolled sheet — don't forget both.
  • 💡Work the hot glue step quickly. It cools fast, and trying to reposition the white sheet after it starts setting will pull and distort the HDC fabric.
  • 💡The tan tube piece needs to be folded and shaped before any glue is applied — skipping this leaves you with a floppy center that won't hold the roll's shape.
  • 💡When tying on the ornament string, make the knot inside the hollow tube rather than on the outside — it keeps things neat and stops the ornament from tilting when it hangs.

There's genuinely nothing on a Christmas tree quite like a tiny grumpy toilet paper roll glaring at your guests — and now you've made one with your own two hands. 🧶 This little guy is proof that the best ornaments don't have to be serious. Whether you keep it for yourself, tuck it into a gift bag, or sneak it onto a friend's tree without saying a word, it's going to bring a smile every single time someone notices it. You did something wonderfully silly today, and that counts for a lot. ✨

You ask,

we answer.

FAQs

Can I use a different yarn weight for this pattern?

You can, but keep in mind the pattern was written for medium worsted weight. Going up to bulky will make both pieces noticeably larger and the roll may not wrap as neatly around the tube. Going down to DK will give you a smaller, daintier ornament — which could be really cute as a mini version.

What if I don't have a hot glue gun — can I sew the pieces together instead?

You could hand-sew the white sheet to the tan tube, but the connection won't be as secure and the sheet may shift over time. Hot glue really is the best choice here for speed and hold — if you don't own a gun, a low-temp mini glue gun is inexpensive and worth having for future projects.

How do I cut the felt face neatly enough to look good at this small scale?

Sharp embroidery scissors are your best friend here — regular scissors will fray the felt edges. Keep the shapes simple: two short angled lines for angry brows and a small flat line for the mouth. Less is more at this size; tiny details read better from a distance on a tree.

Does the ornament hold its rolled shape or does it keep trying to unroll?

Because the white sheet is glued directly to the tan tube, it stays rolled up on its own. The key is making sure you press the sheet firmly against the hot glue along the full length of the tube — any section that didn't adhere properly will gap open. A second light pass of glue on loose edges fixes it.

Is this pattern suitable as a first crochet project?

It really is — the only stitch used is the half double crochet worked in straight rows, which is one of the most beginner-friendly foundations you can learn. If you can chain and HDC, you can make this ornament. The assembly involves a hot glue gun rather than complex sewing, which actually makes finishing much easier than typical amigurumi.