About This Baby Bat Amigurumi Pattern

Makes a wonderful handmade Halloween gift or spooky shelf decoration — thoughtful enough to keep, small enough to finish in a single cozy evening.
Ideal for those with basic crocheting experience, featuring slightly more advanced stitches and techniques to expand your skills.
Fits nicely into a free afternoon — 2 to 5 hours of focused, enjoyable crocheting.
Festive fun for the season, bringing handmade magic to celebrations and creating new family traditions.
Makes a wonderful handmade Halloween gift or spooky shelf decoration — thoughtful enough to keep, small enough to finish in a single cozy evening.
I love this pattern because it's one of those rare makes where every section feels satisfying. The head-to-body construction is so clean — you just keep going and the shape emerges almost magically. The wings were my favorite part though. Working the decrease rows and then adding that embroidered triangle detail with color B felt like giving the bat its personality. I also really appreciate how small and giftable the finished piece is. I've made a few of these now and they disappear fast — everyone wants one.

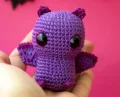
I'll be honest — I wasn't expecting to fall this hard for a bat pattern. Halloween amigurumi usually isn't my first instinct, but something about this little round creature with its oversized eyes and tiny pink feet just got me. I made my first one in the original violet and phlox combination and genuinely could not put it down.
The construction is one of my favorite things about this pattern. Working the head straight into the body without breaking yarn means you get this lovely continuous piece with a clean ridge at the neck from that front-loop round. It's such a satisfying technique once you see how it separates the two sections visually.
The wings are where I'd encourage you to slow down a little. The decrease rows are straightforward, but the part about guiding the yarn tail toward the center of the wing before cutting — don't skip that. I skipped it on my first wing and ended up with a tail that was too short to sew through securely. The second wing I did it properly and the attachment was so much cleaner.
For a color variation, try a charcoal or dark teal for Color A with a bright coral or mustard for Color B. It moves the whole vibe away from Halloween and into something you could display year-round. I've also seen people make these in white and pale pink for a ghostly look — genuinely adorable.
The ears and feet are so quick to make that I always end up crocheting three or four sets just in case I lose one in my project bag. At two chains each, they take about ninety seconds. Make extras. You'll thank yourself later.
This little bat is honestly one of those projects that just makes you smile the whole way through. You'll crochet the head and body as one continuous piece — no awkward seams, no guessing where one ends and the other begins. The wings work up in flat rows and get that gorgeous wing-vein detail embroidered in a contrast color, which sounds fancier than it is. Your finished bat fits right in the palm of your hand, which makes it perfect for tucking into a Halloween basket, perching on a shelf, or gifting to someone who deserves something handmade and a little spooky.
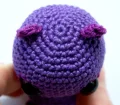
Work with Color A throughout the Head and Body. The head and body are crocheted in one continuous piece without turning chains between rounds.
Start with a mr, work 6 sc into the ring. (6)
Work 2 sc in each st around. (12)
(1 sc, inc) repeat x6. (18)
(2 sc, inc) repeat x6. (24)
(3 sc, inc) repeat x6. (30)
(4 sc, inc) repeat x6. (36)
(5 sc, inc) repeat x6. (42)
1 sc in each st around. (42)
1 sc in each st around. (42)
1 sc in each st around. (42)
1 sc in each st around. (42)
1 sc in each st around. (42)
Attach the 11mm safety eyes between Rounds 12 and 13, leaving 9 stitches between them.
1 sc in each st around. (42)
1 sc in each st around. (42)
(5 sc, inv dec) repeat x6. (36)
(4 sc, inv dec) repeat x6. (30)
(3 sc, inv dec) repeat x6. (24)
Stuff the head firmly at this point before continuing.
Working into flo only: 1 sc in each st around. (24)
(3 sc, inc) repeat x6. (30)
1 sc in each st around. (30)
1 sc in each st around. (30)
1 sc in each st around. (30)
(4 sc, inc) repeat x6. (36)
1 sc in each st around. (36)
1 sc in each st around. (36)
(4 sc, inv dec) repeat x6. (30)
(3 sc, inv dec) repeat x6. (24)
(2 sc, inv dec) repeat x6. (18)
Stuff the body firmly now before beginning the closing rounds.
(1 sc, inv dec) repeat x6. (12)
inv dec x6. (6)
Cut yarn and close the final round. Weave in the end securely.
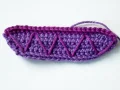
Work with Color A. Chain 25, then turn to begin working in rows. No turning chains are worked at the wing edges.
Ch 25, turn.
1 sc in each ch across, turn. (24)
inv dec, 20 sc, inv dec, turn. (22)
inv dec, 18 sc, inv dec, turn. (20)
inv dec, 16 sc, inv dec, turn. (18)
inv dec, 14 sc, inv dec, turn. (16)
Cut the yarn, leaving a long enough tail for sewing. Weave the tail through the wing so that it exits closer to the center of the wing piece — this makes it much easier to attach the wings to the body later.
Join Color B at the first row of the finished wing piece.
Work 24 sc evenly along the first row edge of the wing. Cut yarn and leave a long tail.
Using the tapestry needle and the long Color B tail, embroider a triangle shape onto each wing to create the wing-vein detail.
Work with Color B.
Ch 2.
Into the second ch from the hook, work: hdc, dc, hdc, sc. Cut yarn and leave a long tail for sewing.
Work with Color B.
Ch 2.
Into the second ch from the hook, work 4 sc. Cut yarn and leave a long tail for sewing.
There's something genuinely magical about watching this little bat come together — you start with a simple magic ring and by the time you're sewing on those tiny phlox-pink feet, you've got the most charming Halloween companion sitting in your palm. Whether you make it for yourself, perch it on a windowsill, or tuck it into someone's trick-or-treat bag, this baby bat is going to bring smiles wherever it lands. 🦇 You've got this — grab your hook and let's make something spooky and sweet. 🧶✨
Absolutely — the key is sticking with a weight 2 (fine/sport) yarn, ideally cotton or cotton-blend. The pattern was designed for Schachenmayr Catania, which is a tightly twisted cotton. A looser or fluffier yarn at the same weight will still work but may show stuffing through the stitches more.
With the recommended 2.5mm hook and weight 2 cotton, the finished bat is roughly palm-sized — about 8–10cm tall from feet to top of head. Going up to a 3mm hook or a weight 3 yarn will make it noticeably larger.
Yes, the wings are intentionally flat and unstructured — that's what gives the bat its characteristic silhouette. If you want them to hold their shape more, you can stiffen them lightly with a tiny amount of fabric stiffener or sew them at two or three points along the body instead of just at the center.
Not with safety eyes, unfortunately — even with the backing washers, 11mm safety eyes pose a choking risk for children under 3. For a baby-safe version, embroider the eyes using black yarn instead and skip the safety eye washers entirely.
The invisible decrease works by inserting your hook through the front loops of two consecutive stitches before pulling through — it creates a much flatter, neater decrease than a standard sc2tog. Go slowly on the first few and use a stitch marker to keep track of where your decrease rounds start.
