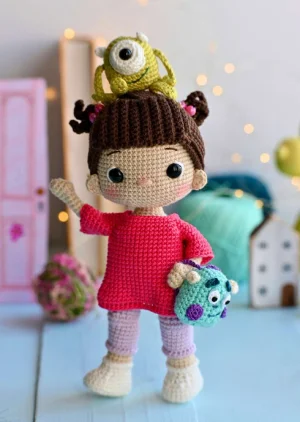
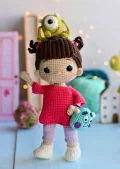
You're going to love bringing this little sweetheart to life. She's got that classic pigtail look and even comes with her tiny monster friends. It's a project that really captures the magic of the movie, and I've made sure the steps are easy to follow so you can focus on the fun parts of creating her personality. From her textured hair to the tiny Sullivan backpack, every detail is designed to make you smile.
Progress Tracker
0% Complete
— 1. Head :
Round 1 :
Start with beige yarn, 6 sc into a MR (6)
Round 3 :
(1 sc, inc) x 6 (18)
Round 4 :
(2 sc, inc) x 6 (24)
Round 5 :
(3 sc, inc) x 6 (30)
Round 6 :
(4 sc, inc) x 6 (36)
Round 7 :
(5 sc, inc) x 6 (42)
Round 8 :
(6 sc, inc) x 6 (48)
Round 9 :
(7 sc, inc) x 6 (54)
Round 10 :
(8 sc, inc) x 6 (60)
Round 11 :
(9 sc, inc) x 6 (66)
Round 12-27 :
sc in each st for 16 rounds (66)
Info :
Place safety eyes between rounds 21 and 22, leaving a gap of 13 stitches between them. Note: The original pattern numbering for the following rounds was inconsistent; please follow these counts for a smooth decrease.
Round 28 :
(9 sc, dec) x 6 (60)
Round 29 :
(8 sc, dec) x 6 (54)
Round 30 :
(7 sc, dec) x 6 (48)
Round 31 :
(6 sc, dec) x 6 (42)
Round 32 :
(5 sc, dec) x 6 (36)
Round 33 :
(4 sc, dec) x 6 (30)
Round 34 :
(3 sc, dec) x 6 (24)
Round 35 :
(2 sc, dec) x 6 (18)
Info :
Fasten off and tuck the yarn end inside. Stuff the head firmly as you work.
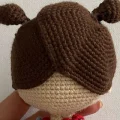
— 2. Hair Base (Make 2) :
Round 1 :
Using brown yarn, 6 sc into a MR (6)
Round 3 :
(1 sc, inc) x 6 (18)
Round 4 :
(2 sc, inc) x 6 (24)
Round 5 :
(3 sc, inc) x 6 (30)
Round 6 :
(4 sc, inc) x 6 (36)
Round 7 :
(5 sc, inc) x 6 (42)
Round 8 :
(6 sc, inc) x 6 (48)
Round 9 :
(7 sc, inc) x 6 (54)
Round 10 :
(8 sc, inc) x 6 (60)
Round 11 :
(9 sc, inc) x 6 (66)
Round 12 :
(10 sc, inc) x 6 (72)
Round 13-15 :
sc in each st for 3 rounds (72)
Info :
Cut the yarn but leave a very long tail to sew the hair to the head.
— 3. Textured Bangs :
Row 1 :
Using brown yarn, ch 11. Starting in the second ch from the hook, 10 sc, ch 1, turn (10)
Row 2-17 :
BLO 10 sc, ch 1, turn for 16 rows (10)
Info :
Fasten off and leave a long tail for sewing.
— 4. Ponytails (Make 2) :
Round 1 :
Using brown yarn, 4 sc into a MR (4)
Round 2 :
(ch 9, starting in 2nd ch from hook 8 sc, sl st into next st of MR) x 4
Info :
Fasten off and leave a tail for attachment.
— 5. Ears (Make 2) :
Round 1 :
In beige yarn, ch 3 into a MR, then 4 hdc. Pull ring tight and leave tail for sewing.
— 6. Hands (Make 2) :
Round 1 :
In beige yarn, 5 sc into a MR (5)
Round 4 :
5 sc, 1 bubble, 4 sc (10)
Round 5 :
(3 sc, dec) x 2 (8)
Round 6-18 :
sc in each st for 13 rounds (8)
Info :
Fasten off and hide the thread. Stuff the hand area lightly.
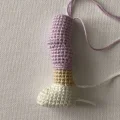
— 7. Legs (Make 2) :
Round 1 :
In white yarn, ch 8. 6 sc starting from 2nd ch, 3 sc in last ch. Turn to other side: 5 sc, inc (16)
Round 2 :
inc, 5 sc, inc, 1 sc, inc, 5 sc, inc, 1 sc (20)
Round 3 :
1 sc, inc, 5 sc, inc, 3 sc, inc, 5 sc, inc, 2 sc (24)
Round 4 :
2 sc, inc, 5 sc, inc, 5 sc, inc, 5 sc, inc, 3 sc (28)
Info :
Trace the sole onto cardboard or plastic and cut out. Glue inside after Round 5.
Round 8 :
8 sc, 6 dec, 8 sc (22)
Round 9 :
7 sc, 4 dec, 7 sc (18)
Round 11 :
Change to beige. BLO (4 sc, dec) x 3 (15)
Round 12-15 :
sc in each st for 4 rounds (15)
Round 16 :
Change to lilac. (4 sc, inc) x 3 (18)
Round 19 :
4 sc, inc, 8 sc, inc, 4 sc (20)
Round 20-21 :
sc in each st for 2 rounds (20)
Round 22 :
dec, 16 sc, dec (18)
Round 23 :
2 sc, dec, 3 sc, 4 inc (for knee), 3 sc, dec, 2 sc (20)
Round 25 :
2 sc, inc, 3 sc, 4 dec, 3 sc, inc, 2 sc (18)
Round 26-27 :
sc in each st for 2 rounds (18)
Round 28 :
(8 sc, inc) x 2 (20)
Round 29-32 :
sc in each st for 4 rounds (20)
Info :
Fasten off and hide ends. For the white sock detail, attach white yarn to the FLO of Round 10 and work 18 sc. For the lilac legging detail, attach lilac yarn to FLO of Round 16 and work 18 sc.
— 8. Body :
Round 1 :
In lilac yarn, 6 sc into a MR (6)
Round 3 :
(1 sc, inc) x 6 (18)
Round 4 :
Join the legs. Work 2 sc on body, 4 sc joining the first leg, 6 sc on body, 4 sc joining the second leg, 2 sc on body (18)
Round 5 :
Work 2 sc on body, 16 sc around the first leg, 6 sc on body, 16 sc around the second leg, 2 sc on body (42)
Round 6-12 :
sc in each st for 7 rounds (42)
Round 13 :
Change to beige. (12 sc, dec) x 3 (39)
Round 14-17 :
sc in each st for 4 rounds (39)
Round 18 :
Join arms: 7 sc on body, 4 sc through body and arm, 16 sc on body, 4 sc through body and second arm, 8 sc on body (39)
Round 19 :
7 sc on body, 4 sc around the outside of arm, 16 sc on body, 4 sc around outside of arm, 8 sc on body (39)
Info :
Insert the wire frame through the body and into the arms now. Secure with tape.
Round 21 :
(11 sc, dec) x 3 (36)
Round 22 :
(1 sc, dec) x 12 (24)
Round 23 :
(2 sc, dec) x 6 (18)
Round 24-26 :
sc in each st for 3 rounds (18)
Info :
Fasten off, leaving a long tail for attaching the head.
— 9. Sleeves (Make 2) :
Round 1 :
In pink yarn, ch 18 and join with a sl st to form a circle (18)
Round 2-4 :
sc in each st for 3 rounds (18)
Round 5 :
(7 sc, dec) x 2 (16)
Round 6-7 :
sc in each st for 2 rounds (16)
Info :
Fasten off and hide the thread.
— 10. Dress :
Round 1 :
In pink yarn, ch 54 and join with a sl st (54)
Round 3 :
(16 sc, dec) x 3 (51)
Round 5 :
(15 sc, dec) x 3 (48)
Round 6-15 :
sc in each st for 10 rounds (48)
Round 16 :
Attach sleeves: 9 sc, 6 sc through dress and sleeve, 18 sc, 6 sc through dress and sleeve, 9 sc (48)
Round 17 :
9 sc, 10 sc around outer sleeve loops, 18 sc, 10 sc around outer sleeve loops, 9 sc (56)
Round 19 :
6 sc, 2 dec, 8 sc, 2 dec, 12 sc, 2 dec, 8 sc, 2 dec, 6 sc (48)
Round 20 :
5 sc, 2 dec, 6 sc, 2 dec, 12 sc, 2 dec, 6 sc, 2 dec, 5 sc (40)
Info :
Fasten off. To finish the hem, attach pink yarn to the starting chain row and work 54 sc around.
— 11. Mike Wazowski :
Round 1 :
In green yarn, 6 sc into a MR (6)
Round 3 :
(1 sc, inc) x 6 (18)
Round 4 :
(2 sc, inc) x 6 (24)
Round 5 :
(3 sc, inc) x 6 (30)
Round 6-7 :
sc in each st for 2 rounds (30)
Round 8 :
(9 sc, inc) x 3 (33)
Round 9-10 :
sc in each st for 2 rounds (33)
Round 11 :
(10 sc, inc) x 3 (36)
Round 12-13 :
sc in each st for 2 rounds (36)
Round 14 :
(2 sc, dec) x 9 (27)
Round 15 :
(1 sc, dec) x 9 (18)
Round 16 :
(1 sc, dec) x 6 (12)
Round 17 :
6 x dec, then close the remaining hole (6)
— 12. Mike's Eye & Limbs :
Eye R1-3 :
In white: 6 sc in MR, then 6 inc, then (1 sc, inc) x 6 (18)
Eye R4-5 :
18 sc. Insert safety eye in center and sew to body (18)
Legs :
In green, ch 14. Starting in 3rd ch: 3 dc, 2 hdc, 8 sc. Make 2.
Hands :
In green, ch 14. Starting in 2nd ch: 3 sc, sl st. (ch 4, 3 sc, sl st back into same base ch) x 2, then 8 sc.
Horns :
In white, ch 4. Starting in 2nd ch: sl st, 2 hdc. Make 2.
— 13. Sullivan Backpack :
Front R1 :
In mint, ch 8. 6 sc from 2nd ch, 3 sc in last ch. Turn: 6 sc, ch 1, turn (15)
Front R2-4 :
Increase at sides to reach 17, 19, then 21 stitches. Ch 1 and turn each row.
Front R5-8 :
Work 29 sc in the round (BLO for R5, both loops for R6-8).
Back Detail :
Repeat the increase rows of the front until you have 21 stitches, then work around the base for a total of 29 sc.
Accessories :
Crochet small circles for eyes in white, blue eyebrows, and white horns. Add purple spots (6 sc in MR for small, 12 sc for big).
I can't wait to see your finished Boo! There's something so nostalgic about this character, and I hope you enjoy every stitch of her and her monster pals. Don't forget to add a little bit of real blush to her cheeks at the very end—it really brings her personality to life and makes her look just like the movie. This is such a rewarding project to finish, and she makes the most wonderful companion for any shelf or toy box. Happy crocheting, and may your stitches be as sweet as she is! 🧶✨