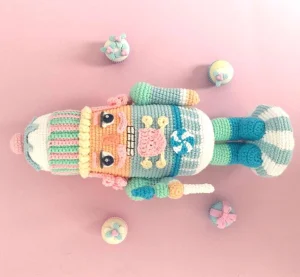
This pastel nutcracker is one of those projects that stops people in their tracks — that cupcake hat, the candy base, the little pink wig. It's a full holiday character with so much personality packed into every section. You'll work through the body, arms, legs, boots, hat, face details, and a handful of adorable accessories, each one adding another layer to this whimsical little figure. If you love projects that keep you engaged from start to finish, this one's for you — there's always something new coming up next.
Progress Tracker
0% Complete
— 1. Body (Head to Base — start with nude) :
Round 1 :
Start with a MR and work 6 sc into it. (6)
Round 2 :
Work 2 sc in every stitch around. (12)
Round 3 :
*1 sc, then 2 sc in the next st* repeat around. (18)
Round 4 :
*2 sc, then 2 sc in the next st* repeat around. (24)
Round 5 :
*3 sc, then 2 sc in the next st* repeat around. (30)
Round 6 :
*4 sc, then 2 sc in the next st* repeat around. (36)
Round 7 :
*5 sc, then 2 sc in the next st* repeat around. (42)
Round 8 :
*6 sc, then 2 sc in the next st* repeat around. (48)
Round 9 :
*7 sc, then 2 sc in the next st* repeat around. (54)
Round 10 :
*8 sc, then 2 sc in the next st* repeat around. (60)
Round 11 :
Working in back loops only, sc in all 60 stitches. (60)
Round 12-21 :
Work 60 sc in continuous rounds. (60)
Round 22 :
Work 26 sc in nude, switch to white and work 8 sc, then switch back to nude to finish the round. At the end of the round, switch to baby blue. (60)
Round 23 :
Work 26 sc in baby blue, switch to white for 8 sc, then switch back to baby blue to finish. (60)
Round 24-34 :
Work 60 sc throughout in baby blue. At the end of Round 34, switch to turquoise. (60)
Round 35-36 :
Work 60 sc in turquoise. At the end of Round 36, switch to baby blue. (60)
Round 37-41 :
Work 60 sc across, alternating 3 sc in baby blue followed by 1 sc in white, repeating this sequence all the way around. At the end of Round 41, switch to white. (60)
Round 42-43 :
Work 60 sc in white. (60)
Round 44 :
Working in back loops only: *8 sc, then 1 dec* repeat around. (54)
Round 45 :
*7 sc, then 1 dec* repeat around. (48)
Round 46 :
*6 sc, then 1 dec* repeat around. (42)
Round 47 :
*5 sc, then 1 dec* repeat around. Stuff the body firmly at this point. (36)
Round 48 :
*4 sc, then 1 dec* repeat around. (30)
Round 49 :
*3 sc, then 1 dec* repeat around. (24)
Round 50 :
*2 sc, then 1 dec* repeat around. (18)
Round 51 :
*1 sc, then 1 dec* repeat around. (12) Leave a long tail and close off.
— 2. Legs — Make 2 (start with green) :
Round 1 :
Start with a MR and work 6 sc into it. (6)
Round 2 :
Work 2 sc in every stitch around. (12)
Round 3 :
*1 sc, then 2 sc in the next st* repeat around. (18)
Round 4 :
Working in back loops only, sc in all 18 stitches. (18)
Round 5-9 :
Work 18 sc in continuous rounds. At the end of Round 9, switch to turquoise. (18)
Round 10-16 :
Work 18 sc in turquoise throughout. Leave a long tail for seaming. Do not forget to stuff before closing. (18)
— 3. Feet — Make 2 :
Round 1 :
Start with a MR and work 6 sc into it. (6)
Round 2 :
Instead of continuing the round as normal, ch 1 to go up, then work 2 sc in each stitch around. (12)
Row 3-7 :
Ch 1 to go up at the start of each row and work 12 sc across. (12) Lightly stuff and sew the foot pieces onto the bottoms of the legs to form the boots.
— 4. Left Arm (start with green) :
Round 1 :
Start with a MR and work 6 sc into it. (6)
Round 2 :
Work 2 sc in every stitch around. (12)
Round 3 :
*1 sc, then 2 sc in the next st* repeat around. (18)
Round 4 :
*2 sc, then 2 sc in the next st* repeat around. (24)
Round 5-6 :
Work 24 sc in continuous rounds. (24)
Round 7 :
*2 sc, then 1 dec* repeat around. (18)
Round 8 :
*1 sc, then 1 dec* repeat around. Switch to baby blue at the end. (12)
Round 9-17 :
Work 12 sc in baby blue. At the end of Round 17, switch to white. (12)
Round 18-19 :
Work 12 sc in white. At the end of Round 19, switch to nude. (12)
Round 18-20 :
Info: The source labels these rounds 18-20 in nude — this appears to overlap with the white rounds above. Work 3 rounds of 12 sc in nude after the white section, and stuff the arm. (12)
Round 21 :
Dec all the way around. (6) Hide the yarn tail with a needle and trim.
— 5. Right Arm Part 1 (start with green) :
Round 1 :
Start with a MR and work 6 sc into it. (6)
Round 2 :
Work 2 sc in every stitch around. (12)
Round 3 :
*1 sc, then 2 sc in the next st* repeat around. (18)
Round 4 :
*2 sc, then 2 sc in the next st* repeat around. (24)
Round 5-6 :
Work 24 sc in continuous rounds. (24)
Round 7 :
*2 sc, then 1 dec* repeat around. (18)
Round 8 :
*1 sc, then 1 dec* repeat around. Switch to baby blue. (12)
Round 9-17 :
Work 12 sc in baby blue. Stuff the arm now before closing. (12)
Round 18 :
Dec all the way around (obl decrease x6). Hide yarn tail with needle and trim.
— 6. Right Arm Part 2 (start with nude) :
Round 1 :
Start with a MR and work 6 sc into it. (6)
Round 2 :
Work 2 sc in every stitch around. (12)
Round 3-4 :
Work 12 sc in continuous rounds. Switch to white at the end of Round 4. (12)
Round 5-6 :
Work 12 sc in white. Switch to baby blue at the end of Round 6. (12)
Round 7-13 :
Work 12 sc in baby blue throughout. Stuff, then leave a long yarn tail to sew this piece to Part 1. (12)
— 7. Buttons — Make 2 :
Info :
Start with a MR and work 6 sc, then join with a sl st. Ch 13, ch 1 to go up, then work 6 sc along the chain. Finish with a sl st. Attach to the body with glue, using pins to hold in place.
— 8. Yellow Base for Cupcake :
Info :
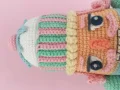
Working into the back loops left free at Round 11 (top of the head), work alternating popcorn stitches (hdc-based) and single hdc stitches all the way around the available loops to create the decorative cupcake wrapper brim.
— 9. Hat Base (start with pink) :
Row 1 :
Ch 10, then ch 1 more to go up and sc in every stitch along the chain. (10 sc)
Row 2 :
Ch 1, work sc in back loops only across all stitches. Switch to green.
Row 3 :
Ch 1, work sc in back loops only across.
Row 4 :
Ch 1, work sc in back loops only across. Switch to pink.
Info :
Continue alternating 2 green rows and 2 pink rows until you have a total of 14 pink rows and 13 green rows. Then seam the side edges together to form the hat tube. Sew this finished hat base to the yellow cupcake brim using yellow thread so the joins are hidden.
— 10. Top of the Cupcake (in white) :
Round 1 :
Start with a MR and work 6 sc into it. (6)
Round 2 :
Work 2 sc in every stitch around. (12)
Round 3 :
*1 sc, then 2 sc in the next st* repeat around. (18)
Round 4 :
*2 sc, then 2 sc in the next st* repeat around. (24)
Round 5 :
*3 sc, then 2 sc in the next st* repeat around. (30)
Round 6 :
*4 sc, then 2 sc in the next st* repeat around. (36)
Round 7 :
*5 sc, then 2 sc in the next st* repeat around. (42)
Round 8 :
*6 sc, then 2 sc in the next st* repeat around. (48)
Round 9 :
*7 sc, then 2 sc in the next st* repeat around. (54)
Round 10-14 :
Work 54 sc in continuous rounds. (54) Once complete, stuff and sew onto the hat base.
— 11. Cupcake Glaze :
Round 1 :
Start with a MR and work 6 sc into it. (6)
Round 2 :
Work 2 sc in every stitch around. (12)
Round 3 :
*1 sc, then 2 sc in the next st* repeat around. (18)
Round 4 :
Work the glaze drips as follows all the way around: *2 sc, ch 6 and sc back along all 6 chains, sc in the next stitch, then 2 sc, ch 4 and sc back along all 4 chains* — repeat this drip sequence around the full round. Once finished, attach this glaze piece to the white cupcake top.
— 12. Cherry for Cupcake :
Round 1 :
Start with a MR and work 6 sc into it. (6)
Round 2 :
Work 2 sc in every stitch around. (12)
Round 3 :
*1 sc, then 2 sc in the next st* repeat around. (18)
Round 4-5 :
Work 18 sc in continuous rounds. (18)
Round 6 :
*1 sc, then 1 dec* repeat around. (12)
Round 7 :
Stuff firmly and attach the cherry to the cupcake glaze.
— 13. Hair-Wig (in pink) :
Step 1 :
Ch 15 and hdc in every stitch along the chain. Do not cut the yarn.
Step 2 :
Ch 20 and hdc in every stitch along that chain. Repeat this step 19 times to create the main hair strands.
Step 3 :
For the final strand, ch 15 and hdc in every stitch. Attach the finished wig to the head using craft glue.
Info :
Try the wig against the head before gluing — depending on your yarn weight, you may need more or fewer than 19 middle strands to get the right fullness.
— 14. Candy Buckle :
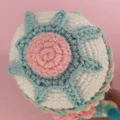
Round 1 :
Start with a MR and work 8 sc into it, alternating one pink sc and one white sc around. (8)
Round 2 :
Work 2 sc in each stitch — working pink into pink stitches and white into white stitches to keep the spiral. (16)
Round 3 :
In the white sections: 1 sc, 1 sc. In the pink sections: 2 sc in the first stitch, then 1 sc in the next. Continue matching colors throughout.
— 15. Face — Nose :
Info :
Ch 5. Starting from chain 5, ch 2 more to go up, then work hdc back along chains 4, 3, 2, and 1. Cut yarn and weave in the tail.
— 16. Face — Eyes (Make 2) :
Step 1 :
White part: Ch 3. Starting from chain 3, ch 4 to go up, then work trc into chains 2 and 1. Cut yarn, weave in the tail, and glue to the face.
Step 2 :
Cut two small circles from felt fabric to act as the dark pupils and glue them to the white eye pieces. Add two tiny white beads for the highlight sparkle and attach them to the blue/dark felt.
Step 3 :
Cut two additional small pieces from gray felt fabric to form the eyelids and glue them into position above the eyes.
— 17. Face — Eyebrows :
Info :
Ch 4 and cut the yarn. Glue each eyebrow in place above the eyes.
— 18. Face — Mustache :
Row 2 :
Work sc in the first 3 stitches, then sl st across the remaining stitches. Glue the mustache to the face and use pins to hold it while the glue sets.
— 19. Face — Teeth Detail :
Info :
Using black embroidery thread and a needle, embroider the teeth outline directly onto the face area to define the nutcracker's signature wide mouth.
— 20. Face — Beard :
Row 1 :
Ch 7 and work dc in each chain stitch. (7)
Row 2 :
Work 7 dc across. (7)
Row 3 :
Starting from chain 4, work 7 dc and finish with a sl st at chain 7. Glue the beard to the lower face area and pin until dry.
— 21. Candy Base :
Round 1 :
Start with a MR in white and work 7 sc into it. (7)
Round 2 :
Work 1 sc in blue and 1 sc in white into the same stitch, repeating all the way around. (14)
Round 3 :
Work 2 sc in blue into blue stitches, and 1 sc in white into white stitches. Keep colors matching throughout. (21)
Round 4 :
Work 1 sc blue, 1 sc blue, then 2 sc in the white stitch. (28)
Round 5 :
1 inc blue, 1 sc blue, 1 sc white, 1 sc white.
Round 6 :
1 sc blue, 1 sc blue, 1 sc blue, inc white, 1 sc white.
Round 7 :
Inc blue, 1 sc blue, 1 sc blue, inc white, 1 sc white, 1 sc white.
Round 8 :
Inc blue, 1 sc blue, 1 sc blue, 1 sc blue, then 1 sc white in the next 4 stitches.
Round 9 :
1 sc blue in the next 5 stitches, inc white, 1 sc white, 1 sc white, 1 sc white.
Round 10 :
Inc blue, 1 sc blue in the next 4 stitches, inc white, 1 sc white in the next 4 stitches.
Round 11 :
Inc blue, 1 sc blue in the next 5 stitches, 1 sc white in the next 6 stitches.
Round 12 :
Working in back loops only: 1 sc blue in the next 7 stitches, 1 sc white in the next 6 stitches.
Round 13-14 :
1 sc blue in the next 7 stitches, 1 sc white in the next 6 stitches.
Round 15 :
Working in back loops only: dec blue, 1 sc blue in the next 5 stitches, 1 sc white in the next 6 stitches.
Round 16 :
Dec blue, 1 sc blue in the next 4 stitches, dec white, 1 sc white in the next 4 stitches.
Round 17 :
1 sc blue in the next 5 stitches, dec white, 1 sc white in the next 3 stitches.
Round 18 :
Dec blue, 1 sc blue in the next 3 stitches, 1 sc white in the next 4 stitches.
Round 19 :
Dec blue, 1 sc blue in the next 2 stitches, dec white, 1 sc white in the next 2 stitches.
Round 20 :
1 sc blue in the next 3 stitches, dec white, 1 sc white.
Round 21 :
Dec blue, 1 sc blue, sc white in the next 2 stitches.
Round 22 :
1 sc blue in the next 2 stitches, dec white.
Round 23 :
Dec blue, 1 sc white and close off.
— 22. Nutcracker's Cane — White Part :
Round 1 :
Start with a MR and work 6 sc into it. (6)
Round 2-9 :
Work 6 sc in continuous rounds. (6) Hide yarn tail and trim. Attach to the hand with glue and pins.
— 23. Nutcracker's Cane — Green Ball :
Round 1 :
Start with a MR and work 6 sc into it. (6)
Round 2 :
*1 sc, then 2 sc in the next st* repeat around. (9)
Round 3 :
Work 9 sc around. (9)
Round 4 :
*dec, then 1 sc* repeat around. (6) Hide yarn tail and trim.
— 24. Nutcracker's Cane — Green Ball from Top :
Round 1 :
Start with a MR and work 6 sc into it. (6)
Round 2 :
*1 sc, then 2 sc in the next st* repeat around. (9)
Round 3 :
Work 9 sc around. (9)
Round 4 :
*dec, then 1 sc* repeat around. (6)
Round 5 :
Work 6 sc. (6) Hide yarn tail and trim. Do not stuff. Attach all cane pieces together with glue and pins.
There's something really special about a project that tells a whole story — and this little nutcracker does exactly that. From his swirly candy base to that wild cupcake hat piled high with a glaze and cherry, every section you finish makes him more and more himself. He's festive without being traditional, sweet without being simple, and honestly one of the most satisfying amigurumi finishes you'll get to experience. Whether he ends up on your shelf, under a tree, or in someone else's hands as a gift — he's going to be loved. Happy crocheting! 🧶✨🍬