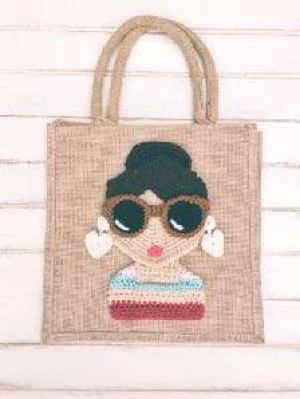
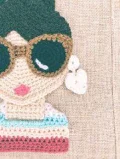
This pattern is honestly one of those projects that just makes you smile the whole way through. You're building a charming portrait of a stylish girl — complete with her swoopy hair, oversized shades, little shirt, and all the personality details that make her feel alive. The finished piece measures roughly 10 by 6 inches, so she's just the right size to glue onto a tote bag, stitch onto the back of a denim jacket, or frame as a wall hanging. Every single element is customizable — her skin tone, hair color, glasses style, earring choice, lip color — so your version will be completely her own. This is the kind of crochet project you start and then can't stop thinking about until she's done.
Progress Tracker
0% Complete
— 1. Face :
Info :
Using your chosen skin tone yarn, start with a magic ring. Work in a continuous spiral throughout — do not join rounds.
Round 1 :
Place 6 sc into the magic ring — 6 sts.
Round 2 :
Work 2 sc into every stitch around — 12 sts.
Round 3 :
[2 sc in next st, sc in next st] repeat around — 18 sts.
Round 4 :
[2 sc in next st, sc in next 2 sts] repeat around — 24 sts.
Round 5 :
[2 sc in next st, sc in next 3 sts] repeat around — 30 sts.
Round 6 :
[2 sc in next st, sc in next 4 sts] repeat around — 36 sts.
Round 7 :
[2 sc in next st, sc in next 5 sts] repeat around — 42 sts.
Round 8 :
[2 sc in next st, sc in next 6 sts] repeat around — 48 sts.
Round 9 :
[2 sc in next st, sc in next 7 sts] repeat around — 54 sts.
Round 10 :
[2 sc in next st, sc in next 8 sts] repeat around — 60 sts.
Round 11 :
[2 sc in next st, sc in next 9 sts] repeat around — 66 sts.
Round 12 :
[2 sc in next st, sc in next 10 sts] repeat around — 72 sts.
Info :
Note: The source pattern labels both Round 11 (66 sts) and Round 12 (72 sts) as 'Round 11'. The second entry has been corrected to Round 12 here. Verify your stitch count is 72 before fastening off. Fasten off and weave in ends.
— 2. Neck :
Info :
Using the same skin tone yarn as the face, chain 9.
Row 1 :
Starting in the 2nd ch from the hook, sc across the chain — 8 sc. Ch 1 and turn.
Row 2 :
Sc in each st across — 8 sc.
Row 3 :
Sc in each st across — 8 sc.
Row 4 :
Sc in each st across — 8 sc.
Row 5 :
Sc in each st across — 8 sc.
Row 6 :
Sc in each st across — 8 sc.
Row 7 :
Sc in each st across — 8 sc.
Row 8 :
Sc in each st across — 8 sc.
Row 9 :
Sc in each st across — 8 sc. Fasten off and weave in ends.
— 3. Shirt :
Info :
Using your chosen shirt color, chain 20.
Row 1 :
Hdc in the 3rd ch from the hook, then hdc in each remaining ch across, turn — 18 hdc.
Row 2 :
Ch 2, hdc in every hdc across, turn.
Row 3 :
Ch 2, hdc in every hdc across, turn.
Row 4 :
Ch 2, hdc in the next 5 hdc, ch 8, skip the center section and rejoin with hdc in the last 5 hdc, turn. Then ch 2, hdc in the next 5 hdc, work 8 hdc into the chain-8 space, hdc in the last 5 hdc, turn. This creates the neckline opening.
Row 5 :
Ch 2, hdc in each st across, turn.
Row 6 :
Ch 2, hdc in each st across, turn.
Row 7 :
Ch 2, hdc in each st across, turn.
Row 8 :
Ch 2, hdc in each st across, turn.
Row 9 :
Ch 2, hdc in each st across, turn.
Row 10 :
Ch 2, hdc in each st across, turn. Fasten off and weave in ends.
Info :
Optional decoration: use a tapestry needle to add French knot polka dots across the shirt, or change yarn color every other row for a striped effect. Once finished, fold both top corners backward to form the shoulder shape before assembling.
— 4. Hair Strands :
Info :
Using your chosen hair color, ch 27 and fasten off. Make 12 strands total (repeat this step 11 more times).
Info :
Placement — Left side: arrange the chains in a straight diagonal line running from the top center of the scalp down to the middle of the left side of the face. Hot glue the strand nearest the face center first, then continue adding strands outward. Fold any excess chain length behind the head and glue it flat.
Info :
Placement — Right side (bangs): create a curved swooping arc beginning roughly 3 stitches left of the top center strand, curving across to the middle of the right side of the head. Add strands one by one going outward from center, folding excess behind. Keep all chains close together so no skin color shows between them.
— 5. High Bun :
Info :
Using hair color, work an oval shape. Do not join rounds — work continuously.
Round 1 :
Ch 8. Hdc in the 3rd ch from the hook, hdc in the next 4 chs, then place 3 hdc in the very last ch. Rotate your work and continue along the opposite side of the foundation chain: hdc in the next 4 sts, then 2 hdc in the first ch. You should now have 3 hdc at each end separated by 4 hdc along each side — 14 hdc total.
Round 2 :
Do not join. Work 2 hdc in the first st of Round 1, 1 hdc in each of the next 4 sts, then 2 hdc in each of the following 3 sts, hdc in the next 4 sts, 2 hdc in each of the next 2 sts — 20 hdc total.
Round 3 :
Do not join. Work 1 hdc in the first st, 2 hdc in the next, hdc in the next 4 sts, *2 hdc in next st, 1 hdc in next st* — repeat from * to * two more times. Hdc in the next 4 sts, 2 hdc in the next st, 1 hdc in the next. Repeat from * to * one final time — 26 hdc total. Fasten off and weave in ends.
— 6. Side Low Bun :
Info :
Using hair color, make a magic ring. Work in a continuous spiral — do not join.
Round 1 :
Place 6 sc into the magic ring — 6 sts.
Round 2 :
Work 2 sc into every st around — 12 sts.
Round 3 :
[2 sc in next st, sc in next st] repeat around — 18 sts.
Round 4 :
[2 sc in next st, sc in next 2 sts] repeat around — 24 sts.
Round 5 :
[2 sc in next st, sc in next 3 sts] repeat around — 30 sts.
Round 6 :
[2 sc in next st, sc in next 4 sts] repeat around — 36 sts. Fasten off and weave in ends.
— 7. Pearls :
Info :
Using white yarn, make a magic ring and place 6 sc into it. Pull the ring tight and fasten off. Make as many pearl circles as you like. Use them as earrings on either side of the face and/or arrange them as a necklace along the top edge of the shirt, attaching with hot glue or a tapestry needle and yarn.
— 8. Sunglasses (Standard) — Make 2 :
Info :
Using your chosen lens color (black or brown), make a magic ring. Work in a continuous spiral.
Round 1 :
Place 6 sc into the magic ring — 6 sts. Do not join, continue in a spiral.
Round 2 :
Work 2 sc into every st around — 12 sts.
Round 3 :
[2 sc in next st, sc in next st] repeat around — 18 sts.
Round 4 :
[2 sc in next st, sc in next 2 sts] repeat around — 24 sts.
Colour Change :
Using a sl st anywhere in the last round, switch to your desired frame/rim color.
Round 5 :
7 sc, hdc in the next 2 sts, 2 dc in each of the next 2 sts, hdc in the next 2 sts, sc in all remaining sts. Fasten off.
Bridge :
With frame color, ch 6. Work sc in the 2nd ch from the hook, sc back across to the end of the chain. Fasten off and weave in ends. This short piece connects the two lenses.
— 9. Hair Ribbon (Optional) :
Info :
Using your chosen ribbon color, ch 15.
Row 1 :
Sc in the 2nd ch from hook, sc in each ch across, turn — 12 sc.
Row 2 :
Ch 1, sc in every sc across. Do not turn at the end of this row.
Row 3 :
Ch 5, sc in the 2nd ch from the hook, sc back toward the ribbon body, then sc into the ribbon between Rows 1 and 2 to anchor this first bow tail.
Row 4 :
Ch 5, sc in the 2nd ch from the hook, sc back toward the ribbon, sl st into Row 1 to anchor the second bow tail. Fasten off and weave in ends.
— 10. Lashes and Lips :
Info :
Thread a tapestry needle with black yarn and embroider the lashes above where the sunglasses will sit. Use the pattern photos as a placement guide — typically short diagonal stitches fanning upward from the top edge of the lens area.
Info :
Thread a tapestry needle with your chosen lip color and stitch on a small set of lips at the lower center of the face. Use the pattern photos as a guide for the shape and placement.
— 11. Heart Sunglasses Lens (Bonus) — Make 2 :
Info :
Using your chosen lens color, make a magic ring and ch 3.
Round 1 :
Working into the magic ring: 3 tr, 3 dc, ch 1, 1 tr, ch 1, 3 dc, 3 tr, ch 2, sl st into the magic ring. Pull tight.
Round 2 :
Sc into the ch-3 from the previous round, sc into the top of the original ch-3. Then: 1 sc and 1 hdc into the first tr from Round 1. 2 hdc into the next tr. 1 hdc and 1 sc into the next st. Sc in the next 4 sts. Ch 1, dc into the center tr from Round 1, ch 1. Sc in the next 4 sts. 1 sc and 1 hdc into the next st. 2 hdc into the next st. 1 hdc and 1 sc into the next st. 1 sc. Sc into the ch-2 from Round 1. Sl st into the center and fasten off.
Frame :
With your chosen frame color, join with 2 sc into the ch-3 from the beginning of Round 2. Work 1 sc in every st around the heart shape. Work 2 sc in the ch-2 space from Round 1. Fasten off and weave in ends.
Bridge :
Using frame color, ch 6. Work 5 sc across, ch 1. Work 5 sc back across. Fasten off and weave in ends.
— 12. Reading Glasses (Bonus) :
Info :
Using your chosen frame color and a 5mm hook.
Frame 1 :
Ch 12, sc in each of the 11 sts across. Ch 20 and attach this chain back to the starting point of the frame with a sl st to form the rounded lens shape. Fasten off.
Frame 2 & Bridge :
Repeat the above frame instructions, but before fastening off ch 3 and connect this chain to the inner corner of the first frame using a sl st — this ch-3 strip becomes the nose bridge. Fasten off and weave in ends on both frames.
Info :
Carefully bend and shape the frames before gluing or sewing. For best results, pin the frames into the desired shape on a foam block, mist with starch spray, and allow to dry fully before positioning on the face.
— 13. Aviators (Bonus) — Make 2 :
Info :
Using lens color and a 5mm hook. Work in a continuous spiral.
Round 1 :
Place 6 sc into a magic ring — 6 sts. Do not join, continue in spiral.
Round 2 :
Work 2 sc in every st around — 12 sts.
Round 3 :
[2 sc in next st, sc in next st] repeat 12 times around — 18 sts.
Round 4 :
[2 sc in next st, sc in next 2 sts] repeat 18 times around — 24 sts.
Round 5 :
[2 sc in next st, sc in next 3 sts] repeat 24 times around — 30 sts.
Round 6 :
Still in lens color: 10 sc, 4 hdc, 2 hdc in the next st, 4 hdc, 5 sc — 25 sts total in this section. Switch to frame color and sc all the way around the lens edge — 31 sts total. Fasten off on the first lens.
Info :
Bridge assembly: when working the second lens, instead of fastening off at the end of Round 6, ch 5 and connect to the inner corner of the first lens to create the nose bridge. Then ch 7 separately and position this second chain underneath both frames a few stitches below the bridge when gluing — this acts as the lower frame bar. Use the pattern photo as a placement reference.
— 14. Statement Earring #1 (Bonus) — Make 2 :
Info :
Using earring color and 4.5mm hook.
Part 1 — Circle :
Place 9 sc into a magic ring. Fasten off.
Part 2 — Ring connector :
Ch 11 and join the chain into a ring. Leave a tail long enough for sewing. Using the tail, sew this ring to the back of the circle at its bottom edge.
Part 3 — Tassel fan :
Re-attach the same yarn to the center of the ch-11 ring. Ch 3, work 6 tr, ch 3, sl st back into the ring. Fasten off.
— 15. Statement Earring #2 (Bonus) — Make 2 :
Info :
Using earring color and 4.5mm hook.
Part 1 — Circle with drop chain :
Place 9 sc into a magic ring. Sl st into the first sc. Ch 8. Fasten off and weave in ends.
Part 2 — Heart charm :
Make a magic ring, ch 3. Work 3 tr, 3 dc, ch 1, tr, ch 1, 3 dc, 3 tr, ch 3. Sl st back into the magic ring. Fasten off and pull the ring tightly closed. Weave in ends.
Assembly :
Attach the heart charm to the ch-8 drop from Part 1 using a tapestry needle and yarn, or hot glue. Leave 2 or 3 ch sts visible between the circle and the heart as a spacer.
— 16. Statement Earring #3 (Bonus) — Make 2 :
Info :
Using earring color and 5mm hook.
Part 1 — Top circle with drop chain :
Place 9 sc into a magic ring. Sl st into the first sc, ch 10. Fasten off and weave in ends.
Part 2 — Middle circle :
Place 9 dc into a magic ring. Fasten off and weave in ends.
Part 3 — Bottom circle :
Place 9 tr into a magic ring. Fasten off and weave in ends.
Assembly :
Attach Part 2 and Part 3 along the ch-10 drop from Part 1, spacing them out so the circles cascade downward. Use hot glue or a tapestry needle to secure each circle to the chain.
— 17. Bonus Girl Earrings — Earring #1: Flower :
Info :
Using assorted yarn colors and 5mm hook. The earring post is hot glued to the back, then the top of the post is hot glued to the side of the portrait face at the ear position.
The Post :
Place 5 sc into a magic ring. Sl st into the first sc. Ch 5 and fasten off. Trim tail short or weave in.
Flower Center :
Using yellow, place 5 sc into a magic ring. Fasten off and weave in ends.
Petals :
Join white yarn to any sc in the flower center. *Ch 2, 3 dc in the same st, sl st into the same st to complete one petal.* Sl st into the next yellow st and repeat from * to * until 5 petals are made total. Fasten off and weave in ends.
— 18. Bonus Girl Earrings — Earring #2: Palm Leaf :
The Post :
Using pink, place 5 sc into a magic ring. Sl st into the first sc. Ch 5, fasten off. Trim tail short or weave in.
The Palm Leaf :
Ch 7. Tr in the 3rd ch from the hook, dc, hdc, sc, sl st in the last ch. Ch 1 and turn so you are working back along the other side of the chain. Sl st in the first st, sc, hdc, dc, tr, ch 2, sl st back to the very beginning. Fasten off and weave in ends.
— 19. Bonus Girl Earrings — Earring #3: Raffia Double Circle :
The Post :
Using raffia and 5mm hook: place 8 sc into a magic ring. Sl st into the first sc. Ch 5, fasten off. Trim tail short or weave in.
Larger Circle :
Using raffia, place 10 dc into a magic ring. Fasten off and weave in ends.
Tassels :
Choose 3 dc from the larger circle evenly spaced. At each chosen dc: sl st the raffia into the stitch and fasten off, leaving two short tails to form a tassel. Repeat for all three chosen stitches.
— 20. Bonus Girl Earrings — Earring #4: Strawberry :
The Post :
Using green, place 5 sc into a magic ring. Sl st into the first sc. Ch 5, fasten off. Trim tail short or weave in.
Strawberry Base :
Using red, ch 3. Sc in the 2nd ch from the hook, sc in the last ch. Ch 1 and turn.
Row 1 :
Skip the first ch, then inc (2 sc) in each st across — 4 sc.
Row 3 :
Join green yarn, sc across — 4 sc. Fasten off and weave in ends.
Info :
Using white yarn and a tapestry needle, sew a few small seed dots scattered across the red portion.
— 21. Bonus Girl Earrings — Earring #5: Pineapple :
Pineapple Top (Leaves) :
Using green, *ch 3, sc in the 2nd ch from the hook, sc in the last ch, sl st in the last ch.* Repeat two more times from * to * to make 3 leaf spikes. Sl st into the very first sc to close. Fasten off and weave in ends.
Pineapple Body :
Using yellow, ch 7. Hdc in the 3rd ch from the hook, hdc, dc, dc, then 4 tr all in the very last ch. Now rotate and work up the other side of the foundation chain: dc, dc, hdc, hdc. Fasten off and weave in ends.
Assembly :
Attach the green leaf top to the top edge of the yellow pineapple body using hot glue or a tapestry needle.
There's something genuinely joyful about this pattern — you make all these tiny pieces separately, and then suddenly you lay them out together and she's just... there. A whole little person with her stylish shades and her bun and her little shirt. 🧶 Every version is different because every maker picks their own colors, glasses style, and earring personality. She ends up feeling like a tiny portrait of someone you actually know. Stick her on a market bag, a jacket, or frame her for a friend's birthday — she always gets noticed. ✨