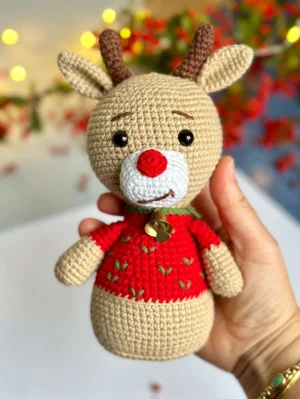
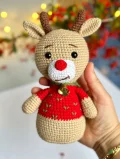
This little reindeer is honestly one of those makes that just makes you smile the whole way through. Your finished deer stands about 15 cm tall, dressed in a festive red sweater with a white snout and that iconic red nose — pure holiday magic in yarn form. You'll work the body and head as one continuous piece, which keeps things tidy and means less seaming at the end. Whether you're making this as a Christmas gift or just because you needed a tiny reindeer in your life (valid), this pattern walks you through every step with clear, approachable instructions.
Progress Tracker
0% Complete
— 1. Body & Head (worked as one continuous piece) :
Info :
Begin with beige yarn. The body and head are crocheted as a single continuous piece from the bottom up. Stuff as you go. Finished height is approximately 15 cm using a 1.80–2.00 mm hook with lightweight yarn.
Round 1 :
Make 15 ch. Starting from the 2nd ch from hook: sc increase, 12 sc, then work 3 sc into the last chain stitch. Continue working along the opposite side of the foundation chain: 13 sc. (30)
Round 2 :
2 inc, 12 sc, 3 inc, 12 sc, inc. (36)
Round 3 :
(sc, inc) 2 times, 13 sc, (inc, inc) 3 times, 12 sc, inc. (42)
Round 4 :
(2 sc, inc) 2 times, 14 sc, (inc, 2 sc) 3 times, 12 sc, inc. (48)
Round 5 :
blo sc around. (48)
Round 7 :
(7 sc, inc) 6 times. (54)
Round 10 :
sc around. (54)
Round 11 :
sc around. (54)
Round 12 :
sc around. (54)
Round 13 :
sc around. (54)
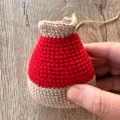
Colour Change :
Switch to red yarn.
Round 14 :
sc around. (54)
Round 15 :
(7 sc, dec) 6 times. (48)
Round 16 :
sc around. (48)
Round 17 :
sc around. (48)
Round 18 :
(6 sc, dec) 6 times. (42)
Round 19 :
sc around. (42)
Round 20 :
sc around. (42)
Round 21 :
(5 sc, dec) 6 times. (36)
Round 22 :
sc around. (36)
Round 23 :
sc around. (36)
Round 24 :
(4 sc, dec) 6 times. (30)
Round 25 :
sc around. (30)
Round 26 :
sc around. (30)
Round 27 :
(3 sc, dec) 6 times. (24)
Round 28 :
sc around. (24)
Round 29 :
sc around. (24)
Colour Change :
Switch back to beige yarn.
Round 30 :
(3 sc, inc) 6 times. (30)
Round 31 :
(4 sc, inc) 6 times. (36)
Round 32 :
(5 sc, inc) 6 times. (42)
Round 33 :
(6 sc, inc) 6 times. (48)
Round 34 :
(7 sc, inc) 6 times. (54)
Round 35 :
(8 sc, inc) 6 times. (60)
Round 36 :
sc around. (60)
Round 37 :
sc around. (60)
Round 38 :
sc around. (60)
Round 39 :
sc around. (60)
Round 40 :
sc around. (60)
Round 41 :
sc around. (60)
Round 42 :
sc around. (60)
Round 43 :
sc around. (60) — Attach safety eyes on this round, placing them 9 stitches apart at the front center of the head.
Round 44 :
sc around. (60)
Round 45 :
sc around. (60)
Round 46 :
sc around. (60)
Round 47 :
sc around. (60)
Round 48 :
sc around. (60)
Round 49 :
(8 sc, dec) 6 times. (54)
Round 50 :
(7 sc, dec) 6 times. (48)
Round 51 :
(6 sc, dec) 6 times. (42)
Round 52 :
(5 sc, dec) 6 times. (36)
Round 53 :
(4 sc, dec) 6 times. (30)
Round 54 :
(3 sc, dec) 6 times. (24)
Round 55 :
(2 sc, dec) 6 times. (18)
Round 56 :
(sc, dec) 6 times. (12)
Round 57 :
dec 6 times. (6) — Fasten off and close the top opening. Weave in the end securely.
— 2. Arms (make 2) :
Info :
Begin with beige yarn. Make two identical arms.
Round 1 :
Work 6 sc into a magic ring. (6)
Round 2 :
inc in each stitch around. (12)
Round 3 :
(sc, inc) 6 times. (18)
Round 4 :
blo sc around. (18)
Round 8 :
(4 sc, dec) 3 times. (15)
Round 10 :
sc around. (15)
Colour Change :
Switch to red yarn.
Round 11 :
sc around. (15)
Round 12 :
(3 sc, dec) 3 times. (12) — Flatten the arm and crochet both open edges closed together in one pass. Fasten off, leaving a long tail for sewing.
— 3. Ears (make 2) :
Info :
Begin with beige yarn. Make two ears.
Round 1 :
Work 6 sc into a magic ring. (6)
Round 2 :
(sc, inc) 3 times. (9)
Round 4 :
(2 sc, inc) 3 times. (12)
Round 6 :
(3 sc, inc) 3 times. (15)
Round 10 :
sc around. (15)
Round 11 :
sc around. (15)
Round 12 :
sc around. (15) — Flatten the ear and crochet both edges closed simultaneously. Fasten off with a long tail for sewing.
— 4. Horns (make 2) :
Info :
Begin with brown yarn. Make two horns.
Round 1 :
Work 6 sc into a magic ring. (6)
Round 2 :
(sc, inc) 3 times. (9)
Round 6 :
3 sc, inc, 4 sc, dec. (9) — Fasten off, leaving a long tail for attaching.
— 5. Snout / Nose Muzzle :
Info :
Begin with white yarn. This piece forms the oval muzzle that gets sewn onto the face.
Round 1 :
Make 6 ch. Starting from the 2nd ch from hook: sc increase, 3 sc, then work 3 sc into the final chain stitch. Continue along the opposite side of the foundation chain: 4 sc. (12)
Round 2 :
2 inc, 3 sc, 3 inc, 3 sc, inc. (18)
Round 3 :
(sc, inc) 2 times, 4 sc, inc 3 times, 3 sc, inc. (24)
Round 4 :
blo sc around. (24)
Round 7 :
sc around. (24) — Fasten off, leaving a long tail for sewing onto the head.
— 6. Red Nose Button :
Info :
Use red yarn. This tiny round piece sits on top of the white snout.
Round 1 :
Work 6 sc into a magic ring. (6)
Round 2 :
inc in each stitch around. (12) — Fasten off, leaving a tail. Gather the edge slightly and sew onto the center top of the white snout.
There's something so joyful about finishing a little amigurumi and holding the completed piece in your hands — and this baby deer is one of those makes that genuinely makes people stop and go 'you MADE that?!' The chubby body, the tiny red nose, those little brown horns — every detail comes together into something that feels really special. Whether you're gifting this reindeer, adding it to your holiday decorations, or just crocheting it because you deserve a fun festive project, I hope you have the best time making it. 🧶 Happy crocheting, and enjoy every round! ✨🦌