🧢 Beautiful ✨ Detailed πŸ’ Adorable

Baby Dino Amigurumi Backpack Pattern

Baby Dino Amigurumi Backpack Pattern
4.7β˜…Rating
8-10 HoursTime Needed
3.9KMade This
βœ‚οΈ

Intermediate Level

Ideal for those with basic crocheting experience, featuring slightly more advanced stitches and techniques to expand your skills.

⏱️

All-Day Adventure

Requires 8-10 hours, ideal for a full day of immersive crocheting.

🐰

Whimsical Buddy

Playful characters full of personality, designed to spark imagination and become cherished playtime favorites.

About This Baby Dino Amigurumi Backpack Pattern

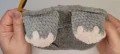
Baby Dino Amigurumi Backpack Pattern crochet pattern - detailed view

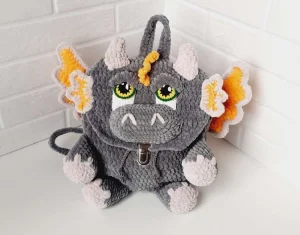
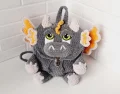
This piece is a showstopper for birthdays or holiday gifts. It is designed to be durable enough for daily play while remaining light enough for a child to wear comfortably during a trip to the park or a playdate.

Why You'll Love This Baby Dino Amigurumi Backpack Pattern

I absolutely adore how the velvet yarn hides stitches so well, giving the dino a professional, store-bought finish while keeping that handmade soul. The way the legs and tail are crocheted directly into the base is a total game-changerβ€”it makes the construction so much more secure for a bag that's going to see a lot of action. Plus, those big green eyes just melt my heart every time I look at them!

Baby Dino Amigurumi Backpack Pattern step 1 Baby Dino Amigurumi Backpack Pattern step 2 Baby Dino Amigurumi Backpack Pattern step 3 Baby Dino Amigurumi Backpack Pattern step 4

Switch Things Up

Whenever I pick up a hook to start a new amigurumi project, I always think about the personality of the character I'm creating. This little dino really came to life for me when I added the eyelidsβ€”it gave him this sleepy, friendly look that just made me want to give him a squeeze. Working with velvet yarn like Himalaya Dolphin Baby is such a tactile experience; it’s like crocheting a cloud!

One tip I’ve learned over the years is that when you're making something functional like a backpack, the tension matters more than usual. I tend to crochet a bit tighter on the base to make sure it doesn't sag when there’s a heavy toy inside. If you want to customize your dino, try using a variegated yarn for the wings or even adding a little embroidered name on the inside of the valve flap. It makes the gift feel even more special. I once made a version of this in deep forest green with gold spikes, and it looked like a tiny dragon! Don't be afraid to play with your color palette and make this pattern your own.

Common Mistakes & How to Fix Them

βœ— When joining the legs to the base in Round 5, make sure the toes are pointing forward; it is very easy to accidentally stitch them on sideways if you aren't looking at the front of the bag.βœ— The 202-chain strap can twist easily during the second half of the round, so lay it flat on a table to ensure your stitches stay aligned before joining the ends.βœ— If you stuff the muzzle too firmly, it can become heavy and pull the valve flap down awkwardlyβ€”aim for a medium squish so it holds its shape without the weight.βœ— For the wings, ensure you are working into the correct chain loop when starting the 'mirror' side, otherwise, one wing will end up significantly longer than the other.

Baby Dino Amigurumi Backpack Pattern

There is something truly magical about a project that doubles as a cuddly toy and a functional accessory. This adorable dinosaur backpack is designed to be a soft, velvet companion for any little explorer in your life. Using plush yarn makes the process incredibly satisfying, as the piece grows quickly and feels like a dream in your hands. You will love seeing this little guy come to life, from his big, expressive eyes to those sweet textured wings. It is the perfect blend of amigurumi charm and practical gear that kids will actually want to carry everywhere.

Intermediate 8-10 Hours

Materials Needed for Baby Dino Amigurumi Backpack Pattern

β€” Main Fabric

  • 01
    2.5 hanks of super bulky plush yarn in Gray (Himalaya Dolphin Baby or similar)
  • 02
    0.5 hanks of super bulky plush yarn in Bright Yellow for the wings and spikes
  • 03
    0.3 hanks of super bulky plush yarn in Beige for the horns and accents
  • 04
    Small amounts of cotton yarn (Yarnart Jeans) in White, Black, Yellow, and Green for the detailed eyes

β€” Tools Required

  • 01
    4mm crochet hook for the main backpack body and plush parts
  • 02
    2.5mm crochet hook for the detailed cotton eyes
  • 03
    Two 3cm metal D-rings or half-rings for strap attachment
  • 04
    One metal tuck lock or decorative buckle for the main closure
  • 05
    High-quality polyester fiberfill for the limbs and muzzle
  • 06
    Stitch markers to keep track of the 80-stitch rounds
  • 07
    Darning needle and standard sewing thread for assembly

Progress Tracker

0% Complete

β€” 1. Legs & Handles (Make 4) :

Info :

We will work these in continuous rounds. Two will be used as legs (joined to the body) and two as handles/arms (sewn on later).

Round 1 :

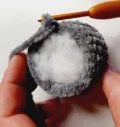
Using beige yarn, ch 2 and work 6 sc into the second ch from your hook.

Round 2 :

Work 1 inc into every stitch around (12)

Round 3 :

Repeat (1 sc, 1 inc) 6 times (18)

Round 4 :

Repeat (2 sc, 1 inc) 6 times (24)

Round 5 :

Switch to gray yarn and work 24 sc into the BLO.

Round 6 :

Work 24 sc around.

Round 7 :

Work 24 sc around.

Round 8 :

Work 24 sc around.

Round 9 :

Work 24 sc around.

Round 10 :

Work 24 sc around.

Round 11 :

Work 24 sc around.

Info :

Stuff the piece with medium density. Fold the top flat and work 12 sc through both layers to close. For the legs, fasten off. For the arms, leave a long tail for sewing.

β€” 2. Tail :

Round 1 :

Using gray yarn, ch 2 and work 6 sc into the second ch from your hook.

Round 2 :

Repeat (1 sc, 1 inc) 3 times (9)

Round 3 :

Work 9 sc around.

Round 4 :

Repeat (2 sc, 1 inc) 3 times (12)

Round 5 :

Repeat (3 sc, 1 inc) 3 times (15)

Round 6 :

Repeat (4 sc, 1 inc) 3 times (18)

Round 7 :

Repeat (5 sc, 1 inc) 3 times (21)

Round 8 :

Repeat (1 sc, 1 inc) 3 times (24)

Round 9 :

Repeat (7 sc, 1 inc) 3 times (27)

Round 10 :

Repeat (8 sc, 1 inc) 3 times (30)

Round 11 :

Repeat (9 sc, 1 inc) 3 times (33)

Round 12 :

Repeat (10 sc, 1 inc) 3 times (36)

Round 13 :

Work 36 sc around.

Round 14 :

Work 36 sc around.

Round 15 :

Work 36 sc around.

Info :

Stuff with medium-density filler. Fold the opening flat and work 18 sc through both sides to close.

β€” 3. Backpack Bottom :

Info :

Note: The starting ch 2 at the beginning of rounds does not count as a stitch. Always join with a sl st to the first stitch of the previous round.

Round 1 :

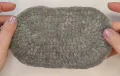
Ch 16. Starting in the 3rd ch from hook: 3 dc in one loop, 12 dc, 6 dc in the last loop. Working down the other side: 12 dc, 3 dc in the final loop, sl st to join (36)

Round 2 :

Ch 2, 3 inc dc, 12 dc, 6 inc dc, 12 dc, 3 inc dc, sl st to join (48)

Round 3 :

Ch 2, repeat (1 inc dc, 1 dc) 3 times, 12 dc, repeat (1 inc dc, 1 dc) 6 times, 12 dc, repeat (1 inc dc, 1 dc) 3 times, sl st to join (60)

Round 4 :

Ch 2, repeat (1 inc dc, 2 dc) 3 times, 12 dc, repeat (1 inc dc, 2 dc) 6 times, 12 dc, repeat (1 inc dc, 2 dc) 3 times, sl st to join (72)

β€” 4. Backpack Body :

Round 5 :

5 sc, 12 sc through both the body and the first leg, 5 sc, 12 sc through the body and the second leg, 7 sc, 5 sc through the body and a metal D-ring, 18 sc through the body and the tail, 5 sc through the body and the second D-ring, 3 sc, sl st to join (72)

Round 6 :

Ch 2. In BLO: 1 inc dc, 5 dc, 1 inc dc, 22 dc, 1 inc dc, 5 dc, 2 inc dc, 5 dc, 1 inc dc, 22 dc, 1 inc dc, 5 dc, 1 inc dc, sl st to join (80)

Round 7 :

Ch 2, 80 dc, sl st to join (80)

Round 8 :

Ch 2, 80 dc, sl st to join (80)

Round 9 :

Ch 2, 80 dc, sl st to join (80)

Round 10 :

Ch 2, 80 dc, sl st to join (80)

Round 11 :

Ch 2, 80 dc, sl st to join (80)

Round 12 :

Ch 2, 80 dc, sl st to join (80)

Round 13 :

Ch 2, 80 dc, sl st to join (80)

Round 14 :

Ch 2, 80 dc, sl st to join (80)

Round 15 :

Ch 2, 80 dc, sl st to join (80)

Round 16 :

Ch 2, 80 dc, sl st to join (80)

Round 17 :

Ch 2, 80 dc, sl st to join (80)

Round 18 :

62 dc, 8 dc through the body and the prepared strap piece (grabbing the post of the stitches), 10 dc, fasten off (80)

β€” 5. Straps :

Round 1 :

Ch 202. Starting in the 3rd ch from hook: 3 hdc in one loop, 198 hdc, 6 hdc in the last loop. Down the other side: 198 hdc, 3 hdc in the final loop. Fasten off leaving a tail.

β€” 6. Valve (Flap) :

Info :

Attach your thread to the back side of the backpack where you marked the center. Work in rows.

Row 1 :

Ch 2, 28 dc, turn (28)

Row 2 :

Ch 2, 28 dc, turn (28)

Row 3 :

Ch 2, 28 dc, turn (28)

Row 4 :

Ch 2, 28 dc, turn (28)

Row 5 :

Ch 2, 28 dc, turn (28)

Row 6 :

Ch 2, 28 dc, turn (28)

Row 7 :

Ch 2, 28 dc, turn (28)

Row 8 :

Ch 2, 1 dec, 24 dc, 1 dec, turn (26)

Row 9 :

Ch 2, 1 dec, 22 dc, 1 dec, turn (24)

Row 10 :

Ch 2, 1 dec, 20 dc, 1 dec, turn (22)

Row 11 :

Ch 2, 1 dec, 18 dc, 1 dec, turn (20)

Row 12 :

Ch 1, 2 dec sc, 2 sc, 1 hdc, 6 dc, 1 hdc, 2 sc, 2 dec sc, fasten off (16)

Strapping :

Work a border of sc around the entire valve. Place 3 sc in the corners to keep them flat.

β€” 7. Eyes & Muzzle :

Eye Round 1 :

With black cotton yarn: 12 dc into a MR. Fasten off.

Eye Round 2 :

Attach yellow cotton: 2 inc sc, 1 inc hdc, 6 inc dc, 1 inc hdc, 2 inc sc. Fasten off (24)

Eye Round 3 :

Attach green cotton: 24 sl st around. Fasten off.

Squirrels :

With white cotton: Ch 12. R1: Start in 3rd ch, 9 dc, 6 dc in one loop, 9 dc, ch 2, turn. R2: 9 dc, 6 inc dc, 9 dc. Fasten off.

Eyelid :

With gray plush: Ch 10. Start in 2nd ch, 2 sc, 2 hdc, 3 dc in one loop, 2 hdc, 2 sc. Fasten off.

Muzzle R1 :

With gray plush: Ch 10. Start in 2nd ch, 3 sc in one loop, 7 sc, 6 sc in last loop, 7 sc, 3 sc in final loop (26)

Muzzle R2 :

3 inc, 7 sc, 6 inc, 7 sc, 3 inc (38)

Muzzle R3-4 :

Work 38 sc around for two rounds.

Muzzle R5 :

Repeat (1 sc, 1 inc) 3 times, 7 sc, repeat (1 sc, 1 inc) 6 times, 7 sc, repeat (1 sc, 1 inc) 3 times (50)

Muzzle R6 :

Work 50 sc around. Fasten off leaving a tail.

β€” 8. Wings & Horns :

Horns :

With beige: R1: 6 sc in MR. R2: 3 sc, 3 hdc (6). R3: 2 sc, 1 inc sc, 2 hdc, 1 inc hdc (8). R4: 3 sc, 1 inc sc, 3 hdc, 1 inc hdc (10). R5: 4 sc, 1 inc sc, 4 hdc, 1 inc hdc (12). R6: 5 sc, 1 inc sc, 5 hdc, 1 inc hdc (14). R7: 4 sc, fold and close with 7 sc.

Wing Side 1 :

With yellow: Ch 26. R1: 7 tr, 7 dc, 4 hdc, 4 sc. R2: 19 sc. R3: 5 tr, 5 dc, 4 hdc, 5 sc. R4: 16 sc. R5: 4 tr, 4 dc, 3 hdc, 5 sc. R6: 13 sc. R7: 3 tr, 4 dc, 3 hdc, 3 sc. Fasten off.

Wing Side 2 :

With yellow: Ch 17. R1: 3 tr, 4 dc, 3 hdc, 3 sc. R2: 13 sc, ch 8. R3: 4 tr, 4 dc, 3 hdc, 5 sc. R4: 16 sc, ch 8. R5: 5 tr, 5 dc, 4 hdc, 5 sc. R6: 19 sc, ch 8. R7: 7 tr, 7 dc, 4 hdc, 4 sc. Fasten off.

Wing Border :

Place two wing sides together and join with beige plush yarn using sc around the edges. Use 3 sc in corners.

Assembly Instructions

  • Begin by sewing the black and yellow eye circles onto the white squirrel pieces, positioning them toward the outer edge. Use white thread to embroider small light reflections.
  • Attach the eyes to the valve flap at the level of the 5th row, leaving exactly 5 stitches between them for a balanced look.
  • Stuff the gray muzzle lightly and sew it below the eyes. The bottom of the muzzle should sit just above where the lock will be placed.
  • Position the horns on top of the valve, angling them slightly outward, and sew them securely through the first and second rows of the flap.
  • Attach the yellow ears to the sides of the valve at eye level, ensuring the pointy ends face outward.
  • Sew the wings to the back of the backpack, aligning them with the side folds so they sit symmetrically when the bag is worn.
  • Complete the dino by embroidering two beige 'nostrils' on the muzzle and attaching the tail spikes and the main metal lock to the valve.

Important Notes

  • πŸ’‘Always use a sewing needle and matching thread for the detailed parts; using plush yarn for sewing can create bulky, messy seams.
  • πŸ’‘When working with velvet yarn, avoid pulling too hard on the magic ring as it can snap; try the ch 2 method if you find the yarn shedding.
  • πŸ’‘Steam the valve flap gently through a thin cloth after finishing to help it lay flat and prevent the edges from curling.
  • πŸ’‘Ensure your metal D-rings are centered perfectly on the base during Round 5 so the backpack hangs straight on the child's back.
  • πŸ’‘If the drawstring cord ends are fraying, you can carefully use a lighter to melt the tips of synthetic yarn to seal them.
  • πŸ’‘Count your 80 stitches every few rounds of the body to make sure you haven't accidentally dropped or added a stitch.

I hope you have as much fun making this little prehistoric pal as I did! There is something so rewarding about seeing a pile of soft yarn transform into a character with so much personality. Whether this becomes a cherished gift or a fun project for yourself, it is sure to bring a smile to anyone who sees it. Don't forget to take a moment to fluff up the wings and adjust the eyelids to give your dino its own unique expression. Happy crocheting, and may your stitches always be cozy! πŸ§ΆπŸ¦–βœ¨

You ask,

we answer.

FAQs

Is this backpack big enough for a toddler?

Yes! At roughly 25cm wide and 20cm tall, it is the perfect size for a toddler or preschooler to carry their favorite toy, a snack, and a small juice box.

Can I use regular worsted weight yarn instead?

You can, but the backpack will turn out much smaller and less structured. If you switch, you'll need to adjust your hook size and the bag may not be sturdy enough to hold its shape.

How do I clean the velvet yarn if it gets dirty?

I recommend spot cleaning with a damp cloth and mild soap. If it needs a deep clean, hand wash in cold water and air dry to keep the plush texture from matting.

Do I really need the metal accessories?

They definitely help with durability and give it a professional look, but you can certainly crochet simple loops or use large buttons if you prefer a completely soft toy.