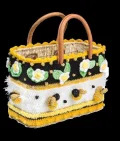
🧢 Beautiful ✨ Detailed πŸ’ Adorable

Bee-utiful Basket Bag Crochet Pattern

Bee-utiful Basket Bag Crochet Pattern
4.1β˜…Rating
5-8 HoursTime Needed
3.8KMade This
βœ‚οΈ

Intermediate Level

Ideal for those with basic crocheting experience, featuring slightly more advanced stitches and techniques to expand your skills.

⏱️

Weekend Treat

Takes 5-7 hours, making it an enjoyable project to finish over a couple of days.

🐰

Whimsical Buddy

Playful characters full of personality, designed to spark imagination and become cherished playtime favorites.

About This Bee-utiful Basket Bag Crochet Pattern

Bee-utiful Basket Bag Crochet Pattern crochet pattern - detailed view

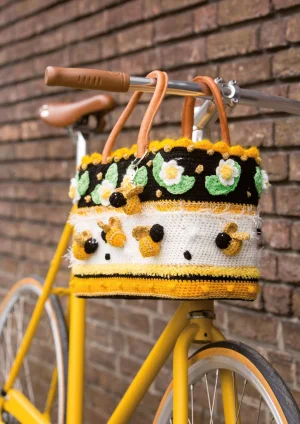
This bag is a total conversation starter for farmer's markets or beach days, making it a wonderful handmade gift for the nature lover in your life who appreciates a touch of whimsy.

Why You'll Love This Bee-utiful Basket Bag Crochet Pattern

I am absolutely obsessed with how the different textures come together hereβ€”the fuzzy Panda yarn mixed with the smooth cotton looks so high-end! Plus, making the tiny bees is incredibly satisfying and they are just so cute once you add their little bead eyes.

Bee-utiful Basket Bag Crochet Pattern step 1 Bee-utiful Basket Bag Crochet Pattern step 2 Bee-utiful Basket Bag Crochet Pattern step 3 Bee-utiful Basket Bag Crochet Pattern step 4

Switch Things Up

I’ve always felt that straw bags are like a blank canvas just waiting for a bit of yarn magic. There’s something so satisfying about taking a mass-produced item and giving it a soul with your own two hands. When I first worked on this design, I was really struck by the contrast between the rustic straw and the softness of the Scheepjes Panda yarnβ€”it adds this ethereal, fuzzy halo that makes the white stripes look like soft clouds.

My biggest tip for you is to not be afraid of the assembly part. I know, I know, we all love the crocheting more than the sewing! But taking that extra time to pin your bees and flowers exactly where you want them makes all the difference. I like to imagine the bees are actually flying in a little path across the bag. If you’re feeling extra creative, you could even add a few more bees or change up the flower colors to match your favorite summer outfit. This bag isn't just an accessory; it’s a whole mood. Every time I take mine out, it’s like carrying a little piece of a sunny meadow with me.

Common Mistakes & How to Fix Them

βœ— If you crochet the initial chain too tightly, the cover won't slide over the straw bag, so keep your tension relaxed at the start.βœ— Spacing the bobbles can be tricky; if you don't measure the 3.5 cm gap on Round 45, they'll look cluttered on one side and sparse on the other.βœ— When sewing the bees to the white section, make sure you don't sew through to the inside of the straw bag yet, or you'll lose the stretch needed to fit it.βœ— The Panda yarn is quite fuzzy, making it hard to see your stitches, so feel for the loops with your fingers rather than relying on sight.

Bee-utiful Basket Bag Crochet Pattern

Give your favorite straw bag a total makeover! We are turning a simple summer staple into a buzzing garden scene that is sure to turn heads. You will love seeing the little bees and flowers come to life as you work through the layers of color and texture. It is the perfect way to carry a bit of sunshine with you wherever you go, and it is a fantastic way to practice working with unique yarn types.

Intermediate 5-8 Hours

Materials Needed for Bee-utiful Basket Bag Crochet Pattern

β€” Main Fabric

  • 01
    Scheepjes Colour Crafter in Black, White, and Yellow Ochre
  • 02
    Scheepjes Softy in Yellow
  • 03
    Scheepjes Panda in White for a fuzzy texture
  • 04
    Scheepjes Softfun in Denim Green for the leaves
  • 05
    Scheepjes Twinkle in Gold for a bit of sparkle

β€” Tools Required

  • 01
    5 mm crochet hook
  • 02
    Straw bag (approx. 84 cm circumference and 21 cm tall)
  • 03
    Fiberfill stuffing for the bees
  • 04
    Gold-colored beads (rocaille beads) for eyes
  • 05
    Keychain with ring (optional)
  • 06
    Yarn needle
  • 07
    Scissors

Progress Tracker

0% Complete

β€” 1. Special Stitch: Bobble :

Info :

To make a bo: Pull up a loop through your fabric. YO, insert hook in the same spot, and pull up a loop. Repeat this two more times until you have 7 loops on your hook. YO and pull through all 7 loops. ch 1, then insert hook back into the work, pull up a loop, and finish with 1 sl st. Pull tight and fasten off.

β€” 2. Main Bag Cover :

Info :

Using black yarn, create a foundation chain that fits around the circumference of your bag. Join with a sl st to work in rounds.

Round 1 :

sc in every ch around.

Round 2 :

sc in each st around.

Round 3 :

sc in each st around.

Round 4 :

sc in each st around.

Round 5 :

sc in each st around.

Round 6 :

sc in each st around.

Round 7 :

sc in each st around.

Round 8 :

sc in each st around.

Round 9 :

sc in each st around.

Round 10 :

sc in each st around.

Round 11 :

sc in each st around.

Round 12 :

sc in each st around.

Round 13 :

sc in each st around. (Total black section should be roughly 6 cm).

Round 14 :

Switch to yellow ochre and sc in each st around.

Round 15 :

sc in each st around.

Round 16 :

sc in each st around.

Round 17 :

sc in each st around.

Round 18 :

sc in each st around. (Total yellow ochre section should be roughly 2 cm).

Round 19 :

Switch to white and sc in each st around.

Round 20 :

sc in each st around.

Round 21 :

sc in each st around.

Round 22 :

sc in each st around.

Round 23 :

sc in each st around.

Round 24 :

sc in each st around.

Round 25 :

sc in each st around.

Round 26 :

sc in each st around.

Round 27 :

sc in each st around.

Round 28 :

sc in each st around.

Round 29 :

sc in each st around.

Round 30 :

sc in each st around.

Round 31 :

sc in each st around.

Round 32 :

sc in each st around.

Round 33 :

sc in each st around.

Round 34 :

sc in each st around.

Round 35 :

sc in each st around. (Total white section should be roughly 7 cm).

Round 36 :

Switch to gold and sc in each st around.

Round 37 :

Switch to yellow and sc in each st around.

Round 38 :

sc in each st around.

Round 39 :

sc in each st around.

Round 40 :

sc in each st around. (Total yellow section should be roughly 1 cm).

Round 41 :

Switch to black and sc in each st around.

Round 42 :

sc in each st around. (Total black section should be roughly 1 cm).

Round 43 :

Switch to yellow ochre and sc in each st around.

Round 44 :

sc in each st around.

Round 45 :

sc in each st around.

Round 46 :

sc in each st around.

Round 47 :

sc in each st around. (Total yellow ochre section should be roughly 2 cm).

Round 48 :

Switch to black and sc in each st around.

Round 49 :

sc in each st around.

Round 50 :

sc in each st around.

Round 51 :

sc in each st around.

Round 52 :

sc in each st around.

Round 53 :

sc in each st around. (Total black section should be roughly 2 cm). Fasten off.

β€” 3. Bag Top Edging :

Info :

Slide the finished cover onto the straw bag. Reattach yellow ochre yarn to the top edge.

Round 1 :

sc in each st around, but skip a few sts where the bag handles are located.

Round 2 :

sc in each st around.

Round 3 :

1 sc, *ch 5, skip 4 sts, 1 sc*, repeat from * to * around.

Round 4 :

Work into the ch-loops from the previous round: *1 sc, 1 hdc, 1 dc, 1 hdc, 1 sc* in each loop around.

β€” 4. Flowers (Make 10) :

Round 1 :

Using white, work 18 sc into a MR. Join with a sl st.

Round 2 :

*ch 3, 1 dc in next st, ch 3, sl st in next st*. Repeat from * to * 5 more times to make 6 petals. Fasten off.

Info :

With yellow, join to the middle of the flower. Work 1 sc around the base of the previous round's sc, skip 1 st, then 1 sc. Repeat until you have 9 center sts. Fasten off.

β€” 5. Leaves :

Row 1 :

Using green, ch 9. In 2nd ch from hook, work 1 sc. Then 1 hdc in next ch, 1 dc, 1 tr, 1 dc, 1 hdc, 1 sc. ch 2 and rotate to work on the other side of the chain: 1 sc, 1 hdc, 1 dc, 1 tr, 1 dc, 1 hdc, 1 sc. Fasten off, leaving a long tail for sewing.

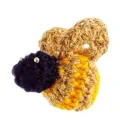
β€” 6. Bee - Head :

Round 1 :

Using black, work 6 sc into a MR.

Round 2 :

Work 2 sc in every st (12).

Round 3 :

sc in each st around (12).

Round 4 :

Work 6 x sc2tog (6). Fasten off and stuff.

β€” 7. Bee - Body :

Round 1 :

Using yellow ochre, work 6 sc into a MR.

Round 2 :

Work 2 sc in every st (12). Switch to gold.

Round 3 :

*1 sc, 2 sc in next st*, repeat around (18). Switch to yellow ochre.

Round 4 :

sc in each st around (18). Switch to gold.

Round 5 :

sc in each st around (18). Switch to yellow ochre.

Round 6 :

*1 sc, sc2tog*, repeat around (12).

Round 7 :

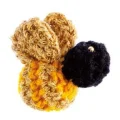
Work 6 x sc2tog (6). Fasten off and stuff. Sew head and body together.

β€” 8. Bee - Wings (Make 2 per Bee) :

Round 1 :

Using gold, work 6 sc into a MR. Turn your work.

Round 2 :

Work 2 hdc in every st. Fasten off and sew to the body.

Assembly Instructions

  • Slide your finished crochet cover over the straw bag and ensure it is positioned correctly before starting any sewing.
  • Attach the green leaves to the underside of your flowers, then sew the flowers onto the black section (Rounds 1-13) of the bag cover.
  • Position the bees across the white section (Rounds 19-35) and sew them securely in place.
  • Add the decorative surface chains: work a gold chain onto Round 14, a fuzzy white Panda chain onto Round 18, and another gold chain onto Round 47.
  • Apply the individual yellow bobbles to Round 45, making sure to space them evenly about 3.5 cm apart.
  • Finish the embellishments by adding gold bobbles around the flowers and black or white bobbles near the bees for extra texture.
  • To keep the cover from sliding, sew the top and bottom edges of the crochet work directly to the straw bag, folding the bottom black edge over as you go.

Important Notes

  • πŸ’‘Check the fit of your cover frequently as you work; straw bags can vary slightly in size, and you may need to adjust your stitch count.
  • πŸ’‘When working with the Panda yarn, keep your stitches loose so you can feel the loops, as the fuzz makes them hard to see.
  • πŸ’‘Use a strong sewing thread or a strand of your main yarn to secure the cover to the straw bag for maximum durability.
  • πŸ’‘If you want to use the bag as a keychain, make one extra bee and attach it to a metal ring before securing it to the bag handle.
  • πŸ’‘Vary the placement of your bees to give the bag a more natural, dynamic look rather than a rigid grid pattern.

I can't wait to see your version of this bag! Whether you stick to these classic garden colors or branch out with your own palette, the result is going to be absolutely stunning. Remember to take your time with the finishing touchesβ€”those little gold beads and fuzzy white stripes are what really make the design pop. Once you've finished, you'll have more than just a bag; you'll have a piece of wearable art that brings a smile to everyone who sees it. Happy stitching, and enjoy every moment of your creative journey! 🧢✨

You ask,

we answer.

FAQs

Can I use a different yarn weight for the bag cover?

You can, but it will change the dimensions. If you use a heavier yarn, you'll reach the 21 cm height much faster and might need a larger bag. Stick to DK weight for the most accurate fit.

How do I make sure the cover doesn't slide off?

The best way is to sew the top and bottom edges of the crochet fabric directly to the straw of the bag using a matching yarn or heavy-duty thread.

Is the Panda yarn necessary for the white stripes?

It's not strictly necessary, but that specific yarn gives the bag its signature 'fuzzy cloud' look. You can substitute it with any bulky white yarn if you prefer.

How many bees should I make?

The pattern recommends 8 bees for the bag and one optional bee for a keychain, but feel free to add more if you want a busier garden look!