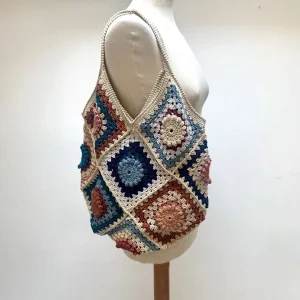
Get ready to create your next favorite accessory! This gorgeous shoulder bag blends rich tones of blue, rose, and warm brown into a stunning diagonal layout. It is the perfect project to sink your teeth into, offering a beautiful rhythm of textured popcorn stitches and classic granny construction. You will love watching the colors play together as you piece this masterpiece together step-by-step.
Progress Tracker
0% Complete
— 1. Granny Square (Make 13) :
Round 1 :
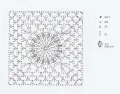
Using your first color choice, begin with a magic loop. Work ch 3 (counts as first dc), then work 15 dc into the loop. Join with a sl st to the third chain of your starting chain. (16 dc)
Round 2 :
Work ch 3, then work 1 dc directly into the base of that chain. Work 2 dc into every remaining stitch around. Join with a sl st to the third chain of your starting chain. (32 dc)
Round 3 :
Work ch 3, then *work 1 popcorn in the next stitch, followed by 1 dc in the next stitch*. Repeat from * to * 15 times. Finish with 1 popcorn in the last stitch, then join with a sl st to the third chain of your starting chain. (16 popcorns, 16 dc)
Round 4 :
Work ch 1, then work 1 sc into the third chain of the previous round. *Work ch 2, skip the next popcorn stitch, and work 1 sc into the next stitch*. Repeat from * to * 15 times. Work ch 2, then join with a sl st to the first sc of the round. Fasten off this color.
Round 5 :
Attach your second color choice. Work ch 3 and 2 dc into the same ch-sp. Work ch 1. *Work 3 dc into the next ch-sp, then work ch 1*. Repeat from * to * 15 times. Join with a sl st to the third chain of your starting chain. Fasten off this color.
Round 6 :
Attach your third color choice. Work [ch 3, 2 dc, ch 3, 3 dc] directly into the same ch-sp to form your first corner. *Work ch 1, 3 dc in the next space, ch 1, 3 dc in the next space, ch 1, 3 dc in the next space, ch 1, then work [3 dc, ch 3, 3 dc] in the corner space*. Repeat from * to * 3 times. Work ch 1, 3 dc in the next space, ch 1, 3 dc in the next space, ch 1, 3 dc in the next space, ch 1. Join with a sl st to the third chain of your starting chain, then work 3 sl st to slip across to the corner ch-sp.
Round 7 :
Repeat the stitch pattern from Round 6, increasing by working one additional group of 3 dc along each of the four sides of your square. Fasten off this color.
Round 8 :
Attach your fourth color choice. Repeat the stitch pattern from Round 6, adjusting the number of 3 dc groups along each side to fit the larger size.
Round 9 :
Using the same fourth color, repeat the stitch pattern to grow the square by one more round of 3 dc groups. Fasten off this color.
Round 10 :
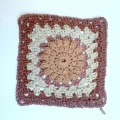
Attach your cream yarn (Color 04). Repeat the stitch pattern once more to complete the final round of your granny square. Fasten off and weave in your ends.
— 2. Joining the Squares :
Info :
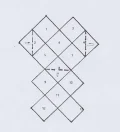
Lay out your 13 finished squares following the assembly diagram. To join them, place the squares with their wrong sides facing together.
Assembly :
Using your cream yarn, join the squares by working 1 sl st through the corner ch-sp of both adjacent squares, followed by ch 3. Repeat this joining sequence across the edges to assemble the diagonal bag body.
— 3. Inner Edging :
Row 1 :
Attach your cream yarn to the inner edge of one side of the bag. Work 1 sc in each stitch across the entire inner edge.
Row 2 :
Work ch 1, turn, and work 1 sc in each stitch across.
Row 3 :
Work ch 1, turn, and work 1 sc in each stitch across.
Row 4 :
Work ch 1, do not turn. Work 1 crab st in each stitch from left to right along the edge to create a textured, sturdy border. Fasten off.
Info :
Repeat Rows 1 through 4 on the opposite inner edge of the bag.
— 4. Outer Edging & Handles :
Round 1 :
Attach your cream yarn to the outer edge. Work sc stitches along the edge, and when you reach the handle position, work ch 60 to form the first handle. Continue working sc stitches along the opposite outer edge, and work another ch 60 for the second handle. Join with a sl st to the first stitch.
Round 2 :
Work 1 sc in each stitch and each chain of the handles all the way around the outer perimeter. Join with a sl st.
Round 3 :
Work 1 sc in each stitch around to reinforce the handles and edges. Join with a sl st.
Round 4 :
Work 1 sc in each stitch around for the final round. Fasten off and weave in all remaining yarn tails securely.
I can't wait to see your beautiful new granny shoulder bag come to life! There is something so magical about watching simple motifs transform into a gorgeous, slouchy, bohemian accessory. Fill it with your latest WIPs, take it to the farmer's market, or gift it to someone who appreciates the beauty of slow fashion. Happy stitching, my lovely craft friends! 🧶✨