About This Boho Pocket Wall Hanging Crochet Pattern
This makes a genuinely thoughtful housewarming gift — practical enough to actually use and beautiful enough to be the first thing someone notices when they walk into a room.
Ideal for those with basic crocheting experience, featuring slightly more advanced stitches and techniques to expand your skills.
Takes 5-7 hours, making it an enjoyable project to finish over a couple of days.
A warm touch for your space that transforms ordinary corners into inviting nooks filled with handmade charm.
This makes a genuinely thoughtful housewarming gift — practical enough to actually use and beautiful enough to be the first thing someone notices when they walk into a room.
I'll be honest — the first time I made the diamond stitch, I had to read the row 3 instructions about four times before it clicked. But once it did? I couldn't stop. There's something almost meditative about the rhythm of FPtr, sc, FPtr2tog repeating across the row, and watching that lattice build up is genuinely exciting. I love that this pattern gives you two very different techniques in one project — the sculptural texture of the diamond section and the quiet simplicity of the BLO pocket rows. It keeps things interesting all the way through.


I made this wall hanging for the first time on a rainy Saturday when I really just wanted a project that felt like it was going somewhere. You know those days when you need to see something take shape? This was exactly that.
The diamond stitch section is the heart of it, and I won't pretend row 3 didn't make me put my hook down for ten minutes. But once the logic clicked — FPtr anchoring down into the fabric, the sc 3 sitting between, FPtr2tog pulling those raised lines into a V — I actually got excited to keep going. Every four rows you see another diamond close up, and it never gets old.
Here's a tip I wish someone had told me: use a locking stitch marker to flag the stitch you're supposed to work your FPtr into at the beginning of each post-stitch row. In the rhythm of sc, sc, FPtr, it's surprisingly easy to drift one stitch off, and catching that mistake four rows later is genuinely painful.
For the pocket rows, the BLO work feels like a completely different project — quiet, rhythmic, almost restful after all the texture work above. I actually love that contrast. It's like the pattern shifts gears at row 40 and gives you a chance to settle in.
One thing I'd love to try next time: a warm terracotta or dusty sage instead of the grey. The diamond stitch reads beautifully in any solid, and a warmer tone would feel more bohemian while a cool neutral keeps it modern. You could also skip the bead entirely and let the fringe be the star — both looks are gorgeous.
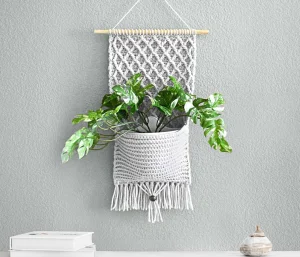
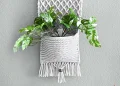
This wall hanging is one of those projects that looks way more complicated than it actually is — and that's exactly what makes it so satisfying to finish. You'll work a gorgeous diamond stitch panel, then build a little pocket right into the bottom that's perfect for a small plant, some mail, or anything you want displayed with intention. It's the kind of piece that makes a plain wall feel curated. If you've been wanting to add something handmade and a little boho to your home, this is your moment.
Turning chain guide: At the beginning of sc rows and FPtr rows, ch 1. At the beginning of dc rows, ch 2. In both cases, the turning chain does not count as a stitch.
FPtr: YO twice, insert hook from the front around the post of the target stitch. YO and pull up a loop. (YO, pull through 2 loops) three times to complete the stitch.
FPtr2tog (forms an upside-down V shape): Work FPtr steps 1–4 around the post of the first target stitch, leaving 2 loops on the hook. YO twice and insert hook around the post of the next target stitch. YO and pull up a loop. (YO, pull through 2 loops) twice. YO and pull through all 3 remaining loops on the hook.
Important: After completing any FPtr or FPtr2tog, always skip one stitch before working the next group of sc 3. Keep this in mind throughout every diamond stitch row.
Ch 30. Beginning in the 2nd ch from the hook, sc into the back bump of each ch across. (29)
Ch 2, dc into each st across. (29)
Ch 1. Work a FPtr around the 2nd st from the right edge of row 1. [Skip 1 st, sc into the next 3 sts of row 2, FPtr2tog working into the same st as the last FPtr and then skipping 3 sts of row 1 to work into the 4th st] 6 times. When 5 sts remain, skip 1 st, sc into the next 3 sts of row 2. Work an FPtr into the same st as the last FPtr from row 1, stopping before the final step (2 loops remain on hook). Complete with a sl st by inserting the hook into the last st, pulling up a loop and drawing it through both loops on the hook. (29)
Ch 2, dc into each st across. (29)
Ch 1. Sc 2. FPtr2tog working around the first FPtr from row 3 and then around the following FPtr2tog (around the whole upside-down V). [Skip 1 st, sc into the next 3 sts of row 4, FPtr2tog working around the last FPtr2tog just used and then around the next FPtr2tog from row 3] 5 times. When 7 sts remain, skip 1 st, sc into the next 3 sts of row 4. FPtr2tog working around the last FPtr2tog used and then around the final FPtr from row 3. Skip 1 st, sc into the last 2 sts. (29)
Ch 2, dc into each st across. (29)
Ch 1. FPtr around the first FPtr2tog from row 5. [Skip 1 st, sc into the next 3 sts of row 6, FPtr2tog working around the last FPtr2tog just used and then around the next FPtr2tog from row 5] 6 times. When 5 sts remain, skip 1 st, sc into the next 3 sts of row 6. Work a FPtr around the last FPtr2tog just used from row 5, stopping before completing the stitch (2 loops on hook). Finish with a sl st by inserting the hook into the last st, pulling up a loop and drawing it through both loops on the hook. (29)
Repeat rows 4–7 once. (29)
Repeat rows 4–7 once. (29)
Repeat rows 4–7 once. (29)
Repeat rows 4–7 once. (29)
Repeat rows 4–7 once. (29)
Repeat rows 4–7 once. (29)
Repeat rows 4–7 once. (29)
Repeat rows 4–7 once. (29)
Ch 1, sc into the BLO of each st across. (29)
Ch 1, sc into the BLO of each st across. (29)
Ch 1, sc into the BLO of each st across. (29)
Ch 1, working into the BLO throughout: sc 9, inc, sc 9, inc, sc 9. (31)
Ch 1, sc into the BLO of each st across. (31)
Ch 1, working into the BLO throughout: sc 10, inc, sc 9, inc, sc 10. (33)
Ch 1, sc into the BLO of each st across. (33)
Ch 1, working into the BLO throughout: sc 10, inc, sc 11, inc, sc 10. (35)
Ch 1, sc into the BLO of each st across. (35)
Ch 1, working into the BLO throughout: sc 17, inc, sc 17. (36)
Ch 1, sc into the BLO of each st across. (36)
Ch 1, working into the BLO throughout: sc 17, inc, sc 18. (37)
Ch 1, sc into the BLO of each st across. (37)
Ch 1, sc into the BLO of each st across. (37)
Ch 1, sc into the BLO of each st across. (37)
Ch 1, sc into the BLO of each st across. (37)
Ch 1, sc into the BLO of each st across. (37)
Ch 1, sc into the BLO of each st across. (37)
Ch 1, sc into the BLO of each st across. (37)
Ch 1, sc into the BLO of each st across. (37)
Ch 1, sc into the BLO of each st across. (37)
Ch 1, sc into the BLO of each st across. (37)
Ch 1, sc into the BLO of each st across. (37)
Ch 1, sc into the BLO of each st across. (37)
Ch 1, sc into the BLO of each st across. (37)
Ch 1, sc into the BLO of each st across. (37)
Ch 1, sc into the BLO of each st across. (37)
Ch 1, sc into the BLO of each st across. (37)
Fasten off and weave in all ends securely.
Cut 30 strands of yarn each measuring 5.5 inches, and a separate set of 7 strands each measuring 8.5 inches.
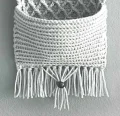
Work 15 tassels along the bottom edge, placing one in every other stitch and starting from one corner. Each tassel uses 2 of the 5.5-inch strands: fold them together in half, insert your hook up through the back of the stitch, catch the folded loop, and pull the cut ends through it. Tighten snugly.
Identify the 7 center tassels. Add one strand of the 8.5-inch yarn on top of each of those 7 tassels, using the same lark's head method.
Take one long strand from a center tassel (or both strands if your bead has a larger hole) and thread it through the decorative bead. If needed, tie a knot just below the bead to hold it in place.
Trim the remaining long strands that weren't threaded through the bead so they sit level with the shorter 5.5-inch tassels.
There's something really special about finishing a piece that lives on your wall rather than in a drawer. Every time you walk past it, you'll notice something — the way the diamond lattice catches afternoon light, the little fringe swaying, the plant sitting perfectly in its crocheted pocket. 🧶 This pattern gives you all of that, and it's honestly such a satisfying make from start to finish. Whether you gift it or keep it for yourself, it brings that handmade warmth to a space in a way that's hard to fake. Happy hooking! ✨
You can, but the pattern is written for size 4 worsted weight yarn with a 5 mm hook. Going up to bulky weight will make the finished piece noticeably wider and the pocket deeper, and the diamond stitch texture may look chunkier than the original. If you swap yarn weights, swatch both stitch sections first since the gauge note covers both the diamond and the pocket separately.
If you're comfortable with single and double crochet and you've done at least some basic shaping, you can absolutely learn FPtr through this project. The diamond stitch rows repeat in a four-row sequence, so once rows 3–7 make sense to you, the rest of the panel is just muscle memory. Take it slowly on row 3 the first time and re-read the FPtr2tog instructions before you start each new FPtr row.
The most common culprit is forgetting to skip a stitch after every FPtr or FPtr2tog before working the sc 3 sequence. That skip is what gives the raised post stitches room to sit on top of the fabric without dragging the surrounding stitches. If your panel is puckering, check that you're consistently skipping before every sc group.
The finished piece is 8 inches wide, so a dowel that's 10–12 inches long works well — it gives a little overhang on each side that looks intentional and gives you room to tie the hanging cord without it sliding. Anything roughly that length at whatever thickness you like will work fine since the yarn simply wraps around it.
This usually happens when the seam yarn is pulled too tight while sewing the pocket edges. The pocket section is slightly wider than the base of the diamond panel due to the increases, so ease the seam gently and don't pull the sewing yarn taut. Pinning both layers together with locking stitch markers before you sew helps keep everything aligned.
