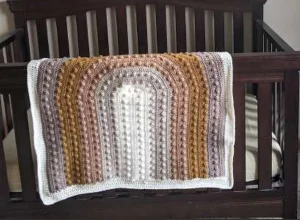
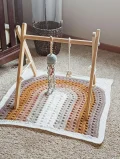
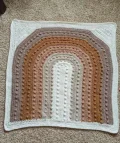
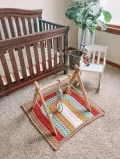
There is something so magical about watching a rainbow take shape under your crochet hook. This pattern is all about creating a stunning, textured heirloom that feels right at home in a modern nursery. You will love how the earthy tones blend together, and the rhythmic bobble stitches add a wonderful tactile element for little hands to explore. It is the kind of project that keeps you engaged without being overly stressful, making it a perfect companion for a cozy evening on the couch.
Progress Tracker
0% Complete
— 1. The Main Rainbow Arch :
Info :
Begin with Color 1 (Ivory).
Row 1 :
ch 56. Put 1 dc in the 2nd ch from your hook. dc 53. In the very last ch, work 6 dc. Rotate your piece to work along the opposite side of the foundation ch and dc 54. ch 2, turn.
Row 2 :
dc 54. Work 2 dc into each of the next 6 sts (this is your increase curve). dc 54. ch 1, turn.
Row 3 :
sc 2, [1 bobble, sc 3] across the entire row, placing your last bobble and sc as needed to finish the row. ch 2, turn.
Row 4 :
dc 54. 2 dc in each of the next 3 sts, dc 6, 2 dc in each of the next 3 sts. dc 54. ch 2, turn.
Row 5 :
dc 54. [2 dc in next st, dc 1] 3x, dc 6, [dc 1, 2 dc in next st] 3x. dc 54. ch 2, turn.
Row 6 :
dc 54. [2 dc in next st, dc 2] 3x, dc 6, [dc 2, 2 dc in next st] 3x. dc 54. ch 1, turn.
Colour Change :
Switch to Color 2 (Linen).
Row 7 :
sc 2, [1 bobble, sc 3] across until 2 sts remain, 1 bobble, sc 1. ch 2, turn.
Row 8 :
dc 54. [2 dc in next st, dc 3] 3x, dc 6, [dc 3, 2 dc in next st] 3x. dc 54. ch 2, turn.
Row 9 :
dc 54. [2 dc in next st, dc 4] 3x, dc 6, [dc 4, 2 dc in next st] 3x. dc 54. ch 2, turn.
Row 10 :
dc 54. [2 dc in next st, dc 5] 3x, dc 6, [dc 5, 2 dc in next st] 3x. dc 54. ch 1, turn.
Row 11 :
sc 2, [1 bobble, sc 3] across the row. ch 2, turn.
Row 12 :
dc 54. [2 dc in next st, dc 6] 3x, dc 6, [dc 6, 2 dc in next st] 3x. dc 54. ch 2, turn.
Row 13 :
dc 54. [2 dc in next st, dc 7] 3x, dc 6, [dc 7, 2 dc in next st] 3x. dc 54. ch 2, turn.
Colour Change :
Switch to Color 3 (Clay).
Row 14 :
dc 54. [2 dc in next st, dc 8] 3x, dc 6, [dc 8, 2 dc in next st] 3x. dc 54. ch 1, turn.
Row 15 :
sc 2, [1 bobble, sc 3] across the row. ch 2, turn.
Row 16 :
dc 54. [2 dc in next st, dc 9] 3x, dc 6, [dc 9, 2 dc in next st] 3x. dc 54. ch 2, turn.
Row 17 :
dc 54. [2 dc in next st, dc 10] 3x, dc 6, [dc 10, 2 dc in next st] 3x. dc 54. ch 2, turn.
Row 18 :
dc 54. [2 dc in next st, dc 11] 3x, dc 6, [dc 11, 2 dc in next st] 3x. dc 54. ch 1, turn.
Row 19 :
sc 2, [1 bobble, sc 3] across the row. ch 2, turn.
Row 20 :
dc 54. [2 dc in next st, dc 12] 3x, dc 6, [dc 12, 2 dc in next st] 3x. dc 54. ch 2, turn.
Colour Change :
Switch to Color 4 (Tobacco).
Row 21 :
dc 54. [2 dc in next st, dc 13] 3x, dc 6, [dc 13, 2 dc in next st] 3x. dc 54. ch 2, turn.
Row 22 :
dc 54. [2 dc in next st, dc 14] 3x, dc 6, [dc 14, 2 dc in next st] 3x. dc 54. ch 1, turn.
Row 23 :
sc 2, [1 bobble, sc 3] across the row. ch 2, turn.
Row 24 :
dc 54. [2 dc in next st, dc 15] 3x, dc 6, [dc 15, 2 dc in next st] 3x. dc 54. ch 2, turn.
Row 25 :
dc 54. [2 dc in next st, dc 16] 3x, dc 6, [dc 16, 2 dc in next st] 3x. dc 54. ch 2, turn.
Row 26 :
dc 54. [2 dc in next st, dc 17] 3x, dc 6, [dc 17, 2 dc in next st] 3x. dc 54. ch 1, turn.
Row 27 :
sc 2, [1 bobble, sc 3] across the row. ch 2, turn.
Colour Change :
Switch to Color 5 (Brownie).
Row 28 :
dc 54. [2 dc in next st, dc 18] 3x, dc 6, [dc 18, 2 dc in next st] 3x. dc 54. ch 2, turn.
Row 29 :
dc 54. [2 dc in next st, dc 19] 3x, dc 6, [dc 19, 2 dc in next st] 3x. dc 54. ch 2, turn.
Row 30 :
dc 54. [2 dc in next st, dc 20] 3x, dc 6, [dc 20, 2 dc in next st] 3x. dc 54. ch 1, turn.
Row 31 :
sc 2, [1 bobble, sc 3] across the row. ch 2, turn.
Row 32 :
dc 54. [2 dc in next st, dc 21] 3x, dc 6, [dc 21, 2 dc in next st] 3x. dc 54. ch 2, turn.
Row 33 :
dc 77. [2 dc in next st, dc 22] 2x, dc 6, [dc 22, 2 dc in next st] 2x. dc 77. Fasten off.
— 2. Top Corner Triangles :
Info :
Make two of these, one for each top corner. Use Color 5 or your border color.
Row 1 :
sk 77 sts from the edge. Join with sl st in the next st. sc 3, hdc 4, dc 11, hdc 4, sc 3, sl st. ch 1, turn.
Row 2 :
sk the sl st. sc2tog, sc 1, hdc 4, dc 11, hdc 4, sc 1, sc2tog. ch 1, turn.
Row 3 :
Work sc2tog twice. hdc 2, dc 11, hdc 2, then work sc2tog twice more. ch 2, turn.
Row 4 :
Work dc2tog twice. dc 11, then work dc2tog twice more. ch 2, turn.
Row 5 :
Work dc2tog twice. dc 7, then work dc2tog twice more. ch 2, turn.
Row 6 :
Work dc2tog twice. dc 3, then work dc2tog twice more. ch 2, turn.
Row 7 :
dc2tog, dc 3, dc2tog. ch 2, turn.
Row 8 :
dc2tog, dc 1, dc2tog. ch 2, turn.
Row 9 :
dc3tog. Fasten off.
— 3. Edging and Border :
Info :
Repeat the triangle process on the opposite top corner, counting 77 sts in from that side.
Top and Bottom Edging :
Work an even number of hdc across the top and bottom of the afghan (aim for about 80 sts on each end).
Border Round 1 :
Join your border color to any side with a sl st. ch 2. dc in every st around the entire blanket, working 5 dc into each of the four corner sts.
Border Round 2-3 :
Continue working dc rounds in the same way for 1 or 2 more rounds until you reach your desired border width. Fasten off and weave in all tails.
I hope you enjoy every moment of making this Boho Rainbow Afghan! There is nothing quite like seeing those earthy tiers of color come together to create something so cozy and stylish. Whether you are making this for your own little one or as a special gift, it is sure to be a piece that is cherished for years to come. Don't forget to take a moment to admire those bobbles once you're finished—they really are the stars of the show! Happy stitching, and I can't wait to see your finished rainbows. 🧶✨