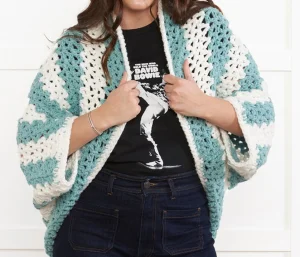
This oversized cardigan is basically a wearable hug. It is worked as one large square, so you do not have to worry about complex shaping or difficult sleeves. You will love how the super bulky fleece yarn works up fast, making it a perfect project for a rainy weekend. It is the kind of piece that feels just as good to make as it does to wear.
Progress Tracker
0% Complete
— 1. Cardigan Body — Size XS/S/M :
Info :
Stripe Pattern: Work 3 rows with Color A, then work 3 rows with Color B. rep this 6-row sequence throughout the project.
Info :
Using Color A, start by making a foundation ch of 99.
Row 1 :
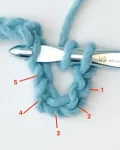
Work (1 dc, ch 1, 1 dc) into the 6th ch from your hook. The skipped 5 ch act as your first dc and a ch-2 sp. *Skip the next 2 ch, then work (1 dc, ch 1, 1 dc) into the following ch. rep from * until you have only 3 ch left. Skip 2 ch and work 1 dc into the final ch. Turn.
Row 2 :
ch 3 to start, which counts as your first dc. *Work (1 dc, ch 1, 1 dc) into the next ch-1 sp from the row below. rep from * across the row. End with 1 dc in the top of the turning ch. Turn.
Info :
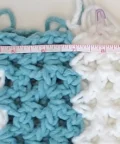
rep Row 2, following the Stripe Pattern sequence, until your work measures approximately 39 inches long. Ensure you finish after a full 3-row stripe of either color. Fasten off.
— 2. Cardigan Body — Size L/XL/2XL :
Info :
Stripe Pattern: Work 3 rows with Color A, then work 3 rows with Color B. rep this 6-row sequence throughout the project.
Info :
Using Color A, start by making a foundation ch of 108.
Row 1 :
Work (1 dc, ch 1, 1 dc) into the 6th ch from your hook. The skipped 5 ch act as your first dc and a ch-2 sp. *Skip the next 2 ch, then work (1 dc, ch 1, 1 dc) into the following ch. rep from * until you have only 3 ch left. Skip 2 ch and work 1 dc into the final ch. Turn.
Row 2 :
ch 3 to start, which counts as your first dc. *Work (1 dc, ch 1, 1 dc) into the next ch-1 sp from the row below. rep from * across the row. End with 1 dc in the top of the turning ch. Turn.
Info :
rep Row 2, following the Stripe Pattern sequence, until your work measures approximately 42 inches long. Ensure you finish after a full 3-row stripe of either color. Fasten off.
— 3. Cardigan Body — Size 3/4/5XL :
Info :
Stripe Pattern: Work 3 rows with Color A, then work 3 rows with Color B. rep this 6-row sequence throughout the project.
Info :
Using Color A, start by making a foundation ch of 114.
Row 1 :
Work (1 dc, ch 1, 1 dc) into the 6th ch from your hook. The skipped 5 ch act as your first dc and a ch-2 sp. *Skip the next 2 ch, then work (1 dc, ch 1, 1 dc) into the following ch. rep from * until you have only 3 ch left. Skip 2 ch and work 1 dc into the final ch. Turn.
Row 2 :
ch 3 to start, which counts as your first dc. *Work (1 dc, ch 1, 1 dc) into the next ch-1 sp from the row below. rep from * across the row. End with 1 dc in the top of the turning ch. Turn.
Info :
rep Row 2, following the Stripe Pattern sequence, until your work measures approximately 45 inches long. Ensure you finish after a full 3-row stripe of either color. Fasten off.
— 4. Assembly :
Info :
Lay your square flat and fold it in half with the wrong sides together, bringing the first and last rows to meet.
Info :
Measure 8 inches down from the folded top edge on both sides and place a marker. This creates your armhole openings.
Info :
Using Color A and your yarn needle, sew the side seams starting from the marker down to the bottom edge using a flat seam. Leave the markers in place for now.
— 5. Body Edging :
Info :
With the right side facing you, join Color B with a sl st to the front opening at the side seam.
Rnd 1 :
ch 1. Work 1 sc into the same sp as your join. Work 1 sc into every ch and dc all the way around the opening. Join with a sl st to the first sc. Do not turn. You should have 192 (210, 222) sts total.
Rnd 2 :
ch 1. Work 1 sc into every sc around the entire opening. Join with a sl st to the first sc and fasten off.
— 6. Armhole Edging :
Info :
With the right side facing, join Color B with a sl st to the armhole opening at the marker.
Rnd 1 :
ch 1. Working around the posts of the dc stitches, work 2 sc around each post evenly around the entire armhole. Join with a sl st to the first sc.
Rnd 2 :
ch 1. Work 1 sc into every sc around the armhole. Join with a sl st to the first sc and fasten off. rep for the second armhole.
Info :
Weave in all your yarn tails securely on the inside of the garment.
I really hope you enjoy making this cardigan as much as I did. It is one of those projects that feels so rewarding because you can see the progress with every single row. Once you are done, you will have the softest, most comfortable piece in your wardrobe. It is perfect for gifting, too — though you might find it hard to give away once you feel how soft it is! Happy stitching, and I cannot wait to see your finished cocoon. 🧶 ✨