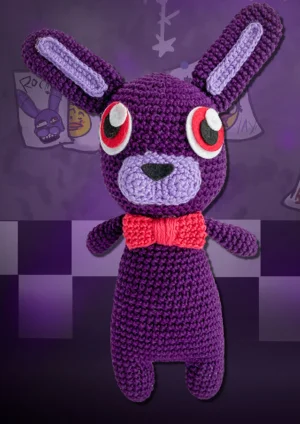
Get ready to bring a touch of spooky-cute charm to your crochet collection with this Bonnie the Bunny project. This pattern captures that iconic animatronic look with a vibrant purple body and a bright red bow tie that really pops. You will love the way the legs and body come together in one piece, making for a sturdy little rabbit that stands tall on any shelf. It is a satisfying build that feels like a real accomplishment once those oversized ears are finally attached.
Progress Tracker
0% Complete
— 1. Head :
Round 1 :
Using dark purple, start with a mr and work 6 sc into the ring (6)
Round 2 :
Work 1 inc in each st around (12)
Round 3 :
Repeat [1 sc, 1 inc] 6 times (18)
Round 4 :
Repeat [1 sc, 1 inc, 1 sc] 6 times (24)
Round 5 :
Repeat [3 sc, 1 inc] 6 times (30)
Round 6 :
Repeat [2 sc, 1 inc, 2 sc] 6 times (36)
Round 7 :
Repeat [5 sc, 1 inc] 6 times (42)
Round 8 :
Repeat [3 sc, 1 inc, 3 sc] 6 times (48)
Round 9-20 :
Work 1 sc in every st around (48)
Info :
If you are using safety eyes or preparing for felt placement, the eyes should sit between rounds 13 and 14, spaced about two inches apart.
Round 21 :
Repeat [3 sc, 1 dec, 3 sc] 6 times (42)
Round 22 :
Repeat [5 sc, 1 dec] 6 times (36)
Round 23 :
Repeat [2 sc, 1 dec, 2 sc] 6 times (30)
Round 24 :
Repeat [3 sc, 1 dec] 6 times (24)
Round 25 :
Repeat [1 sc, 1 dec, 1 sc] 6 times (18)
Round 26 :
Repeat [1 sc, 1 dec] 6 times (12)
Round 27 :
Work 1 dec in every st around (6)
Info :
Finish with a sl st, leave a tail for closing, and weave in your ends after stuffing firmly.
— 2. Bow Tie :
Info :
Using red yarn, ch 25. Join the first and last ch with a sl st to form a loop, being careful not to twist the chain.
Round 1-4 :
Work 1 sc in each ch and st around for four complete rounds (25)
Info :
Sl st to finish and leave a very long tail (about 16 inches). Pinch the center of the tube and wrap the long tail firmly around the middle multiple times to create the bow shape, then secure.
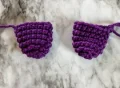
— 3. Legs :
Round 1 :
Using dark purple, create a mr and work 5 sc into it (5)
Round 2 :
Work 1 inc in every st around (10)
Round 3 :
Repeat [1 sc, 1 inc] 5 times (15)
Round 4-5 :
Work 1 sc in every st around (15)
Round 6 :
Work 1 sc in every st around (15)
Info :
Cut the yarn and fasten off for the first leg (Right Leg). Repeat steps 1-6 for the second leg (Left Leg), but do not cut the yarn. Place a marker in the last stitch of the left leg.
— 4. Body :
Round 7 :
From the left leg, sc in the next 8 sts, ch 9, and join to the right leg with a sc (this sc is the start of the next count). Sc in the remaining 14 sts of the right leg, sc in each of the 9 ch sts, and sc in the remaining 7 sts of the left leg (48)
Round 8 :
Work 1 sc in every st around (48)
Round 9 :
Repeat [22 sc, 1 dec] twice (46)
Round 10 :
Work 1 sc in every st around (46)
Round 11 :
Repeat [21 sc, 1 dec] twice (44)
Round 12 :
Work 1 sc in every st around (44)
Round 13 :
Repeat [20 sc, 1 dec] twice (42)
Round 14 :
Work 1 sc in every st around (42)
Round 15 :
Repeat [19 sc, 1 dec] twice (40)
Round 16 :
Work 1 sc in every st around (40)
Round 17 :
Repeat [18 sc, 1 dec] twice (38)
Round 18 :
Work 1 sc in every st around (38)
Round 19 :
Repeat [17 sc, 1 dec] twice (36)
Round 20 :
Work 1 sc in every st around (36)
Round 21 :
Repeat [16 sc, 1 dec] twice (34)
Round 22 :
Work 1 sc in every st around (34)
Round 23 :
Repeat [15 sc, 1 dec] twice (32)
Round 24 :
Work 1 sc in every st around (32)
Round 25 :
Repeat [14 sc, 1 dec] twice (30)
Round 26 :
Work 1 sc in every st around (30)
Round 27 :
Repeat [3 sc, 1 dec] 6 times (24)
Info :
Fasten off and leave a tail for sewing to the head. Stuff the legs and body firmly as you work.
— 5. Arms :
Round 1 :
Using dark purple, start with a mr and work 6 sc into it (6)
Round 2 :
Work 1 inc in each st around (12)
Round 3-11 :
Work 1 sc in every st around (12)
Info :
Stuff the hands up to round 5, but leave the rest of the arm empty so they lie flat against the body. Fasten off and leave a tail for sewing.
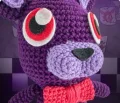
— 6. Muzzle :
Round 1 :
Using amethyst yarn, start with a mr and work 5 sc into it (5)
Round 2 :
Work 1 inc in each st around (10)
Round 3 :
Repeat [1 sc, 1 inc] 5 times (15)
Info :
Repeat steps 1-3 to make a second circle, but do not fasten off the second one. Sew the two circles together along one side for 3 stitches.
Round 4-5 :
Work 1 sc in every st around the outer edge of both joined circles (24)
Info :
Fasten off and leave a long tail for attachment.
— 7. Outer Ear :
Round 1 :
Using dark purple, start with a mr and work 6 sc into it (6)
Round 2 :
Work 1 inc in each st around (12)
Round 3 :
Repeat [1 sc, 1 inc] 6 times (18)
Round 4-17 :
Work 1 sc in every st around (18)
Round 18 :
Repeat [1 sc, 1 dec] 6 times (12)
Info :
Sl st to finish and leave a tail for sewing to the top of the head.
— 8. Inner Ear :
Row 1 :
Using amethyst, ch 13. Skip the first ch and sc in the next 11 ch. Work 1 inc in the last ch. Turn and work along the back of the foundation chain: sc in 11 ch, then work 1 inc in the final space. Sl st to finish and leave a tail for sewing to the outer ear.
— 9. Crocheted Eyes (Optional Alternative) :
Round 1 :
Using pink yarn, start with a mr and work 6 sc into it (6)
Round 2 :
Work 1 inc in each st around (12)
Round 3 :
Change to white yarn and repeat [1 sc, 1 inc] 6 times (18)
Info :
Sl st to finish and leave a tail for sewing.
I truly hope you enjoyed crafting Bonnie! There is something so special about seeing those big, bright eyes and that iconic red bow come together at the very end. He is the perfect size for a desk companion or a high-impact gift for a fan. Don't forget to take a moment to admire your stitch work on that leg-to-body join—it's one of the most satisfying parts of the whole build. I can't wait to see your finished bunnies out in the world! Happy crafting! 🧶✨