🧢 Beautiful ✨ Detailed πŸ’ Adorable

Bonita Granny Square Project Bag Crochet Pattern

Bonita Granny Square Project Bag Crochet Pattern
4.4β˜…Rating
5-7 HoursTime Needed
1.9KMade This
βœ‚οΈ

Intermediate Level

Ideal for those with basic crocheting experience, featuring slightly more advanced stitches and techniques to expand your skills.

⏱️

Weekend Treat

Takes 5-7 hours, making it an enjoyable project to finish over a couple of days.

✨

Stylish Touch

An elegant detail to elevate any look, combining traditional techniques with contemporary design sensibilities.

About This Bonita Granny Square Project Bag Crochet Pattern

Bonita Granny Square Project Bag Crochet Pattern crochet pattern - detailed view

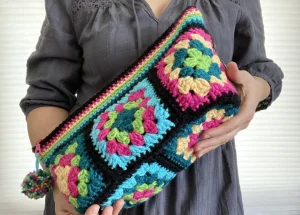
This pouch is a total lifesaver for keeping your small projects organized. It is just the right size to toss into a larger tote, making it a wonderful gift for any fellow crafter in your life.

Why You'll Love This Bonita Granny Square Project Bag Crochet Pattern

I honestly adore this pattern because it turns those tiny, 'useless' leftovers into a masterpiece. There is a special kind of joy in seeing a chaotic pile of colors suddenly look intentional and chic. Plus, adding a lining and a zipper makes the finished bag feel so high-end β€” you will be so proud to pull this out at your next crochet group!

Bonita Granny Square Project Bag Crochet Pattern step 1 Bonita Granny Square Project Bag Crochet Pattern step 2 Bonita Granny Square Project Bag Crochet Pattern step 3 Bonita Granny Square Project Bag Crochet Pattern step 4

Switch Things Up

I have a confession to make: I am a total yarn hoarder. I simply cannot bring myself to throw away those small, leftover balls from previous projects. They usually end up in a giant basket, tangled and forgotten, until I find a pattern like this one. There is something so therapeutic about mixing and matching colors without a strict plan. For this bag, I really leaned into the 'anything goes' vibe, and I think that is where the magic happens.

When I was putting my version together, I found that the lining is what really makes it feel professional. I know sewing can be a bit intimidating for us hook-wielders, but having a sturdy fabric inside means your smaller hooks and tapestry needles won't go poking through the crochet stitches. I chose a bright canvas for my lining so that every time I open the bag, I get a little pop of extra joy. It is the perfect size for a sock project or a few amigurumi pieces. I hope you enjoy digging through your stash as much as I didβ€”it is like a trip down memory lane with every color you pick up!

Common Mistakes & How to Fix Them

βœ— If your granny squares aren't all the same size, the bag will look lopsided; make sure to check your gauge or block them before seaming.βœ— When sewing the zipper, don't place it too close to the crochet stitches or the teeth will constantly snag on the yarn fibers.βœ— The whip-stitch seaming needs a consistent tension; if you pull too tight, the seams will pucker and the bag won't lay flat.βœ— Make sure to leave a large enough seam allowance when cutting your lining fabric, or it will be too small to fit inside the crocheted exterior.

Bonita Granny Square Project Bag Crochet Pattern

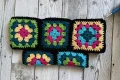
If you have a growing pile of yarn scraps that you just can't bear to toss, this project is calling your name. You will love how these eight vibrant granny squares come together to create a functional, stylish pouch for your crafting essentials. It is the perfect way to play with color and clear out your stash while making something you will actually use every day.

Intermediate 5-7 Hours

Materials Needed for Bonita Granny Square Project Bag Crochet Pattern

β€” Main Fabric

  • 01
    Approximately 60 yards each of worsted weight acrylic yarn in six different colors
  • 02
    One piece of structured woven fabric (like canvas or denim) measuring 22 by 18 inches
  • 03
    Small amount of black worsted weight yarn for the final edging and seaming

β€” Tools Required

  • 01
    US H (5.0 mm) crochet hook
  • 02
    Tapestry needle for weaving in ends
  • 03
    Removable stitch markers
  • 04
    One 16-inch zipper (can be shortened as needed)
  • 05
    Sewing needle and thread that matches your yarn
  • 06
    Fabric marking tool like chalk or a pencil
  • 07
    A 2-inch piece of cardboard for making the pompom
  • 08
    Sharp scissors

Progress Tracker

0% Complete

β€” 1. Granny Square (Make 8) :

Info :

For the sample shown, use the following color sequences. Square 1: B, A, C, E, F. Square 2: E, C, A, D, F. Square 3: C, E, B, A, F. Square 4: A, B, E, D, F. Square 5: D, A, C, E, F. Square 6: E, D, A, B, F. Square 7 (bottom): A, C, E, D, F. Square 8 (bottom): D, A, B, E, F.

Round 1 :

Start with your first color. ch 4 and sl st to create a small ring. ch 3 (this counts as a dc), then work 2 dc into the ring. [ch 2, 3 dc] 3 times into the ring, ch 2, then sl st into the top of your starting ch-3. Fasten off.

Round 2 :

Switch to color two. Join with a sl st in any corner ch-2 sp. ch 3 (counts as dc), 2 dc in that same corner. [Work 3 dc, ch 2, 3 dc in the next corner sp] 3 times. Work 3 dc in the very first corner sp you started in, ch 2, and sl st to the top of the ch-3. Fasten off.

Round 3 :

Pick up color three. Join in any corner ch-2 sp. ch 3 (counts as dc), 2 dc in corner. [3 dc in the sp between the dc clusters, then (3 dc, ch 2, 3 dc) in the corner sp] 3 times. 3 dc in the next side sp, 3 dc in the starting corner, ch 2, sl st to the top of the ch-3. Fasten off.

Round 4 :

Grab color four. Join in any corner ch-2 sp. ch 3 (counts as dc), 2 dc in corner. [3 dc in each of the next 2 side sps, then (3 dc, ch 2, 3 dc) in the corner] 3 times. 3 dc in each of the next 2 side sps, 3 dc in the starting corner, ch 2, sl st to top of ch-3. Fasten off.

Round 5 :

Final granny round with color five. Join in any corner ch-2 sp. ch 1 (counts as first sc), sc in same sp. [sc in each of the next 12 sts, then 4 sc in the corner sp] 3 times. sc in the last 12 sts, 2 sc in the starting corner, sl st to the first sc. Fasten off, leaving a long tail (about 18 inches) for sewing.

β€” 2. Top Edging :

Info :

Before starting the edging, assemble the bag as described in the assembly instructions. You should have a tube with a bottom attached, but the side-bottom corners left open.

Round 1 :

Lay your bag flat and join color F at the top right corner. ch 1 (doesn't count as a st), then sc in every stitch around the top opening. sl st to join. (96)

Round 2 :

Use color E to yo and pull up a lp to start your color change. Pull the tail of color F tight to hide the join. ch 1 (this doesn't count as a st), sc in every stitch around the top, and sl st to join.

Round 3 :

Join color D and work exactly like the previous round, making sure to pull the previous color's tail tight for a clean look. ch 1, sc in each st around, sl st to join.

Round 4 :

Switch to color C. ch 1, then work 1 sc into every stitch around the bag opening. sl st to join.

Round 5 :

Change to color B. ch 1, sc in each stitch around the top edge, and sl st to join.

Round 6 :

Pick up color A. ch 1, sc in every stitch around, then sl st to join.

Round 7 :

For the final round of the edging, switch back to color F. ch 1, sc in each stitch around, sl st to join, and fasten off.

β€” 3. Pompom :

Info :

Cut two 10-inch pieces and one 20-inch piece of yarn. Fold the 20-inch piece in half and tie a knot 1.5 inches from the fold to create a loop for the zipper.

Info :

Hold 5 strands of mixed colors together and wrap them around a 2-inch piece of cardboard 15 times. Tie the two 10-inch pieces tightly around the loops on each side of the cardboard.

Info :

Slide the yarn off the cardboard and tie the long knotted loop piece around the center of all the loops very tightly. Cut all the loops (except the long attachment loop), fluff, and trim into a 1.75-inch ball.

Assembly Instructions

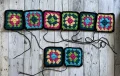
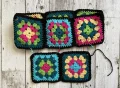
  • Whip-stitch squares 1 through 6 into a single long row, then join the ends together to form a large tube.
  • Sew squares 7 and 8 together along one side to create the rectangular bottom panel for your bag.
  • Pin the bottom panel to the base of your granny square tube, aligning the center seams, and whip-stitch in place.
  • Fold your lining fabric and trace the outline of your bag onto it, making sure to leave a 1/4 inch seam allowance for sewing.
  • Sew the side seams of the lining and press the top edge toward the WS by 1/2 inch to create a clean finish.
  • Insert the zipper into the top of the crochet bag and sew it in place, then slip the lining inside and stitch it to the zipper tape.
  • Thread the loop of your handmade pompom through the hole in the zipper tab and pull the pompom through the loop to secure it.

Important Notes

  • πŸ’‘Steam block your squares before assembly to ensure they are perfectly square and easy to sew.
  • πŸ’‘When seaming, leave the bottom-side corners open until the lining is finished for a better fit.
  • πŸ’‘The turning chains in the granny square rounds count as a stitch, so don't skip them.
  • πŸ’‘Choose a sturdy fabric like canvas or denim for the lining to give the bag more structure.
  • πŸ’‘Use a sharpie or chalk that contrasts with your fabric so your cutting lines are easy to see.

I really hope this project brings a bit of sunshine to your craft corner! There is something so special about carrying your current work-in-progress in a bag that you actually made yourself. It is a great conversation starter at stitch groups and a lovely way to show off your color style. Once you finish this one, you might find yourself wanting to make a second (or third!) for all your friends. Happy crocheting, and may your tension always be perfect! 🧢✨

You ask,

we answer.

FAQs

Can I use cotton yarn instead of acrylic?

Absolutely! Cotton yarn will give the bag a slightly different feel and less stretch, which can actually be quite nice for a project bag. Just keep in mind that cotton might not block quite the same way as acrylic.

Do I have to use a sewing machine for the lining?

Not at all. While a machine is faster, you can easily sew the lining by hand using a sturdy backstitch. Since it is a relatively small project, hand sewing is very manageable.

What if my zipper is longer than 15 inches?

No problem! You can shorten a zipper by sewing several stitches across the teeth at the desired length to create a new 'stop,' then trimming the excess tape about half an inch below your new stitches.

Is blocking the granny squares really necessary?

I highly recommend it! Blocking ensures all 8 squares are the exact same size, which makes seaming them together much easier and prevents the bag from looking wonky or distorted once finished.