About This Brian the Penguin Amigurumi Pattern

Brian makes a wonderful handmade gift — his compact size and personality mean he's the kind of thing people actually keep on their desk rather than stuffing in a drawer.
Ideal for those with basic crocheting experience, featuring slightly more advanced stitches and techniques to expand your skills.
Fits nicely into a free afternoon — 2 to 5 hours of focused, enjoyable crocheting.
Playful characters full of personality, designed to spark imagination and become cherished playtime favorites.
Brian makes a wonderful handmade gift — his compact size and personality mean he's the kind of thing people actually keep on their desk rather than stuffing in a drawer.
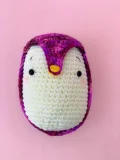
I keep coming back to this one because the coat construction is just so clever — working it as a separate piece from a foundation chain means you get that crisp colour separation without ever having to juggle two yarns at once. And that beak! Working the rows to a single point and then edging around it feels fiddly for about thirty seconds and then comes together perfectly. Honestly, the moment I stuffed my first Brian and tried the coat on him I actually said 'oh, you little guy' out loud. He's just got so much charm packed into five inches.

I'll be honest — I wasn't expecting to fall as hard for this pattern as I did. I picked it up because I wanted something manageable for an evening in, something with a beginning and an end that didn't require me to keep seventeen things in my head at once. Brian delivered on all of that, and then some.
The bit that really got me was the coat construction. Working it from a foundation chain and building outward in rounds gives you this clean oval shape that just slots over the body like it was made for it — which, of course, it was. No seaming two flat pieces together, no fiddling with colour joins mid-round. Just a satisfying oval that grows, decreases beautifully, and then becomes a beak through a sequence of rows that feels almost meditative by the end.
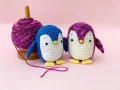
If I were to suggest one customisation, it's this: don't feel locked into the purple colourway. A deep teal coat with an ivory body reads as properly oceanic; a soft grey with pale blue works beautifully for a more understated look. The structure of the pattern stays identical — only the yarn labels change. I've already got a third Brian planned in a hand-dyed speckled navy that I think is going to be something special.
The embroidery details at the end — the tiny eyebrow stitches, the yellow triangle on the beak tip, the blush dusted under the eyes — take maybe ten minutes total and make an enormous difference to the finished face. Don't skip them. Brian without his eyebrows is a completely different penguin, and not in a good way.
Meet Brian — a round little penguin with a whole lot of personality and the sweetest embroidered beak you ever did see. This pattern walks you through every piece, from his colour-blocked coat to his tiny folded feet, with clear instructions that feel more like chatting with a crafty friend than following a manual. You'll end up with a chubby, cheerful penguin standing about 5 inches tall, stuffed full of character and ready to waddle his way into someone's heart. Whether you're making Brian for your own shelf or tucking him into a gift bag, he never fails to get a reaction.
Use yarn A throughout this section. Begin with a foundation chain of 13.
Working in BLO only: sc into the 2nd ch from your hook, sc x 10, then work 3 sc into the final ch to turn the corner. Now sc back along the underside of the foundation chain: sc x 10, sc inc. (26 sts) Switch to working in continuous rounds from here.
Sc inc, sc x 10, sc inc x 3, sc x 10, sc inc x 2. (32)
Sc, sc inc, sc x 10, (sc, sc inc) x 3, sc x 10, (sc, sc inc) x 2. (38)
Sc x 2, sc inc, sc x 10, (sc x 2, sc inc) x 3, sc x 10, (sc x 2, sc inc) x 2. (44)
Sc x 3, sc inc, sc x 10, (sc x 3, sc inc) x 3, sc x 10, (sc x 3, sc inc) x 2. (50)
Sc x 4, sc inc, sc x 10, (sc x 4, sc inc) x 3, sc x 10, (sc x 4, sc inc) x 2. (56)
Sc inc, sc x 15, (sc inc, sc x 5) x 3, sc x 10, (sc inc, sc x 5) x 2. (62)
Sc x 62. (62)
Sc x 62. (62)
Sc x 62. (62)
Sc x 62. (62)
Sc x 62. (62)
Sc x 62. (62)
Sc x 62. (62)
Sc x 62. (62)
Sc x 62. (62)
Sc x 8, sc dec, sc x 10, sc dec, sc x 2 — place a stitch marker in the last stitch just made. Then continue: sc x 5, sc dec, sc x 8, sc dec, sc x 10, sc dec, sc x 7, sc dec. (56) Finish with a ss, break yarn and pull through. Leave a long tail for sewing.
Join yarn A at the stitch marker you placed on Round 17 of the coat. Shift your stitch marker back one stitch from where you just joined. This section is worked in rows with a ch 1 turn at the end of each row. Begin with ch 1; your first sc goes into the very stitch where you joined the yarn.
Sc x 14. (14)
Sc dec, sc x 10, sc dec. (12)
Sc dec, sc x 8, sc dec. (10)
Sc dec, sc x 6, sc dec. (8)
Sc dec, sc x 4, sc dec. (6)
Sc x 6. (6)
Sc dec, sc x 2, sc dec. (4)
Sc x 4. (4)
Sc dec x 2. (2)
Sc x 2. (2)
Sc dec. (1)
Sc x 1. (1) Do NOT ch 1 or turn after this row. Break yarn and pull through, then weave in the end.
Now sc around the full edge of the beak. Rejoin yarn A at the stitch marker (one stitch back from where you originally joined). Ch 1, ss onto the side of the beak, then sc up the edge toward the tip. At the very tip, work 3 sc into the final stitch from Row 12 to create a neat point. Sc back down the other side, then ss onto the next stitch on the coat. Break yarn and pull through, weave in the end. Using yellow thread, embroider a small triangle shape onto the tip of the beak.
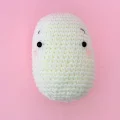
Use yarn B. Work in continuous rounds throughout.
Sc x 6 into a MR. (6)
Sc inc x 6. (12)
(Sc, sc inc) x 6. (18)
(Sc x 2, sc inc) x 6. (24)
(Sc x 3, sc inc) x 6. (30)
(Sc x 4, sc inc) x 6. (36)
(Sc x 5, sc inc) x 6. (42)
Sc x 42. (42)
Sc x 42. (42)
Sc x 42. (42)
Sc x 42. (42)
Sc x 42. (42)
Sc x 42. (42)
Sc x 42. (42) — Insert the safety eyes between rounds 14 and 15 now, leaving a 9-stitch gap between them. Begin stuffing the body and continue adding stuffing as you work the remaining rounds.
Sc x 42. (42)
Sc x 42. (42)
Sc x 42. (42)
Sc x 42. (42)
Sc x 42. (42)
Sc x 42. (42)
Sc x 42. (42)
Sc x 42. (42)
Sc x 42. (42)
Sc x 42. (42)
Sc x 42. (42) — Try the coat on the body at this point to check eye placement and stuffing level. The eyes should sit roughly level with the yellow beak embroidery and midway between the beak and the coat sides.
(Sc x 5, sc dec) x 6. (36)
(Sc x 4, sc dec) x 6. (30)
(Sc x 3, sc dec) x 6. (24)
(Sc x 2, sc dec) x 6. (18)
(Sc, sc dec) x 6. (12)
Sc dec x 6. (6) Ss into the next stitch, break yarn and pull through. Check stuffing one final time. Thread the yarn tail through the FLO of this last round to draw the opening closed.
Optional embroidery details: Using black thread, stitch the eyebrows 3 rounds above the eyes, across rounds 10–11. Dust a small amount of blush just below each eye for rosy cheeks.
Use yarn A. Make 2 identical flippers. Work in continuous rounds.
Sc x 4 into a MR. (4)
(Sc, sc inc) x 2. (6)
(Sc x 2, sc inc) x 2. (8)
(Sc x 3, sc inc) x 2. (10)
(Sc x 4, sc inc) x 2. (12)
(Sc x 5, sc inc) x 2. (14)
(Sc x 6, sc inc) x 2. (16)
(Sc x 7, sc inc) x 2. (18)
Sc x 18. (18)
(Sc x 7, sc dec) x 2. (16)
Sc x 16. (16)
(Sc x 6, sc dec) x 2. (14)
Sc x 14. (14)
Sc dec x 7. (7) Break yarn and leave a generous tail for sewing. Flatten the flipper and sew the open top edge closed before attaching to the body.
Use yarn C. Make 2 identical feet. Begin with a foundation chain of 7.
Working in BLO: sc into the 2nd ch from your hook, sc x 4, then work 3 sc into the final ch to turn the corner. Now work back along the underside of the foundation chain: sc x 4, sc inc. (14 sts) Switch to working in continuous rounds.
Sc inc, sc x 4, sc inc x 3, sc x 4, sc inc x 2. (20)
Sc, sc inc, sc x 4, (sc, sc inc) x 3, sc x 4, (sc, sc inc) x 2. (26) Ss, break yarn and pull through. Leave a long tail for sewing. Fold the foot in half and sew around the edges to hold the shape.
Brian has this quiet little way of making people smile the moment they spot him on a shelf. There's something about that round body, that tiny pointed beak, and those stubby yellow feet that just gets people — even people who don't usually notice crafty things will pick him up and hold him. 🐧 If you make your own Brian, know that you're not just following a pattern — you're creating something genuinely full of charm. I hope every stitch is enjoyable, and that the finished penguin finds exactly the right home. Happy crocheting! 🧶✨
You can, but the pattern specifically flags this — DK yarns vary a lot between brands, and if the coat and body don't work up to the same stitch size, the coat won't fit properly over the body. If you're mixing brands, swatch both and compare before committing.
This almost always happens when the yarn is joined at exactly the same stitch used to start the beak rows, rather than one stitch back as the pattern instructs. The stitch marker placement in Round 17 of the coat is the key reference point — double-check that before starting the edging.
Stuff the body quite firmly — Brian's coat is a fitted piece and a loosely stuffed body means the coat sits baggy and the penguin loses his satisfyingly round shape. The pattern suggests trying the coat on the body at Round 25 to check; that's a useful moment to add more stuffing if needed.
Yes — the pattern itself notes that safety eyes aren't suitable for young children. You could embroider the eyes instead using black yarn or thread, using a French knot or a small satin stitch circle. Just make sure all embroidery tails are firmly secured and woven in.
Going up in hook size will make Brian larger, but the coat is fitted to the body, so you'd need to use the same larger hook for both pieces and swatch to check the fit. The original example was made with a 2.5mm hook and comes out at approximately 5 inches tall.
