🧶 Beautiful ✨ Detailed 💝 Adorable

Brighten Your Day Crochet Rainbow Stuffie Amigurumi Pattern

Brighten Your Day Crochet Rainbow Stuffie Amigurumi Pattern
4.3★Rating
2-3 HoursTime Needed
3.4KMade This
✂️

Beginner Friendly Level

Perfect for those just starting their crocheting journey, with clear instructions and simple techniques

⏱️

Quick Craft

Fits nicely into a free afternoon — 2 to 5 hours of focused, enjoyable crocheting.

🐰

Whimsical Buddy

Playful characters full of personality, designed to spark imagination and become cherished playtime favorites.

About This Brighten Your Day Crochet Rainbow Stuffie Amigurumi Pattern

Brighten Your Day Crochet Rainbow Stuffie Amigurumi Pattern crochet pattern - detailed view

This makes such a thoughtful handmade gift — it's bright enough for a baby's room, cheerful enough for a friend's desk, and personal enough to feel genuinely special rather than store-bought.

Why You'll Love This Brighten Your Day Crochet Rainbow Stuffie Amigurumi Pattern

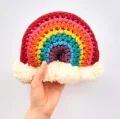
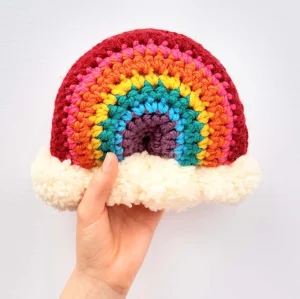
I honestly could not put this one down once I started. Something about watching those color stripes stack up, row by row, and seeing the arc of the rainbow take shape — it's so satisfying in a way that's hard to explain until you're in it. The pom-poms at the end feel like a little reward, too. Wrapping yarn around cardboard, tying it off, snipping those loops — there's something almost meditative about it. And when you sew those fluffy clouds onto the finished stuffie and hold the whole thing up? Pure joy.

Brighten Your Day Crochet Rainbow Stuffie Amigurumi Pattern step 1 Brighten Your Day Crochet Rainbow Stuffie Amigurumi Pattern step 2 Brighten Your Day Crochet Rainbow Stuffie Amigurumi Pattern step 3 Brighten Your Day Crochet Rainbow Stuffie Amigurumi Pattern step 4

Switch Things Up

I made my first rainbow stuffie on a rainy Tuesday afternoon when I genuinely just needed something cheerful to work on. I had all these little balls of bulky yarn sitting in a basket — leftovers from bigger projects — and the second I lined up those colors in rainbow order I knew exactly what I was making.

What I love most about this pattern is how immediate the reward feels. You cast on with that deep mauve and by the time you're a few rows in, the arc is already forming. Each color change marks progress so clearly that you never hit that mid-project slump. It's the crochet equivalent of a countdown clock — except instead of time ticking away, you're watching a rainbow appear in your hands.

One thing I'd tell anyone making this for the first time: don't rush the pom-poms. I know, I know — you've got your finished rainbow sitting right there and you just want to sew everything together. But taking the time to wrap a full 40 times around that cardboard makes such a difference. The clouds on my first attempt were a bit thin because I got impatient, and they just didn't have that pillowy, storybook look. My second set? Perfect. Fluffy, round, exactly what this little stuffie deserves.

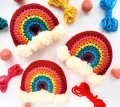
As for color variations — the original palette is stunning, but I've also seen makers do this in pastels (blush, lavender, mint, butter yellow) for a softer nursery vibe, and it's absolutely lovely. You could even go full sunset with terracotta, peach, dusty rose, and gold. The construction stays exactly the same; only the mood shifts.

Common Mistakes & How to Fix Them

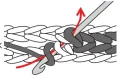
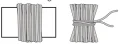
✗ When switching colors at the end of a row, it's easy to forget to complete the yarn-over with the new color before finishing the stitch — if you pull through with the old color, you'll get a muddled edge instead of a clean, crisp stripe transition.✗ The increases in rows 4 through 6 are unevenly spaced to create the curved arc shape, so if you work them in the wrong positions you'll end up with a lopsided piece that won't match the second panel when you go to seam them — read each row carefully rather than assuming a regular increase pattern.✗ When seaming the front and back together with the flat slip stitch join method, working into anything other than the back loop only will make the seam bulky and stiff — keeping strictly to the back loops gives you that neat, flat join that holds the rainbow's shape.✗ Stuffing the rainbow too firmly will flatten the rounded top arc and push the shape wide instead of maintaining the dome — use small pieces of stuffing and work them in gradually, checking the profile from the side as you go.✗ The inner arc seam (the curved bottom opening of the rainbow) requires a strand of the darkest contrast color and the flat slip stitch method — if you use a regular whip stitch here, the inner curve will pucker and the stuffie will lose its clean profile.✗ For the pom-poms, winding fewer than the recommended 40 wraps around the cardboard produces thin, floppy clouds that won't hold their round shape after trimming — stick to the full wrap count for pom-poms that stay plump.

Brighten Your Day Crochet Rainbow Stuffie Amigurumi Pattern

This little rainbow is one of those makes that just puts a smile on your face from the very first stitch. You'll work two matching flat pieces in cheerful stripes of bulky yarn, seam them together, stuff them up, and finish the whole thing off with the fluffiest pom-pom clouds you've ever seen. It's a project that moves fast — color change after color change, each row bringing that rainbow to life right in your hands. Whether you're making it for a nursery shelf, a desk at work, or just because you need a little color in your life right now, this stuffie delivers every single time.

Beginner Friendly 2-3 Hours

Materials Needed for Brighten Your Day Crochet Rainbow Stuffie Amigurumi Pattern

— Main Fabric

  • 01
    Bulky weight (#6) yarn in Dark Mauve — approximately 7 yards needed for the innermost rainbow arc
  • 02
    Bulky weight (#6) yarn in Ultra Blue — approximately 4 yards for the second arc
  • 03
    Bulky weight (#6) yarn in Emerald — approximately 6 yards for the third arc
  • 04
    Bulky weight (#6) yarn in Glowing Gold — approximately 6 yards for the fourth arc
  • 05
    Bulky weight (#6) yarn in Pumpkin — approximately 8 yards for the fifth arc
  • 06
    Bulky weight (#6) yarn in Hot Pink — approximately 9 yards for the sixth arc
  • 07
    Bulky weight (#6) yarn in Wine — approximately 21 yards for the outermost arc and outer seaming
  • 08
    Bulky weight (#6) yarn in Natural (off-white) — approximately 21 yards for the pom-pom clouds

— Tools Required

  • 01
    US J/10 (6 mm) crochet hook, or whichever size gets you to gauge
  • 02
    Polyester fiberfill stuffing
  • 03
    Yarn needle for seaming and weaving in ends
  • 04
    Scissors
  • 05
    A 2-inch (5 cm) piece of cardboard for winding the pom-poms
  • 06
    Stitch markers to track row ends

Progress Tracker

0% Complete

— 1. Front & Back Panels (Make 2 Alike) :

Info :

Both the front and back panels are worked identically, flat in rows, with color changes at the end of the designated rows. Make two panels total. Starting chain is worked with Contrast G (Wine)... correction: starting chain is worked with Contrast A (Dark Mauve). Read the color change note before beginning: to switch colors, work the final stitch of the current row until 2 loops remain on hook, then yoh with the new color and pull through both loops to complete the stitch, then proceed in the new color.

Foundation :

Using Contrast A (Dark Mauve), ch 8.

Row 1 :

RS row. Work 1 sc into the 2nd ch from the hook (this ch counts as the turning ch, not a stitch). 1 sc in the following ch. 2 sc in the next ch. 1 sc in the next ch. 2 sc in the next ch. 1 sc in each of the final 2 ch. Turn. (9 sc)

Row 2 :

Ch 1. 1 sc in each of the first 2 sc. Work 2 sc into each of the next 5 sc. 1 sc in each of the last 2 sc. Switch to Contrast B (Ultra Blue) at end of row. Cut Contrast A. Turn. (14 sc)

Row 3 :

With Contrast B (Ultra Blue), ch 1. Work 1 sc in every sc across the row. Switch to Contrast C (Emerald) at end of row. Cut Contrast B. Turn. (14 sc)

Row 4 :

With Contrast C (Emerald), ch 1. 1 sc in each of the first 3 sc. 2 sc in the next sc. 1 sc in the next sc. 2 sc in the next sc. 1 sc in each of the following 2 sc. 2 sc in the next sc. 1 sc in the next sc. 2 sc in the next sc. 1 sc in each of the last 3 sc. Switch to Contrast D (Glowing Gold) at end of row. Cut Contrast C. Turn. (18 sc)

Row 5 :

With Contrast D (Glowing Gold), ch 1. 1 sc in each of the first 5 sc. 2 sc in the next sc. 1 sc in the next sc. 2 sc in the next sc. 1 sc in each of the following 2 sc. 2 sc in the next sc. 1 sc in the next sc. 2 sc in the next sc. 1 sc in each of the last 5 sc. Switch to Contrast E (Pumpkin) at end of row. Cut Contrast D. Turn. (22 sc)

Row 6 :

With Contrast E (Pumpkin), ch 1. 1 sc in each of the first 4 sc. 2 sc in the next sc. (1 sc in the next sc, 2 sc in the next sc) 3 times. (2 sc in the next sc, 1 sc in the next sc) 4 times. 1 sc in each of the last 3 sc. Switch to Contrast F (Hot Pink) at end of row. Cut Contrast E. Turn. (30 sc)

Row 7 :

With Contrast F (Hot Pink), ch 1. Work 1 sc in every sc across. Switch to Contrast G (Wine) at end of row. Cut Contrast F. Turn. (30 sc)

Row 8 :

With Contrast G (Wine), ch 1. 1 sc in each of the first 10 sc. (2 sc in the next sc, 1 sc in the next sc) twice. 2 sc in each of the following 2 sc. (1 sc in the next sc, 2 sc in the next sc) twice. 1 sc in each of the last 10 sc. Turn. (36 sc)

Row 9 :

Ch 1. Work 1 sc in every sc across. Fasten off. (36 sc)

— 2. Pom-Pom Clouds (Make 4) :

Info :

Each pom-pom is approximately 2 inches (5 cm) across. You will need 4 pom-poms total — 2 for each side of the rainbow's base. Use Contrast H (Natural) for all pom-poms.

Pom-Pom :

Cut a 2-inch (5 cm) strip of cardboard. Wrap Contrast H (Natural) yarn around the cardboard 40 times. Slide the wrapped yarn off the cardboard, then tie a separate length of yarn firmly around the center of the bundle, leaving a long tail on each end for attaching to the stuffie later. Snip through all the loops on both sides of the center tie. Fluff and trim the cut ends into a smooth, rounded ball shape.

— 3. Finishing & Assembly :

Info :

Seaming uses the flat slip st join method throughout: with RS facing, insert hook into the back loop only of the first st on one panel and into the back loop only of the matching st on the second panel; with working yarn held behind both layers, draw a loop through both back loops and through the loop on hook; repeat stitch by stitch along the seam.

Seam & Stuff :

Hold the two panels together with WS facing each other, matching stripes carefully. Using the appropriate color for each stripe section, seam around the entire perimeter using matching yarn and the flat slip st join method, leaving a gap along the bottom straight edge for stuffing. Fill the stuffie with fiberfill, taking care to keep the rounded arc shape intact — don't overstuff. Sew the opening closed once you're happy with the shape.

Inner Arc Seam :

To close the inner curved arc of the rainbow (the innermost opening at the center bottom), use a strand of Contrast A (Dark Mauve) and the flat slip st join method across those stitches.

Outer Arc Seam :

To close the outer top arc of the rainbow, use a strand of Contrast G (Wine) and the flat slip st join method across.

Bottom Seam :

To close the flat bottom edges of the rainbow, use any matching yarn shade and sew the edges together.

Attach Pom-Poms :

Using the long tails left on each pom-pom, sew 2 pom-poms evenly spaced across each bottom end of the rainbow (one pom-pom cluster on the left base, one on the right base), positioning them as shown in the pattern photo so they sit like little fluffy clouds.

Assembly Instructions

  • Hold both finished panels together with their wrong sides facing inward, lining up the color stripes row for row so the arcs sit perfectly on top of each other.
  • Using the flat slip stitch join method and a yarn strand matched to each stripe color, seam around the entire outer edge, working stitch by stitch through the back loops only of both layers, and stop before closing the straight bottom edge completely — leave a gap wide enough to get stuffing inside.
  • Push fiberfill into the opening in small amounts, pressing it into the arc evenly; check the profile from the side as you go to make sure the dome shape stays round rather than flattening out or going lopsided.
  • Once you're happy with the fullness, sew the bottom gap closed using any matching yarn shade.
  • Use a strand of Contrast A (Dark Mauve) and the flat slip stitch join method to close the inner curved arc opening at the center of the rainbow.
  • Use a strand of Contrast G (Wine) and the flat slip stitch join method to seam the outer top arc closed.
  • Thread the long tails from each pom-pom onto a yarn needle and sew 2 pom-poms evenly across each bottom corner of the stuffie so they sit like little clouds cradling the rainbow's base.

Important Notes

  • 💡Gauge matters more than you'd think for a stuffie this small — at 10 sc and 11 rows to 4 inches, your finished rainbow should land right around 7 inches wide by 6 inches tall. Go up a hook size if your gauge is coming up tight and the fabric feels stiff.
  • 💡The color change technique here is worked mid-stitch: on the last stitch of the row, work until 2 loops remain on hook, then bring in the new color and pull through. Doing it this way gives you a clean color break at the row edge rather than a blurry bleed.
  • 💡Cut each outgoing color as you go — carrying yarn up the side of a flat piece this small is more trouble than it's worth, and the yarn tails get woven into the seam anyway.
  • 💡When making your pom-poms, the full 40 wraps around the 2-inch cardboard are what make them round and fluffy enough to read as clouds — fewer wraps and they'll look sparse after trimming.
  • 💡The flat slip stitch join method is different from a standard slip stitch seam — you must work into back loops only on both pieces simultaneously, with yarn held behind. Practice the first few stitches on a scrap before starting on your actual rainbow.
  • 💡The two panels are worked identically — there's no separate 'back' piece, just make two of the same. Double-check before starting that you have two matching panels before seaming.

Few crochet projects pack this much color into such a small, satisfying make. Nine rows, eight shades, four fluffy clouds — and you end up with something that genuinely makes people stop and smile when they see it on a shelf. 🌈 This rainbow stuffie is the kind of thing you'll want to make more than once, in different colorways, as gifts, or just to keep for yourself because honestly, you deserve a little handmade sunshine. Grab your bulky yarn, your 6mm hook, and an afternoon — that's really all it takes. ✨ Happy stitching! 🧶

You ask,

we answer.

FAQs

Can I use a different brand of bulky yarn instead of Bernat Softee Chunky?

Yes — any #6 bulky weight yarn will work as long as you hit gauge (10 sc and 11 rows to 4 inches). The yardage per color is quite small, so this is actually a great stash-buster pattern. Just make sure all eight colors are the same weight so the stripes stay even.

Do both pieces really come out exactly the same? There's no separate front and back?

Yes, both panels are worked identically — same row instructions, same color sequence, same stitch counts. You just make the piece twice. The distinction between 'front' and 'back' only comes into play when you hold them together for seaming.

My inner arc seam keeps puckering when I close it — what am I doing wrong?

The inner arc is the trickiest seam because it's curved. Make sure you're using the flat slip stitch join method strictly — back loops only on both pieces, yarn held behind. If you're pulling the yarn too tight as you work along the curve it will pucker. Try to keep an even, relaxed tension and go slowly.

How do I keep the rainbow's dome shape when stuffing?

Work in small amounts of fiberfill at a time and press each addition into the top of the arc before adding more. The temptation is to stuff it all at once, but that tends to push the shape flat or make it lumpy. Check the profile from the side frequently and stop when it looks round and even.

Can I make the pom-poms bigger for a fluffier cloud effect?

Absolutely. The pattern calls for 2-inch cardboard, but you could go up to 3 inches for a bigger, more dramatic cloud. Just increase your wrap count proportionally — around 50 to 60 wraps for a 3-inch pom-pom — so it stays dense and round after trimming.