About This Sunburst Patchwork Crochet Sweater Pattern
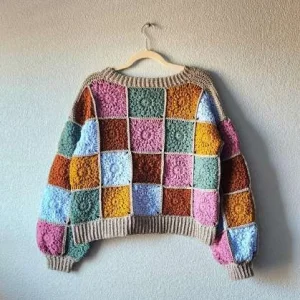
This sweater makes a genuinely impressive handmade gift — it looks far more complex than it is, and whoever receives it will never believe you made it yourself.
Ideal for those with basic crocheting experience, featuring slightly more advanced stitches and techniques to expand your skills.
Takes 5-7 hours, making it an enjoyable project to finish over a couple of days.
An elegant detail to elevate any look, combining traditional techniques with contemporary design sensibilities.
This sweater makes a genuinely impressive handmade gift — it looks far more complex than it is, and whoever receives it will never believe you made it yourself.
Honestly? I love this one because it never gets boring. Every square is its own little finish line — you fasten off, pick a new color, and start fresh. There's something so satisfying about watching a pile of tiny colorful squares slowly become an actual wearable garment. The puff stitches in Round 2 feel a little fiddly at first but once you get into the rhythm they're genuinely fun to work. And the assembly — joining everything with single crochet rather than sewing — keeps the seams tidy and the whole process feeling connected rather than like a patchwork chore.
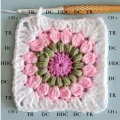
I want to be upfront about something: when I first saw a patchwork sweater made of granny squares, I genuinely thought it was way above my skill level. All those individual pieces, all those ends to weave in, the assembly process — it looked overwhelming. But then I actually sat down and made one square. Just one. And it was so satisfying that I made another. And another. And somewhere around square fifteen I realized I was having more fun than I'd had on a crochet project in months.
The Sunburst Granny Square is the star of this whole pattern, and honestly it deserves to be. Round 2 with the puff stitches gives each square this gorgeous dimensional center that catches the light differently depending on your yarn color, and Round 4's corner construction creates those neat little diagonal lines that make the finished grid look almost woven. Every square is genuinely pretty on its own.
My biggest tip for this project is to sort your yarn colors before you start crocheting rather than picking as you go. I laid all my yarn out on the floor, arranged the colors roughly how I wanted them to sit on the finished sweater, and took a photo for reference. It saved me from making twelve squares of one color and then not having enough for the sleeves.
For color placement, I'd encourage you to think about contrast and balance across the panels rather than randomness — putting two very similar colors next to each other in the grid can make them look like one big square from a distance, which isn't always the effect you want. A little planning goes a long way.
The ribbing is honestly easier than it looks on the page, and it finishes the whole sweater so beautifully — that contrast color pulling together the hem, cuffs, and collar is what takes this from a patchwork experiment to an actual polished garment. Don't rush that part.
Picture yourself wrapped in a sweater made entirely of your own hands — every little sunburst square a tiny celebration of color. This patchwork pullover is one of those projects that grows on you as you make it, square by square, until suddenly you have something genuinely beautiful laid out on your table. You get to play with color in a way most sweater patterns don't allow, mixing and matching as freely as you like. The construction is clever too — four flat panels that come together into a cozy, slightly cropped oversized fit that feels effortless to wear.
Using the larger hook, start with a Magic Loop. If you prefer, ch 4 and sl st into the first ch to form a small ring instead. Make 40 squares total for the body and 32 squares for the sleeves at the standard size. Each square uses approximately 25 yd of yarn.
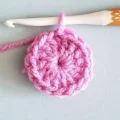
Ch 3 (this counts as your first dc), then work 15 more dc into the ring. Join with a sl st to the top of the beginning ch-3. (16 dc total)
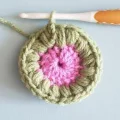
Ch 1, work a puff st in the same st, then work a puff st in every dc around. Join with a sl st to the first puff st. (16 puff sts) Note: the following round will be worked into the ch-1 locking spaces on top of each puff st.
Ch 2, then work (cluster st, ch 2) into the first ch-1 sp and into every ch-1 sp around. Join with a sl st to the first cluster of the round. (16 cluster sts)
This entire round is worked into the ch-2 spaces between clusters. Ch 3, work 2 dc into the same sp, *then into the next sp work (3 tr, ch 2, 3 tr) for the corner, followed by 3 dc, 3 hdc, 3 dc into the next three spaces; repeat from * around, omitting the final 3 dc before joining to the top of the beginning ch-3. There will be 15 sts on each side between the ch-2 corner spaces. Fasten off.
Size alteration note: Using a 4mm hook produces a 4-inch square. Using a 5mm hook produces a 5-inch square. Changing hook size is how you alter the overall sweater size — no other stitch count changes are needed for the squares themselves. If you are working with natural fiber yarn, block each square before beginning assembly.
Switch to contrast color yarn. Lay out 20 squares (or 35 squares for a wider fit) in a grid — 5 squares across by 4 squares tall (7 across by 5 tall for the longer or wider version). You will make two identical panels: one for the front and one for the back.
Size adjustment options: To widen the sweater, add 5 squares to each side of both the front and back panels. To add length, add 7 more squares along the bottom of both panels. To widen the sleeves, add 4 more squares to each side of each sleeve panel.
Seaming: Always work horizontal seams first. Insert your hook into the corner sts of two adjacent squares, sl st those corners together, ch 1, then work 2 sc into the corner. Continue with 1 sc in each st across to the next corner, working 2 sc at each corner as you go. Complete all seams in one direction before turning and working the seams in the other direction.
Switch to contrast color yarn. The shoulder extension is worked on both the front and back panels to create the joined shoulder seam. Work both shoulders on both panels before joining.
Starting position: On the front panel, find the 2nd square in from the side edge at the top. Sl st in between the 2nd and 3rd cluster sts of that square, ch 1, sc in the same sp.
Working toward the corner of the square, sc 24 sts across. Ch 1, turn.
Continue working back and forth for 3 more rows even (sc across, ch 1, turn each row). Fasten off. Repeat the entire shoulder extension on the opposite side of the same panel, then repeat both shoulders on the back panel to match.
All panel joining is done with sc throughout. Align the front and back panels with the two sleeve panels at the sides, following the layout diagram — sleeve panels sit between the front and back on each side. Join all four panels together using sc, working seams consistently so the joins remain tidy.
Switch to the smaller hook and contrast color yarn.
Sl st into the bottom corner of the front panel, ch 1. Work 1 sc into each st all the way around the full bottom opening of the sweater, then sl st to the first sc to join. Ch 16.
Sc in the second ch from the hook and in every ch across until you reach the body edge, then sc in the next 2 sts of the body. Turn.
Sk the 2 body sts, sc blo across every st of the ribbing strip, ch 1, turn.
Sc blo across all ribbing sts to the body edge, sc in the next 2 body sts, turn. (15 sts in ribbing strip)
Repeat Rows 2 and 3 continuously, consuming 2 body sts on each right-side row, until all sts around the bottom opening have been worked. Fasten off and sew the short edges of the ribbing strip together to close the hem.
Switch to the smaller hook and contrast color yarn.
Sl st into a color sp at the neck opening, ch 1. Work 1 sc into each st around the entire neck opening, sl st to the first sc. Ch 8.
Sc in the second ch from hook and in each ch across to the neck edge, then sc in the next 2 body sts. Turn.
Sk the 2 body sts, sc blo across the full ribbing strip, ch 1, turn.
Sc blo across all ribbing sts to the body edge, sc in the next 2 body sts, turn. (7 sts in ribbing strip)
Repeat Rows 2 and 3, consuming 2 neck sts on each right-side row, until all sts around the neck opening are used up. Fasten off and join the short ribbing edges together.
Switch to the smaller hook. Work the sleeve cinching rounds first before making the cuff ribbing strip.
Insert hook into the bottom of the sleeve opening. Ch 1, then sc into each st and each ch-sp all the way around. Sl st to the first sc to join.
Ch 1, sc2tog all the way around to reduce the sleeve opening. Sl st to the first st.
Making the Cuff: Ch 11.
Sc in the second ch from the hook and in each ch across to the sleeve edge, then sc in the next 2 sts of the sleeve. Turn. (10 sts in cuff strip)
Sk the 2 sleeve sts, sc blo across every st of the cuff strip, ch 1, turn.
Sc blo across all cuff sts to the sleeve edge, sc in the next 2 sleeve sts, turn.
Repeat Rows 2 and 3 until all sleeve sts are consumed. Fasten off, leaving a long enough tail to sew the short edges of the cuff together through the back loops of the final row.
Fasten off any remaining yarn. Weave in all ends securely on the wrong side. If desired, wet block or steam block the finished sweater to even out the squares and help the ribbing sections relax into shape.
There's something quietly magical about a project made entirely of individual little squares — each one its own tiny colorful win, and all of them adding up to something you'll actually want to wear every single day. This sweater really does look harder than it is, and that's one of my favorite things about it. 🧶 Whether you go wild with a full rainbow of colors or keep it toned down with three or four shades you love, it's going to turn out beautifully. Stick with it square by square, and enjoy every step of the process — this one's a keeper. ✨
For the standard size you'll need 72 squares total — 40 for the body (split into front and back panels of 20 each) and 32 for the two sleeve panels. If you're sizing up by adding extra squares for width or length, make sure to calculate the additional squares before you start so you don't run short of a particular color.
You can, but the squares will come out noticeably larger even at the same hook size, and the finished sweater will be bulkier and less drapey than intended. If you want to try it, swatch first and compare your square size to the gauge in the pattern — you may need to go down a hook size to compensate.
If you're working with acrylic yarn you can skip it, but if you're using any natural fiber yarn — wool, cotton, bamboo — blocking before assembly makes a significant difference. The squares join much more cleanly when they're all the same size and lying flat.
Probably not — puff stitches naturally create tension. The key is to pull each loop up long (longer than you think you need) before drawing through all seven loops. If your puff is flat rather than raised and rounded, your pull-up loops are too short. Loosen your tension and try again on a practice swatch.
To add width, include 5 extra squares on each side of both the front and back panels. To add length, add 7 more squares along the bottom of both panels. To widen the sleeves, add 4 squares to each side of each sleeve panel. Remember that switching from a 4mm to a 5mm hook also increases every square from 4 inches to 5 inches, which naturally sizes the whole sweater up.
The most efficient approach is to weave in each square's tails as you go rather than saving them all for the end — 72 squares means a lot of tails, and doing them in batches while you're in a rhythm is far less overwhelming than facing them all at once after assembly.
