🧶 Beautiful ✨ Detailed 💝 Adorable

Festive Winter Snow Globe Amigurumi Pattern

Festive Winter Snow Globe Amigurumi Pattern
3.9★Rating
3-5 HoursTime Needed
3.8KMade This
✂️

Intermediate Level

Ideal for those with basic crocheting experience, featuring slightly more advanced stitches and techniques to expand your skills.

⏱️

Quick Craft

Fits nicely into a free afternoon — 2 to 5 hours of focused, enjoyable crocheting.

🎄

Holiday Cheer

Festive fun for the season, bringing handmade magic to celebrations and creating new family traditions.

About This Festive Winter Snow Globe Amigurumi Pattern

Festive Winter Snow Globe Amigurumi Pattern crochet pattern - detailed view

This project makes a beautiful handmade gift—thoughtful enough for someone special, but quick enough to make a few before the holidays. It looks stunning on a mantle or as a centerpiece.

Why You'll Love This Festive Winter Snow Globe Amigurumi Pattern

I absolutely love how the tapestry crochet creates that 'snowing' effect against the blue sky. It’s such a clever way to add detail without needing to embroider dozens of tiny dots later. Plus, picking out the miniature buttons for the scene inside is like being a kid in a candy store—you can really make this globe your own!

Festive Winter Snow Globe Amigurumi Pattern step 1 Festive Winter Snow Globe Amigurumi Pattern step 2 Festive Winter Snow Globe Amigurumi Pattern step 3 Festive Winter Snow Globe Amigurumi Pattern step 4

Switch Things Up

I’ve always been fascinated by snow globes—there’s something so peaceful about a tiny winter world trapped in glass. But let’s be honest, glass is fragile and water leaks! That’s why I was so excited to design this plush version. It captures all that seasonal magic without the worry of it breaking on the shelf. The best part of this project is the tapestry crochet section. If you haven’t tried carrying your yarn before, this is a fantastic way to practice. It creates those little 'snowflakes' in the sky that really bring the whole piece to life.

When I made mine, I spent way too much time picking out the perfect buttons. I ended up finding these tiny little snowmen and glittery trees that just made my heart melt. Don't be afraid to go a bit overboard with the embellishments! It’s your own little world, after all. Also, a quick tip from my craft room to yours: don’t skip the weighted pellets. They give the globe that satisfying 'heft' that makes it feel like a real decorative object rather than just a stuffed toy. I hope you enjoy every stitch of this as much as I did. Happy hooking!

Common Mistakes & How to Fix Them

✗ If you don't finish the last pull-through of a stitch with the new color during the tapestry section, the 'snowflakes' will look jagged instead of clean.✗ Skipping the cardboard insert in the base will cause the bottom to round out, making your snow globe wobble instead of sitting flat.✗ When working the BLO rounds for the base, it's easy to accidentally grab both loops, which loses that sharp edge where the globe meets the stand.✗ If you use buttons with shanks and don't trim them completely flush, they won't sit flat against the fabric and might eventually pull or snag the yarn.

Festive Winter Snow Globe Amigurumi Pattern

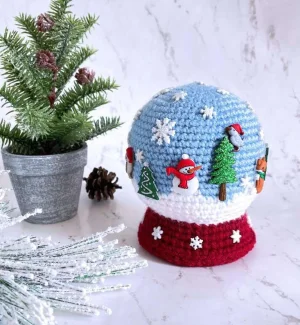
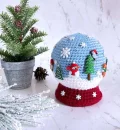
Bring a touch of winter magic into your home with this charming crochet snow globe. It’s the perfect way to enjoy a snowy scene without the cold, featuring a classic burgundy base and a sky filled with falling snow. You’ll love how this piece comes together, from the satisfying rounds of the globe to the fun of picking out tiny buttons to create your own unique landscape. It’s more than just a toy; it’s a handmade keepsake you'll cherish every year.

Intermediate 3-5 Hours

Materials Needed for Festive Winter Snow Globe Amigurumi Pattern

— Main Fabric

  • 01
    Medium weight #4 yarn in light blue (Color A) for the sky
  • 02
    Medium weight #4 yarn in white (Color B) for the snow
  • 03
    Medium weight #4 yarn in burgundy (Color C) for the base

— Tools Required

  • 01
    3.5 mm (E/4) crochet hook
  • 02
    Stitch markers for tracking rounds
  • 03
    Large sewing needle for assembly
  • 04
    Poly-fil stuffing for the globe
  • 05
    A piece of cardboard for the base support
  • 06
    Scissors
  • 07
    Hot glue gun for attaching decorations
  • 08
    Weighted material like Poly Pellets
  • 09
    Assorted winter-themed buttons (flat back preferred)
  • 10
    Craft cutters if you need to remove button shanks

Progress Tracker

0% Complete

— 1. Snow Globe :

Round 1 :

Start with Color A and make a magic ring, ch 1, and work 6 sc into the center (6)

Round 2 :

Put 2 sc into every st around (12)

Round 3 :

Repeat the pattern of [2 sc in the first st, 1 sc in the next st] 6 times (18)

Round 4 :

Work 1 sc, then repeat [2 sc in the next st, 1 sc in each of the following 2 sts] 5 times. Finish with 2 sc in the next st and 1 sc in the last st (24)

Round 5 :

Repeat the pattern of [2 sc in the first st, 1 sc in the next 3 sts] 6 times (30)

Round 6 :

Work 1 sc in each of the first 2 sts, then repeat [2 sc in the next st, 1 sc in each of the next 4 sts] 5 times. Finish with 2 sc in the next st and 1 sc in the final 2 sts (36)

Round 7 :

Repeat the pattern of [2 sc in the first st, 1 sc in the next 5 sts] 6 times (42)

Round 8 :

Work 1 sc in each of the first 3 sts, then repeat [2 sc in the next st, 1 sc in each of the next 6 sts] 5 times. Finish with 2 sc in the next st and 1 sc in the final 3 sts (48)

Round 9 :

Repeat the pattern of [2 sc in the first st, 1 sc in the next 7 sts] 6 times (54)

Round 10 :

Work 1 sc in each of the first 4 sts, then repeat [2 sc in the next st, 1 sc in each of the next 8 sts] 5 times. Finish with 2 sc in the next st and 1 sc in the final 4 sts (60)

Round 11 :

Work 1 sc into every st around (60)

Round 12 :

Continue with 1 sc in every st (60)

Round 13 :

Keep going with 1 sc in every st (60)

Round 14 :

Maintain the count with 1 sc in every st (60)

Round 15 :

Another round of 1 sc in every st (60)

Round 16 :

Work 1 sc into every st (60)

Round 17 :

Continue with 1 sc in every st (60)

Round 18 :

Keep going with 1 sc in every st (60)

Round 19 :

Final plain round of 1 sc in every st (60)

Round 20 :

Using Color A, make 4 sc, then switch to Color B for 4 sc. Switch back to Color A for 9 sc, then Color B for 4 sc. Move to Color A for 7 sc, Color B for 5 sc, Color A for 7 sc, Color B for 4 sc, Color A for 7 sc, Color B for 6 sc, and finish with 3 sc in Color A (60)

Round 21 :

Using Color A, work 3 sc, then switch to Color B for 20 sc. Change to Color A for 3 sc, Color B for 9 sc, Color A for 3 sc, Color B for 9 sc, Color A for 2 sc, and finish with 11 sc in Color B. Fasten off Color A (60)

Round 22 :

Using Color B, repeat [sc in the next 8 sts, inv dec] 6 times (54)

Round 23 :

Work 1 sc in each of the first 3 sts, inv dec, then repeat [sc in the next 7 sts, inv dec] 5 times. Finish with 1 sc in the last 4 sts (48)

Round 24 :

Repeat the pattern of [sc in the next 6 sts, inv dec] 6 times (42)

Round 25 :

Work 1 sc in each of the first 2 sts, inv dec, then repeat [sc in the next 5 sts, inv dec] 5 times. Finish with 1 sc in the last 3 sts (36)

Round 26 :

Work 1 sl st into every st around. Fasten off Color B (36)

— 2. Base :

Info :

Attach Color C to the BLO of the first stitch from the previous round.

Round 1 :

Ch 1, then working in the BLO only: sc in the first st and the next 7 sts, work 2 sc in the following st, then repeat the pattern of [sc in the next 8 sts, 2 sc in the next st] 3 more times (40)

Round 2 :

Work 1 sc into every st around (40)

Round 3 :

Repeat [sc in the next 9 sts, 2 sc in the next st] 4 times (44)

Round 4 :

Work 1 sc into every st around (44)

Round 5 :

Repeat [sc in the next 10 sts, 2 sc in the next st] 4 times (48)

Round 6 :

Work 1 sc in the next st, then sl st in the following 2 sts. Fasten off (48)

— 3. Bottom :

Round 1 :

Using Color C, make a magic ring, ch 1, and work 6 sc into the ring (6)

Round 2 :

Work 2 sc into every st around (12)

Round 3 :

Repeat [2 sc in the first st, 1 sc in the next st] 6 times (18)

Round 4 :

Work 1 sc, [2 sc in the next st, 1 sc in each of the next 2 sts] 5 times, 2 sc in the next st, 1 sc (24)

Round 5 :

Repeat [2 sc in the first st, 1 sc in the next 3 sts] 6 times (30)

Round 6 :

Work 1 sc in each of the first 2 sts, [2 sc in the next st, 1 sc in each of the next 4 sts] 5 times, 2 sc in the next st, 1 sc in each of the next 2 sts (36)

Round 7 :

Repeat [2 sc in the first st, 1 sc in the next 5 sts] 6 times (42)

Round 8 :

Work 1 sc in each of the first 3 sts, [2 sc in the next st, 1 sc in each of the next 6 sts] 5 times, 2 sc in the next st, 1 sc in each of the next 3 sts. Leave a long tail for sewing (48)

Assembly Instructions

  • Firmly stuff the globe and the base section, taking care to keep the top portion nice and spherical while leaving a little room at the very bottom for the pellets and cardboard.
  • Trace and cut a circular piece of cardboard that fits just inside the diameter of the base. This will ensure your globe sits flat and doesn't bulge at the bottom.
  • Using your sewing needle and the long tail from the bottom piece, start sewing it to the base. Go about three-quarters of the way around the edge.
  • Slide the cardboard circle inside the base, then pour in your weighted pellets for stability. Add a bit more stuffing on top of the pellets if needed.
  • Complete the sewing to close the bottom entirely and weave in your ends securely.
  • Prepare your winter buttons by using craft cutters to remove the shanks from the back, making sure they are as flat as possible.
  • Use a hot glue gun to carefully attach your buttons to the globe, creating whatever winter scene makes you happy!

Important Notes

  • 💡The globe is worked in continuous rounds, so keep your stitch marker at the start of each round to avoid losing your place.
  • 💡This pattern uses tapestry crochet; carry the unused yarn color along the top of your previous stitches and work over it to keep the inside tidy.
  • 💡When changing colors, always complete the final pull-through of the previous stitch with the new color for a seamless transition.
  • 💡Stuffing is key for amigurumi—if you under-stuff, the globe will look lumpy, but if you over-stuff, the stitches might stretch and show the filling.
  • 💡For the invisible decrease, only pick up the front loops of the two stitches you are joining to keep the texture smooth.

I can't wait to see how your snow globe turns out! This is one of those projects that really lets your personality shine through the little details. Whether you go for a classic winter scene or something totally whimsical with your button choices, I know it's going to look amazing on your shelf. Remember to take your time with the stuffing so it stays perfectly round and proud. Sending you so much creative energy as you finish up your latest masterpiece. Happy crocheting, and may your holiday season be filled with handmade joy! 🧶✨
You ask,

we answer.

FAQs

Can I use a larger hook for this project?

You can, but I'd recommend sticking to the 3.5mm hook. A larger hook will create bigger gaps between stitches, which might let the stuffing or weighted pellets peek through the fabric.

What if I can't find flat-back buttons?

No problem at all! Just use a pair of craft cutters to snip the little loops (shanks) off the back of standard buttons so they sit flush when you glue them to the globe.

Is tapestry crochet hard for beginners?

It takes a little practice to keep your tension even while carrying the second color, but this pattern is a great 'entry-level' way to learn the technique because the color changes are fairly simple.

Do I have to use weighted pellets?

You don't strictly have to, but they really help the globe stay upright and give it a nice weight. If you skip them, just make sure to stuff the bottom very firmly around the cardboard insert.