🧶 Beautiful ✨ Detailed 💝 Adorable

Chibi Caped Crusader Amigurumi Pattern

Chibi Caped Crusader Amigurumi Pattern
4.7★Rating
3-5 HoursTime Needed
2.6KMade This
✂️

Intermediate Level

Ideal for those with basic crocheting experience, featuring slightly more advanced stitches and techniques to expand your skills.

⏱️

Quick Craft

Fits nicely into a free afternoon — 2 to 5 hours of focused, enjoyable crocheting.

🐰

Whimsical Buddy

Playful characters full of personality, designed to spark imagination and become cherished playtime favorites.

About This Chibi Caped Crusader Amigurumi Pattern

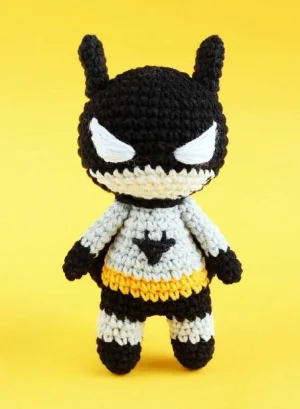
Chibi Caped Crusader Amigurumi Pattern crochet pattern - detailed view

Whether you're making him for a nursery shelf or as a fun keychain for a fellow fan, this project is a total crowd-pleaser that works up surprisingly fast and looks great on display.

Why You'll Love This Chibi Caped Crusader Amigurumi Pattern

I honestly couldn't stop smiling while making the little cape—it adds so much personality to the finished piece! The color changes in the mask are a bit of a fun challenge, but they are so rewarding when you finally see that heroic face staring back at you. It's one of those projects where you'll immediately want to make a whole squad of heroes.

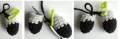
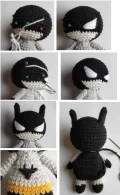
Chibi Caped Crusader Amigurumi Pattern step 1 Chibi Caped Crusader Amigurumi Pattern step 2 Chibi Caped Crusader Amigurumi Pattern step 3 Chibi Caped Crusader Amigurumi Pattern step 4

Switch Things Up

I remember the first time I tried to crochet a superhero—I was so nervous about getting the mask just right! This pattern is a tribute to that feeling, designed to be approachable but still look incredibly professional once you're done. The trickiest part is definitely the head where we switch between the black and beige yarn. My best advice? Don't rush those rounds. Keep your tension relaxed so the face doesn't pull, and you'll be amazed at how that little heroic expression starts to emerge.

I also really love how the cape turned out. It’s such a simple addition, but it completely changes the silhouette of the toy. If you're feeling adventurous, you could even make the cape in a dark navy or a deep purple for a different 'alternate universe' look! This little guy has lived on my desk for weeks now, and he never fails to spark a conversation. He’s just the right size to be a pocket pal or a lucky charm for someone special. Happy crocheting, friends!

Common Mistakes & How to Fix Them

✗ When joining the legs at Round 9, make sure your feet are facing the same direction before you work the ch 2, or your hero might end up with one leg pointing backward.✗ The color changes in the head during Rounds 14-17 require carrying the yarn; if you pull those floats too tight, the face will pucker and lose its nice round shape.✗ It is easy to forget to shift the stitch marker by 2 sc at the end of Round 8 on the second leg, which is crucial for aligning the body correctly.✗ If you don't stuff the neck area firmly enough between the head and body, the head might wobble once the heavy ears and cape are attached.

Chibi Caped Crusader Amigurumi Pattern

You're going to love bringing this little hero to life. He's got that perfect blend of tough and adorable that makes amigurumi so much fun to work on. I've kept the steps clear and friendly so you can focus on the joy of watching your tiny defender take shape. Grab your favorite black and gray yarn, and let's get those hooks moving on your new favorite project!

Intermediate 3-5 Hours

Materials Needed for Chibi Caped Crusader Amigurumi Pattern

— Main Fabric

  • 01
    Cotton blend yarn in deep black for the mask, boots, and cape
  • 02
    Medium gray yarn for the main suit and limb segments
  • 03
    Bright yellow yarn for the utility belt detail
  • 04
    Beige or skin-tone yarn for the lower face section
  • 05
    Small amount of white yarn for the embroidered eye highlights

— Tools Required

  • 01
    2.00 mm crochet hook or size needed to achieve a tight fabric
  • 02
    High-quality polyester fiberfill for stuffing
  • 03
    Sharp scissors for clean yarn breaks
  • 04
    Tapestry needle for assembly and facial embroidery
  • 05
    Straight pins to help with precise placement during assembly
  • 06
    Stitch markers to keep track of your spiral rounds

Progress Tracker

0% Complete

— 1. First Leg :

Round 1 :

Using your black yarn, work 5 sc into a MR (5)

Round 2 :

Work 1 inc into every stitch around (10)

Round 3-5 :

Work 10 sc around for these three rounds (10)

Round 6-8 :

Switch to gray yarn and work 10 sc for each round. Fasten off and cut the yarn (10)

— 2. Second Leg & Body :

Round 1 :

Using black yarn, work 5 sc into a MR (5)

Round 2 :

Work 1 inc into every stitch around (10)

Round 3-5 :

Work 10 sc around for these three rounds (10)

Round 6-8 :

Switch to gray yarn and work 10 sc for each round. At the end of R8, switch back to black and work 2 extra sc (10)

Info :

Move your stitch marker to the very last loop you just made and stuff both legs firmly.

Round 9 :

ch 2 and attach to the first leg with a sc. Work 9 more sc around that leg, 2 sc into the ch, 10 sc around the second leg, and 2 sc into the other side of the ch (24)

Round 10-11 :

Work 24 sc around for both rounds (24)

Round 12-13 :

Switch to yellow yarn and work 24 sc for each round (24)

Round 14-15 :

Switch to gray yarn and work 24 sc for each round (24)

Info :

Pause here to begin stuffing the body firmly.

Round 16 :

Work a pattern of (2 sc, 1 dec) repeated 6 times (18)

Round 17-19 :

Work 18 sc around for these three rounds (18)

Round 20 :

Work a pattern of (1 sc, 1 dec) repeated 6 times (12)

Round 21 :

Work 12 sc around. Finish stuffing the body, then fasten off and cut the yarn (12)

— 3. Head :

Round 1 :

Using black yarn, work 6 sc into a MR (6)

Round 2 :

Work 1 inc into every stitch around (12)

Round 3 :

Work (1 sc, 1 inc) repeated 6 times (18)

Round 4 :

Work (2 sc, 1 inc) repeated 6 times (24)

Round 5 :

Work (3 sc, 1 inc) repeated 6 times (30)

Round 6 :

Work (4 sc, 1 inc) repeated 6 times (36)

Round 7 :

Work (5 sc, 1 inc) repeated 6 times (42)

Round 8-13 :

Work 42 sc around for these six rounds (42)

Round 14 :

In black: (5 sc, dec) x 2, 2 sc. Switch to beige: 3 sc, dec. Switch to black: 5 sc, dec, 4 sc. Switch to black: 1 sc, dec, 5 sc, dec (36)

Round 15 :

In black: (4 sc, dec) x 2, 2 sc. Switch to beige: 2 sc, dec. Switch to black: 4 sc, dec, 4 sc. Switch to black: dec, 4 sc, dec (30)

Round 16 :

In black: (3 sc, dec) x 2, 2 sc. Switch to beige: 1 sc, dec. Switch to black: 3 sc, dec, 3 sc. Switch to black: dec, 3 sc, dec (24)

Round 17 :

In black: (2 sc, dec) x 2, 2 sc. Switch to beige: dec. Switch to black: 2 sc, dec, 2 sc. Switch to black: dec, 2 sc, dec (18)

Round 18 :

Switch to gray yarn. Work (1 sc, 1 dec) repeated 6 times. Stuff the head and leave a long tail for sewing (12)

— 4. Arms :

Round 1 :

Using black yarn, work 6 sc into a MR (6)

Round 2-4 :

Work 6 sc around for these three rounds (6)

Round 5-11 :

Switch to gray yarn and work 6 sc for each round. Do not stuff. Fasten off leaving a tail for sewing (6)

— 5. Ears :

Round 1 :

Using black yarn, work 4 sc into a MR (4)

Round 2 :

Work 1 inc into every stitch around (8)

Round 3-4 :

Work 8 sc around for these two rounds (8)

Round 5 :

Work (1 sc, 1 inc) repeated 4 times (12)

Round 6 :

Work 12 sc around (12)

Round 7 :

Work 6 sc. Fasten off and leave a tail for sewing (12)

— 6. Cape :

Row 1 :

Using black yarn, ch 16. Starting in the second ch from the hook, work 15 sc (15)

Row 2-6 :

ch 1, turn your work, and work 15 hdc across for these five rows (15)

Row 7 :

ch 1, turn, work 1 dec, 11 hdc, and 1 dec (13)

Row 8 :

ch 1, turn, work 1 dec, 9 hdc, and 1 dec (11)

Row 9 :

ch 1, turn, work 1 dec, 7 hdc, and 1 dec (9)

Row 10 :

ch 1, turn, work 1 dec, 5 hdc, and 1 dec (7)

Info :

Using black yarn, work sc evenly around the entire edge of the cape. ch 12 to create a neck tie, then fasten off.

Assembly Instructions

  • Securely sew the head to the body opening, adding a bit more stuffing to the neck area right before you close it up for extra stability.
  • Position the arms on either side of the body near the neck line and sew them on symmetrically so he looks ready for action.
  • Using your white yarn and a tapestry needle, embroider the large, expressive eye shapes onto the black mask section of the face.
  • Attach the pointed ears to the top of the head, making sure they sit straight and tall about 3 rounds away from the center.
  • Embroider the iconic bat symbol onto the center of the chest using black thread, or cut a small shape out of black felt and glue it on.
  • Fasten the cape to the back of the neck, using the chain tie to wrap around and secure it in place.

Important Notes

  • 💡Keep your tension consistent throughout the project to ensure all the pieces fit together perfectly without any gaps.
  • 💡When changing colors, always complete the last pull-through of the previous stitch with the new color for a clean, professional finish.
  • 💡I recommend stuffing as you go, especially in the legs and narrow parts of the body, to avoid any lumps or empty spots.
  • 💡If you want sharper edges on the boots or belt, you can work those transition rounds in the back loops only.
  • 💡If this toy is intended for a small child, ensure all embroidered details are double-knotted and very secure.

I hope you had as much fun making this little defender of the night as I did! There is something so satisfying about seeing a character come together stitch by stitch, especially when those little ears finally go on. Don't forget to share your finished photos with the crafting community—I would absolutely love to see the colors you chose for your hero. Keep those hooks busy, stay inspired, and enjoy your new handmade companion! 🧶✨🦇
You ask,

we answer.

FAQs

Can I use safety eyes instead of embroidering them?

You certainly can! I would recommend 8mm or 10mm eyes, but keep in mind the embroidered white eyes give him that specific comic-book mask look that defines the character.

My color changes on the face look a bit messy, any tips?

Try to carry the unused yarn behind your work (tapestry style) and make sure your tension is even so the alternate color doesn't peek through the black stitches too much.

The cape seems a bit small for the body, is that right?

The cape is designed with a 'mini' chibi aesthetic in mind, but if you prefer a longer, more dramatic look, you can easily add a few more rows of hdc before starting the decreases.

What if I don't have the exact yarn brand mentioned in the pattern?

No worries at all! Any sport weight or DK weight cotton blend will work beautifully—just check your hook size to make sure the fabric is tight enough that the stuffing won't show through.