About This Christmas Giftbox Cat Amigurumi Pattern

She makes a wonderful handmade Christmas gift — personal enough to feel truly special, but quick enough that you could realistically make a few before the holidays arrive.
Ideal for those with basic crocheting experience, featuring slightly more advanced stitches and techniques to expand your skills.
Fits nicely into a free afternoon — 2 to 5 hours of focused, enjoyable crocheting.
Festive fun for the season, bringing handmade magic to celebrations and creating new family traditions.
She makes a wonderful handmade Christmas gift — personal enough to feel truly special, but quick enough that you could realistically make a few before the holidays arrive.
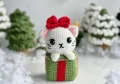
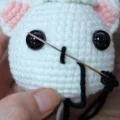
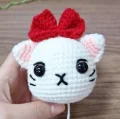
I fell hard for this one the moment I saw that box-shaped body — it's such a clever construction. The way the BLO rows create that crisp edge on the gift box is so satisfying, and watching the red stripe emerge round by round gives you this little thrill every time. I also love that the embroidery details — whiskers, eyelids, those tiny yellow brows — are what really bring her personality to life. It's the kind of project where the finishing touches feel like the best part.
I made my first Christmas Giftbox Cat in early November, tucked into an armchair with a cup of tea and a podcast playing, and I genuinely didn't expect to finish the whole thing in one sitting. But something about how the pieces come together — that satisfying BLO fold that suddenly makes the box look like an actual wrapped present — just kept pulling me back for one more row.
The body is the part that surprised me most. When you're working Rows 10 through 21 with that repeating green-and-red sequence, it feels almost meditative. You fall into the rhythm of it, and then suddenly you look down and there's this perfect little gift box sitting in your lap with a ribbon stripe running right up the front.
My favourite tip for this one: before you start the body, wind off a separate small bobbin of red yarn rather than carrying it from the main ball. It keeps the tension even and stops the yarn from tangling as you switch back and forth between colours across all those rows.
For colour variations, I've been dreaming about a version in cream and gold for a more elegant look, or deep navy with silver — very midnight Christmas Eve energy. You could honestly make a whole set in different colourways and line them up on a mantle. Each one would look completely different just from the colour swap.
The cat's face is where the real personality comes in. Take your time with the embroidery — the tiny yellow eyebrows especially. They're just a few stitches, but they're what give her that slightly smug, endearing expression that makes everyone smile when they see her.
Picture this little white kitty peeking out of a crocheted gift box, a big red bow perched on her head — she's honestly one of the most charming holiday makes I've come across. This pattern walks you through every piece step by step, so you can focus on the fun parts without second-guessing yourself. She works up surprisingly quickly with sport weight yarn and a 2.5mm hook, making her a realistic goal even in a busy December. Whether you're filling a gift basket or decorating your mantle, this little cat earns her spot every single time.
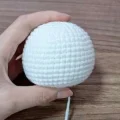
Begin with white yarn. Work in continuous rounds.
Start with an MR, work 8 SC into the ring. (8)
Work 8 INC around. (16)
(SC, INC) 8 times. (24)
(2 SC, INC) 8 times. (32)
32 SC. (32)
(7 SC, INC) 4 times. (36)
(5 SC, INC) 6 times. (42)
(6 SC, INC) 6 times. (48)
48 SC. (48)
48 SC. (48)
48 SC. (48)
48 SC. (48)
48 SC. (48)
48 SC. (48)
48 SC. (48)
48 SC. (48)
48 SC. (48)
(4 SC, DEC) 8 times. (40)
(3 SC, DEC) 8 times. (32)
(2 SC, DEC) 8 times. (24)
(SC, DEC) 8 times. (16)
(SC, DEC) 5 times, then 1 SC. (11)
5 DEC, then 1 SC. (6)
Cut yarn leaving a long tail for sewing. Stuff the head firmly before closing.
Begin with white yarn. Where the instructions show pink, switch to pink yarn for those stitches.
Work 6 SC into an MR. (6)
(SC, INC) 3 times. (9)
2 SC, INC in white — then 2 SC, INC in pink — then 2 SC, INC in white. (12)
3 SC, INC in white — then 3 SC, INC in pink — then 3 SC, INC in white. (15)
4 SC, INC in white — then 4 SC, INC in pink — then 4 SC, INC in white. (18)
Cut yarn leaving a long tail for sewing. Make two ears total.
Begin with green yarn. Where the instructions show red, switch to red yarn for those stitches. The body is worked from the bottom of the box upward.
Work 8 SC into an MR. (8)
(3 SC in one st, SC) 4 times. (16)
(SC, 3 SC in one st, 2 SC) 4 times. (24)
(2 SC, 3 SC in one st, 3 SC) 4 times. (32)
(3 SC, 3 SC in one st, 4 SC) 4 times. (40)
(4 SC, 3 SC in one st, 5 SC) 4 times. (48)
(5 SC, 3 SC in one st, 6 SC) 4 times. (56)
(6 SC, 3 SC in one st, 7 SC) 4 times. (64)
Working in BLO throughout this row: 2 SC in green, (11 SC in green, 5 SC in red) 3 times, 11 SC in green, 3 SC in red. (64)
2 SC in green, (11 SC in green, 5 SC in red) 3 times, 11 SC in green, 3 SC in red. (64)
2 SC in green, (11 SC in green, 5 SC in red) 3 times, 11 SC in green, 3 SC in red. (64)
2 SC in green, (11 SC in green, 5 SC in red) 3 times, 11 SC in green, 3 SC in red. (64)
2 SC in green, (11 SC in green, 5 SC in red) 3 times, 11 SC in green, 3 SC in red. (64)
2 SC in green, (11 SC in green, 5 SC in red) 3 times, 11 SC in green, 3 SC in red. (64)
2 SC in green, (11 SC in green, 5 SC in red) 3 times, 11 SC in green, 3 SC in red. (64)
2 SC in green, (11 SC in green, 5 SC in red) 3 times, 11 SC in green, 3 SC in red. (64)
2 SC in green, (11 SC in green, 5 SC in red) 3 times, 11 SC in green, 3 SC in red. (64)
2 SC in green, (11 SC in green, 5 SC in red) 3 times, 11 SC in green, 3 SC in red. (64)
2 SC in green, (11 SC in green, 5 SC in red) 3 times, 11 SC in green, 3 SC in red. (64)
2 SC in green, (11 SC in green, 5 SC in red) 3 times, 11 SC in green, 3 SC in red. (64)
2 SC in green, (11 SC in green, 5 SC in red) 3 times, 11 SC in green, 3 SC in red. (64)
Working in BLO: 5 SC, 2 DEC, (12 SC, 2 DEC) 3 times, 7 SC. (56)
4 SC, 2 DEC, (10 SC, 2 DEC) 3 times, 6 SC. (48)
3 SC, 2 DEC, (8 SC, 2 DEC) 3 times, 5 SC. (40)
2 SC, 2 DEC, (6 SC, 2 DEC) 3 times, 4 SC. (32)
Stuff the body firmly at this point before continuing to close.
SC, 2 DEC, (4 SC, 2 DEC) 3 times, 3 SC. (24)
2 DEC, (2 SC, 2 DEC) 3 times, 2 SC. (16)
8 DEC. (8)
Cut yarn and pull through remaining stitches to close.
Use white yarn. Work in continuous rounds.
Work 6 SC into an MR. (6)
(SC, INC) 3 times. (9)
9 SC. (9)
9 SC. (9)
9 SC. (9)
9 SC. (9)
9 SC. (9)
Cut yarn leaving a long tail for sewing. Make two arms total. Do not stuff.
Use red yarn. This piece is worked in rows with turning chains.
Ch 12, then starting in the 3rd chain from the hook, work 10 DC, turn. (10)
Ch 2, 10 DC, turn. (10)
Ch 2, 10 DC, turn. (10)
Ch 2, 10 DC, turn. (10)
Ch 2, 10 DC, turn. (10)
Cut yarn. Pinch the rectangle at its centre and wrap yarn tightly around the middle several times to form the bow shape, then tie off securely.
There's something so genuinely joyful about this little kitty — she sits in her crocheted gift box looking absolutely pleased with herself, red bow and all, like she knows exactly how cute she is. 🎁 She's the kind of handmade piece that stops people in their tracks, whether she's sitting on a shelf, tucked into a gift bag, or perched under a Christmas tree. The construction is clever, the colour combination is festive without being over the top, and the whole thing comes together faster than you'd expect. I hope you have as much fun making her as I did! 🧶✨
You can, but the pattern was designed for sport weight (Fine 2) yarn with a 2.5mm hook. Using DK weight will give you a noticeably larger cat — the head in particular can get quite big — and the box shape may not hold its corners as sharply. If you go up in weight, consider going down half a hook size to keep the fabric tight.
No — the arms are left unstuffed intentionally. Keeping them flat makes them soft and floppy so they drape naturally over the edge of the box. Stuffing them would make them stick out stiffly and look less like a cat peeking out of a gift.
The pattern doesn't specify an exact size, but for sport weight yarn at this scale, 6mm or 8mm black safety eyes tend to work well. Anything larger may crowd the face given the spacing of 9 stitches between the eyes.
Two things make the biggest difference: working the BLO rows at Row 9 and Row 22 exactly as written (these create the fold lines for the corners), and stuffing the body very firmly. Loose stuffing lets the walls cave in, which rounds out the box shape.
It's a good second or third amigurumi project. You'll need to be comfortable with magic rings, increases, decreases, and basic colour changes. The trickiest parts are tracking the two-colour stripe pattern across Rows 9–21 and the BLO rows — if you've made one or two simple amigurumi before, you'll manage this one with confidence.
Absolutely — the bow is glued on at the very end, so it's completely optional. Without it, the cat reads as a sweet plain kitty in a gift box. You could also swap it for a small crocheted flower, a pompom, or a loop of ribbon if you want a slightly different look.
