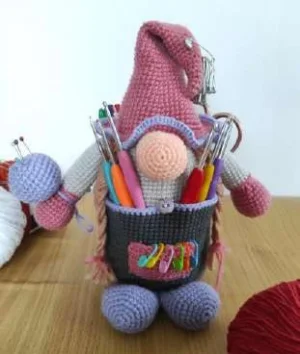
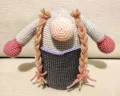
Tired of your crochet hooks and yarn needles playing hide-and-seek? You are going to love making this charming little gnome! She’s not just a cute face; she’s a fully functional organizer designed to keep your workspace tidy. With a weighted base to keep her steady and plenty of pockets for your notions, she’ll quickly become your favorite crafting companion. I’ve put so much heart into making sure this project is as practical as it is adorable for your craft room.
Progress Tracker
0% Complete
— 1. Main Body :
Info :
Begin with Grey yarn.
Round 1 :
Work 6 sc into a MR (6)
Round 2 :
Work 6 inc around (12)
Round 3 :
Repeat (1 sc, 1 inc) 6 times (18)
Round 4 :
Repeat (2 sc, 1 inc) 6 times (24)
Round 5 :
Repeat (3 sc, 1 inc) 6 times (30)
Round 6 :
Repeat (4 sc, 1 inc) 6 times (36)
Round 7 :
Repeat (5 sc, 1 inc) 6 times (42)
Round 8 :
Repeat (6 sc, 1 inc) 6 times (48)
Round 9 :
Repeat (7 sc, 1 inc) 6 times (54)
Round 10 :
Repeat (8 sc, 1 inc) 6 times (60)
Round 11 :
Repeat (9 sc, 1 inc) 6 times (66)
Round 12 :
Repeat (10 sc, 1 inc) 6 times (72)
Round 13 :
sc in each stitch around using BLO (72)
Round 14 :
sc in each stitch around (72)
Round 15 :
sc in each stitch around (72)
Info :
Transition to White yarn for the remainder of the body.
Round 16 :
sc in each stitch around (72)
Round 17 :
sc in each stitch around (72)
Round 18 :
sc in each stitch around (72)
Round 19 :
sc in each stitch around (72)
Round 20 :
sc in each stitch around (72)
Round 21 :
sc in each stitch around (72)
Round 22 :
sc in each stitch around (72)
Round 23 :
sc in each stitch around (72)
Round 24 :
sc in each stitch around (72)
Round 25 :
sc in each stitch around (72)
Round 26 :
sc in each stitch around (72)
Round 27 :
sc in each stitch around (72)
Round 28 :
sc in each stitch around (72)
Round 29 :
sc in each stitch around (72)
Round 30 :
sc in each stitch around (72)
Round 31 :
sc in each stitch around (72)
Round 32 :
sc in each stitch around (72)
Round 33 :
sc in each stitch around (72)
Round 34 :
sc in each stitch around (72)
Round 35 :
sc in each stitch around (72)
Round 36 :
sc in each stitch around (72)
Round 37 :
sc in each stitch around (72)
Round 38 :
sc in each stitch around (72)
Round 39 :
sc in each stitch around (72)
Round 40 :
sc in each stitch around (72)
Round 41 :
sc in each stitch around (72)
Round 42 :
sc in each stitch around (72)
Info :
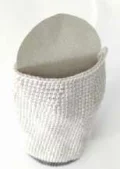
Place your cardboard circle inside the base and add the glass balls for weight before continuing.
Round 43 :
Repeat (10 sc, 1 dec) 6 times (66)
Round 44 :
sc in each stitch around (66)
Round 45 :
sc in each stitch around (66)
Round 46 :
Repeat (9 sc, 1 dec) 6 times (60)
Round 47 :
sc in each stitch around (60)
Round 48 :
sc in each stitch around (60)
Round 49 :
Repeat (8 sc, 1 dec) 6 times (54)
Round 50 :
sc in each stitch around (54)
Round 51 :
sc in each stitch around (54)
Round 52 :
Repeat (7 sc, 1 dec) 6 times (48)
Round 53 :
Repeat (6 sc, 1 dec) 6 times (42)
Round 54 :
Repeat (5 sc, 1 dec) 6 times (36)
Round 55 :
Repeat (4 sc, 1 dec) 6 times (30)
Round 56 :
Repeat (3 sc, 1 dec) 6 times (24)
Round 57 :
Repeat (2 sc, 1 dec) 6 times (18)
Round 58 :
Repeat (1 sc, 1 dec) 6 times (12)
Round 59 :
Work 6 dec around (6)
Info :
Fasten off and secure the end.
— 2. Pants Overlay :
Info :
Join Grey yarn to the front loops of Round 13 on the body.
Round 1 :
Repeat (5 sc, 1 inc) 12 times using FLO (84)
Round 2 :
sc in each stitch around (84)
Round 3 :
sc in each stitch around (84)
Round 4 :
sc in each stitch around (84)
Round 5 :
sc in each stitch around (84)
Round 6 :
sc in each stitch around (84)
Round 7 :
sc in each stitch around (84)
Round 8 :
sc in each stitch around (84)
Round 9 :
sc in each stitch around (84)
Round 10 :
sc in each stitch around (84)
Round 11 :
sc in each stitch around (84)
Round 12 :
sc in each stitch around (84)
Round 13 :
sc in each stitch around (84)
Round 14 :
sc in each stitch around (84)
Round 15 :
sc in each stitch around (84)
Round 16 :
sc in each stitch around (84)
Round 17 :
sc in each stitch around (84)
Round 18 :
sc in each stitch around (84)
Round 19 :
sc in each stitch around (84)
Round 20 :
sc in each stitch around (84)
Round 21 :
sc in each stitch around (84)
Round 22 :
sc in each stitch around (84)
Round 23 :
sc in each stitch around (84)
Round 24 :
sc in each stitch around (84)
Round 25 :
sc in each stitch around (84)
Round 26 :
sc in each stitch around (84)
Round 27 :
sc in each stitch around (84)
Info :
Switch to Purple yarn.
Round 28 :
sc in each stitch around (84)
Info :
Fasten off and break yarn.
— 3. Hat :
Info :
Start with Pink yarn.
Round 1 :
Work 3 sc into a MR (3)
Round 2 :
sc in each stitch around (3)
Round 3 :
Work 3 inc around (6)
Round 4 :
sc in each stitch around (6)
Round 5 :
sc in each stitch around (6)
Round 6 :
Repeat (1 sc, 1 inc) 3 times (9)
Round 7 :
sc in each stitch around (9)
Round 8 :
sc in each stitch around (9)
Round 9 :
Repeat (2 sc, 1 inc) 3 times (12)
Round 10 :
sc in each stitch around (12)
Round 11 :
sc in each stitch around (12)
Round 12 :
Repeat (3 sc, 1 inc) 3 times (15)
Round 13 :
sc in each stitch around (15)
Round 14 :
sc in each stitch around (15)
Round 15 :
Repeat (4 sc, 1 inc) 3 times (18)
Round 16 :
sc in each stitch around (18)
Round 17 :
sc in each stitch around (18)
Round 18 :
Repeat (5 sc, 1 inc) 3 times (21)
Round 19 :
sc in each stitch around (21)
Round 20 :
sc in each stitch around (21)
Round 21 :
Repeat (6 sc, 1 inc) 3 times (24)
Round 22 :
sc in each stitch around (24)
Round 23 :
sc in each stitch around (24)
Round 24 :
Repeat (7 sc, 1 inc) 3 times (27)
Round 25 :
sc in each stitch around (27)
Round 26 :
sc in each stitch around (27)
Round 27 :
Repeat (8 sc, 1 inc) 3 times (30)
Round 28 :
sc in each stitch around (30)
Round 29 :
sc in each stitch around (30)
Round 30 :
Repeat (9 sc, 1 inc) 3 times (33)
Round 31 :
sc in each stitch around (33)
Round 32 :
sc in each stitch around (33)
Round 33 :
Repeat (10 sc, 1 inc) 3 times (36)
Round 34 :
sc in each stitch around (36)
Round 35 :
sc in each stitch around (36)
Round 36 :
Repeat (5 sc, 1 inc) 6 times (42)
Round 37 :
sc in each stitch around (42)
Round 38 :
sc in each stitch around (42)
Round 39 :
Repeat (6 sc, 1 inc) 6 times (48)
Round 40 :
sc in each stitch around (48)
Round 41 :
sc in each stitch around (48)
Round 42 :
Repeat (7 sc, 1 inc) 6 times (54)
Round 43 :
sc in each stitch around (54)
Round 44 :
Repeat (8 sc, 1 inc) 6 times (60)
Round 45 :
sc in each stitch around (60)
Round 46 :
Repeat (9 sc, 1 inc) 6 times (66)
Round 47 :
sc in each stitch around (66)
Round 48 :
Repeat (5 sc, 1 inc) 11 times (77)
Round 49 :
Repeat (6 sc, 1 inc) 11 times (88)
Info :
Switch to Purple yarn for the ruffle.
Round 50 :
Repeat (1 sc, 1 inc) 44 times (132)
Info :
Fasten off and weave in ends.
— 4. Hands (Make 2) :
Info :
Start with Pink yarn.
Round 1 :
Work 6 sc into a MR (6)
Round 2 :
Work 6 inc around (12)
Round 3 :
Repeat (1 sc, 1 inc) 6 times (18)
Round 4 :
Repeat (2 sc, 1 inc) 6 times (24)
Round 5 :
sc in each stitch around (24)
Round 6 :
sc in each stitch around (24)
Round 7 :
sc in each stitch around (24)
Round 8 :
sc in each stitch around (24)
Round 9 :
sc in each stitch around (24)
Round 10 :
Repeat (2 sc, 1 dec) 6 times (18)
Round 11 :
Repeat (1 sc, 1 dec) 6 times (12)
Round 12 :
Repeat (1 sc, 1 inc) 6 times (18)
Round 13 :
sc in each stitch around (18)
Info :
Switch to White yarn.
Round 14 :
sc in each stitch around using BLO (18)
Round 15 :
sc in each stitch around (18)
Round 16 :
sc in each stitch around (18)
Round 17 :
sc in each stitch around (18)
Round 18 :
sc in each stitch around (18)
Round 19 :
sc in each stitch around (18)
Round 20 :
sc in each stitch around (18)
Round 21 :
sc in each stitch around (18)
Round 22 :
sc in each stitch around (18)
Round 23 :
sc in each stitch around (18)
Round 24 :
sc in each stitch around (18)
Round 25 :
sc in each stitch around (18)
Round 26 :
sc in each stitch around (18)
Round 27 :
sc in each stitch around (18)
Round 28 :
sc in each stitch around (18)
Round 29 :
sc in each stitch around (18)
Round 30 :
sc in each stitch around (18)
Round 31 :
sc in each stitch around (18)
Info :
Lightly stuff the hand part but leave the rest of the arm flat. Fold the top edge and crochet through both layers with 9 sc to close.
— 5. Legs (Make 2) :
Round 1 :
Work 6 sc into a MR (6)
Round 2 :
Work 6 inc around (12)
Round 3 :
Repeat (1 sc, 1 inc) 6 times (18)
Round 4 :
Repeat (2 sc, 1 inc) 6 times (24)
Round 5 :
Repeat (3 sc, 1 inc) 6 times (30)
Round 6 :
sc in each stitch around (30)
Round 7 :
sc in each stitch around (30)
Round 8 :
sc in each stitch around (30)
Round 9 :
sc in each stitch around (30)
Round 10 :
sc in each stitch around (30)
Round 11 :
Repeat (3 sc, 1 dec) 6 times (24)
Round 12 :
sc in each stitch around (24)
Round 13 :
Repeat (2 sc, 1 dec) 6 times (18)
Round 14 :
sc in each stitch around (18)
Info :
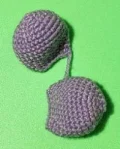
Stuff the leg part lightly. Flatten the top and crochet 9 sc through both layers to seal.
— 6. Nose :
Round 1 :
Work 6 sc into a MR (6)
Round 2 :
Work 6 inc around (12)
Round 3 :
Repeat (1 sc, 1 inc) 6 times (18)
Round 4 :
Repeat (2 sc, 1 inc) 6 times (24)
Round 5 :
Repeat (3 sc, 1 inc) 6 times (30)
Round 6 :
sc in each stitch around (30)
Round 7 :
sc in each stitch around (30)
Round 8 :
sc in each stitch around (30)
Round 9 :
sc in each stitch around (30)
Round 10 :
Repeat (3 sc, 1 dec) 6 times (24)
Round 11 :
Repeat (2 sc, 1 dec) 6 times (18)
Info :
Stuff firmly. Flatten the opening and crochet 9 sc across to close.
— 7. Needle Ball Accessory :
Round 1 :
Work 6 sc into a MR (6)
Round 2 :
Work 6 inc around (12)
Round 3 :
Repeat (1 sc, 1 inc) 6 times (18)
Round 4 :
Repeat (2 sc, 1 inc) 6 times (24)
Round 5 :
Repeat (3 sc, 1 inc) 6 times (30)
Round 6 :
sc in each stitch around (30)
Round 7 :
sc in each stitch around (30)
Round 8 :
sc in each stitch around (30)
Round 9 :
sc in each stitch around (30)
Round 10 :
Repeat (3 sc, 1 dec) 6 times (24)
Round 11 :
Repeat (2 sc, 1 dec) 6 times (18)
Round 12 :
Repeat (1 sc, 1 dec) 6 times (12)
Round 13 :
Work 6 dec around (6)
Info :
Stuff firmly before closing. Leave a long tail to attach to the gnome's hand.
— 8. Pockets :
Info :
Front Pocket: Use Pink yarn.
Row 1 :
ch 13, sc in 2nd ch from hook and each across, turn (12)
Row 2 :
sc in each stitch across, turn (12)
Row 3 :
sc in each stitch across, turn (12)
Row 4 :
sc in each stitch across, turn (12)
Row 5 :
sc in each stitch across, turn (12)
Row 6 :
sc in each stitch across, turn (12)
Row 7 :
sc in each stitch across, turn (12)
Row 8 :
sc in each stitch across, turn (12)
Info :
Back Pockets (Make 2): Use Purple yarn.
Row 1 :
ch 14, sc in 2nd ch from hook and each across, turn (13)
Row 2 :
sc in each stitch across, turn (13)
Row 3 :
sc in each stitch across, turn (13)
Row 4 :
sc in each stitch across, turn (13)
Row 5 :
sc in each stitch across, turn (13)
Row 6 :
sc in each stitch across, turn (13)
Row 7 :
sc in each stitch across, turn (13)
Row 8 :
sc in each stitch across, turn (13)
Row 9 :
sc in each stitch across, turn (13)
Row 10 :
sc in each stitch across, turn (13)
I hope this little gnome brings a bit of magic and a whole lot of order to your crafting corner! She was such a joy to design, and I think you'll find that having her nearby makes every stitch just a little bit brighter. Don't forget to share your finished gnome with our community—I'd love to see what colors you chose for her outfit. Happy crocheting, and may your desk stay forever organized! 🧶 ✨