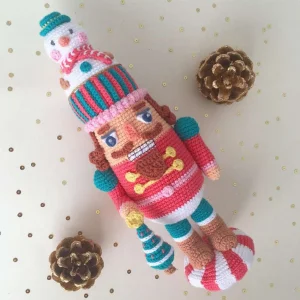
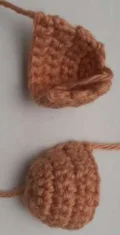
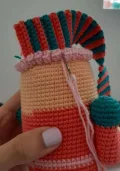
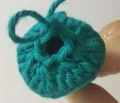
There is something so magical about a handmade Nutcracker standing guard on the mantle during the holidays. This isn't just your standard wooden soldier; he’s got a whimsical cupcake-style hat topped with a tiny snowman friend! You are going to love how the textures come together, from the curly hair to the peppermint swirl base. It is a bit of a project, but seeing his little face peek out from the yarn is so rewarding. Grab your favorite festive cotton and let's make a new family heirloom together.
Progress Tracker
0% Complete
— 1. Body & Head :
Info :
We will begin at the top of the head using your skin-tone yarn.
Round 1 :
Start by making 6 sc into a mr (6)
Round 2 :
Work 2 sc into every stitch around (12)
Round 3 :
sc 1, then work an inc in the next stitch. Repeat around (18)
Round 4 :
sc 2, then work an inc in the next stitch. Repeat around (24)
Round 5 :
sc 3, then work an inc in the next stitch. Repeat around (30)
Round 6 :
sc 4, then work an inc in the next stitch. Repeat around (36)
Round 7 :
sc 5, then work an inc in the next stitch. Repeat around (42)
Round 8 :
sc 6, then work an inc in the next stitch. Repeat around (48)
Round 9 :
sc 7, then work an inc in the next stitch. Repeat around (54)
Round 10 :
sc 8, then work an inc in the next stitch. Repeat around (60)
Round 11 :
Working in blo only, sc in each stitch around (60)
Round 12-21 :
Work 1 sc in every stitch for these ten rounds (60)
Round 22 :
sc 26, switch to white for 8 sc, switch back to nude for the rest of the round (60). Change color to red at the end.
Round 23 :
sc 26, switch to white for 8 sc, then switch to red and finish the round (60)
Round 24-34 :
Using red yarn, sc in every stitch for these eleven rounds (60). Switch to pink at the end.
Round 35-36 :
Using pink yarn, sc in every stitch for these two rounds (60). Switch to red at the end.
Round 37-41 :
Using red yarn, sc in every stitch for these five rounds (60). Switch to white at the end.
Round 42-43 :
Using white yarn, sc in every stitch for these two rounds (60)
Round 44 :
Working in blo only, sc 8, then work a dec. Repeat around (54)
Round 45 :
sc 7, then work a dec. Repeat around (48)
Round 46 :
sc 6, then work a dec. Repeat around (42)
Round 47 :
sc 5, then work a dec. Repeat around (36). Begin stuffing the body firmly.
Round 48 :
sc 4, then work a dec. Repeat around (30)
Round 49 :
sc 3, then work a dec. Repeat around (24)
Round 50 :
sc 2, then work a dec. Repeat around (18)
Round 51 :
sc 1, then work a dec. Repeat around (12). Cut yarn leaving a long tail and sew the opening closed.
— 2. Legs (Make 2) :
Info :
Start with green yarn for the legs.
Round 1 :
Make 6 sc into a mr (6)
Round 2 :
Work 2 sc in every stitch around (12)
Round 3 :
sc 1, then work an inc in the next stitch. Repeat around (18)
Round 4 :
Working in blo only, sc in each stitch around (18)
Round 5-8 :
sc in each stitch around (18). Switch to white at the end of Round 8.
Round 9 :
Using white, sl st in each stitch around (18)
Round 10 :
Working in blo only, sc in each stitch around (18). Switch to khaki at the end.
Round 11 :
Using khaki, sl st in each stitch around (18)
Round 12 :
Working in blo only, sc in each stitch around (18)
Round 13-18 :
sc in each stitch around for these six rounds (18). Stuff the legs and leave a tail for sewing.
— 3. Feet (Make 2) :
Round 1 :
Make 6 sc into a mr (6)
Row 2 :
Instead of a round, ch 1 to turn and work 2 sc in every stitch (12)
Row 3-7 :
ch 1 and turn, then work 12 sc across (12). These will be sewn to the legs to form the boots.
— 4. Left Arm :
Info :
Start with green yarn.
Round 1 :
Make 6 sc into a mr (6)
Round 2 :
Work 2 sc in every stitch around (12)
Round 3 :
sc 1, then work an inc in the next stitch. Repeat around (18)
Round 4 :
sc 2, then work an inc in the next stitch. Repeat around (24)
Round 5-6 :
sc in each stitch around (24)
Round 7 :
sc 2, then work a dec. Repeat around (18)
Round 8 :
sc 1, then work a dec (12). Switch to red.
Round 9-17 :
Using red, sc in each stitch around (12). Switch to pink at the end.
Round 18-19 :
Using pink, sc in each stitch around (12). Switch to nude at the end.
Round 18-20 :
Using nude, sc in each stitch around (12). Stuff the arm.
Round 21 :
dec in every stitch around (6). Fasten off and hide the yarn tail.
— 5. Right Arm (Piece 1) :
Info :
Start with green yarn.
Round 1 :
Make 6 sc into a mr (6)
Round 2 :
Work 2 sc in every stitch around (12)
Round 3 :
sc 1, then work an inc in the next stitch. Repeat around (18)
Round 4 :
sc 2, then work an inc in the next stitch. Repeat around (24)
Round 5-6 :
sc in each stitch around (24)
Round 7 :
sc 2, then work a dec. Repeat around (18)
Round 8 :
sc 1, then work a dec (12). Switch to red.
Round 9-17 :
Using red, sc in each stitch around (12). Stuff the piece now.
Round 18 :
Working in blo, dec 6 times. Use a needle to close and hide the yarn.
— 6. Right Arm (Piece 2) :
Info :
Start with nude yarn.
Round 1 :
Make 6 sc into a mr (6)
Round 2 :
Work 2 sc in every stitch around (12)
Round 3-4 :
sc in each stitch around (12). Switch to pink.
Round 5-6 :
Using pink, sc in each stitch around (12). Switch to red.
Round 7-13 :
Using red, sc in each stitch around (12). Stuff and leave a long tail to sew to Piece 1.
— 7. Buttons & Pink Base :
Buttons :
Make 2: 6 sc into a mr, sl st to join. ch 13, then work 6 sc back along the ch. Fasten off and glue to the chest.
Pink Base :
Join pink yarn to the blo from the top of the head. Work a repeating pattern of 1 pop (using hdc) followed by 1 hdc around.
— 8. Hat Base :
Row 1 :
Using red, ch 10, then ch 1 and work 10 sc across.
Row 2 :
ch 1, turn, and work 10 sc in blo. Switch to green.
Row 3 :
ch 1, turn, and work 10 sc in blo.
Row 4 :
ch 1, turn, and work 10 sc in blo. Switch to red.
Info :
Continue alternating colors every two rows until you have 14 red stripes and 13 green stripes. Sew the short ends together to form the hat cylinder.
— 9. Snowman Body :
Round 1 :
Make 6 sc into a mr (6)
Round 2 :
Work 2 sc in each stitch (12)
Round 3 :
sc 1, inc 1. Repeat around (18)
Round 4 :
sc 2, inc 1. Repeat around (24)
Round 5 :
sc 3, inc 1. Repeat around (30)
Round 6 :
sc 4, inc 1. Repeat around (36)
Round 7 :
sc 5, inc 1. Repeat around (42)
Round 8 :
sc 6, inc 1. Repeat around (48)
Round 9 :
sc 7, inc 1. Repeat around (54)
Round 10-14 :
sc in each stitch around (54). Stuff and sew to the hat base.
— 10. Snowman Head :
Round 1 :
Make 6 sc into a mr (6)
Round 2 :
Work 2 sc in each stitch (12)
Round 3 :
sc 1, inc 1. Repeat around (18)
Round 4 :
sc 2, inc 1. Repeat around (24)
Round 5 :
sc 3, inc 1. Repeat around (30)
Round 6 :
sc 4, inc 1. Repeat around (36)
Round 7-11 :
sc in each stitch around (36)
Round 12 :
sc 4, dec 1. Repeat around (30)
Round 13 :
sc 3, dec 1. Repeat around (24)
Round 14 :
sc 2, dec 1. Repeat around (18)
Round 15 :
sc 1, dec 1. Repeat around (12). Stuff firmly.
Round 16 :
dec in every stitch (6). Close and fasten off.
— 11. Snowman Accessories :
Hat Base :
Using green: Round 1: 6 sc in mr. Round 2: 12 sc. Round 3: (1 sc, inc) x 6 (18). Round 4: (2 sc, inc) x 6 (24). Round 5: (3 sc, inc) x 6 (30).
Hat Top :
Using green: Round 1: 6 sc in mr. Round 2: 12 sc. Round 3: (1 sc, inc) x 6 (18). Round 4: blo sc 18. Switch to yellow. Round 5: sc 18. Sew to hat base.
Scarf :
ch 50. Work 1 hdc in red, then 1 hdc in white alternating across the chain.
Nose :
Round 1: 4 sc in mr. Round 2: (1 sc, inc) x 2 (6). Sew to head.
Arms :
Make 2: ch 7, then sc back along the chain.
— 12. Hair & Beard :
Hair Round 1 :
ch 15, hdc in each ch. Do not cut yarn.
Hair Round 2 :
ch 20, hdc in each ch. Repeat this 19 times to create curls.
Hair Round 3 :
ch 15, hdc in each ch. Glue the wig to the head.
Beard :
Row 1: ch 7, dc across (7). Row 2: 7 dc. Row 3: ch 4, then 7 dc and sl st into the 7th ch. Glue below the mouth.
— 13. Christmas Tree & Star :
Round 1 :
Using green: 6 sc in mr (6)
Round 2 :
sc in each stitch (6)
Round 3 :
sc 1, inc 1. Repeat around (9)
Round 4 :
sc in each stitch (9)
Round 5 :
sc 2, inc 1. Repeat around (12)
Round 6 :
sc in each stitch (12)
Round 7 :
sc 1, inc 1. Repeat around (18)
Round 8 :
sc in each stitch (18)
Round 9 :
sc 2, inc 1. Repeat around (24)
Round 10 :
sc in each stitch (24)
Round 11 :
blo, work a dec using 3 stitches instead of 2 all around. Stuff.
Round 12 :
Switch to brown: blo, sc in each stitch around.
Round 13 :
sc in each stitch around. Fasten off.
Star :
In a mr, work (sc, dc) 5 times. Finish with a sc and glue to the tree top.
— 14. Candy Base :
Round 1 :
Using white: 7 sc in mr (7)
Round 2 :
Work 1 red sc and 1 white sc into every stitch around (14)
Round 3 :
Work 2 red sc into red stitches and 1 white sc into white stitches (21)
Round 4 :
sc 1 red, sc 1 red, then 2 white sc in the white stitch (28)
Round 5 :
inc 1 red, sc 1 red, sc 1 white, sc 1 white
Round 6 :
sc 1 red, sc 1 red, sc 1 red, inc 1 white, sc 1 white
Round 7 :
inc 1 red, sc 1 red, sc 1 red, inc 1 white, sc 1 white, sc 1 white
Round 8 :
inc 1 red, sc 1 red, sc 1 red, sc 1 red, sc 1 white in next 4 stitches
Round 9 :
sc 1 red in next 5 stitches, inc 1 white, sc 1 white in next 3 stitches
Round 10 :
inc 1 red, sc 1 red in next 4 stitches, inc 1 white, sc 1 white in next 4 stitches
Round 11 :
inc 1 red, sc 1 red in next 5 stitches, sc 1 white in next 6 stitches
Round 12 :
blo: sc 1 red in next 7 stitches, sc 1 white in next 6 stitches
Round 13-14 :
sc 1 red in next 7 stitches, sc 1 white in next 6 stitches
Round 15 :
blo: dec 1 red, sc 1 red in next 5 stitches, sc 1 white in next 6 stitches
Round 16 :
dec 1 red, sc 1 red in next 4 stitches, dec 1 white, sc 1 white in next 4 stitches
Round 17 :
sc 1 red in next 5 stitches, dec 1 white, sc 1 white in next 3 stitches
Round 18 :
dec 1 red, sc 1 red in next 3 stitches, sc 1 white in next 4 stitches
Round 19 :
dec 1 red, sc 1 red in next 2 stitches, dec 1 white, sc 1 white in next 2 stitches
Round 20 :
sc 1 red in next 3 stitches, dec 1 white, sc 1 white
Round 21 :
dec 1 red, sc 1 red, sc 1 white in next 2 stitches
Round 22 :
sc 1 red in next 2 stitches, dec 1 white
Round 23 :
dec 1 red, sc 1 white. Close and fasten off.
I truly hope you enjoyed bringing this Nutcracker to life as much as I did! There’s something so special about the way he stands on his little peppermint base, ready to join your holiday celebrations. Whether he’s a gift for a loved one or a new addition to your own decor, he’s sure to be a conversation starter. Don't forget to share your finished photos—I love seeing the different colors you choose! Happy crocheting, and may your holidays be filled with handmade joy. 🧶 ✨ 🎄