About This Miosotis Floral Granny Square Pattern
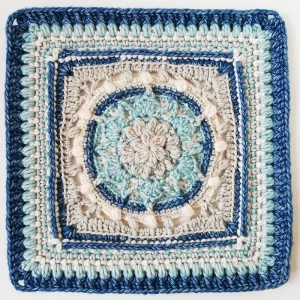
This pattern makes a gorgeous statement piece for your home—it's sophisticated enough for a formal living room but cozy enough for a heirloom nursery blanket.
Ideal for those with basic crocheting experience, featuring slightly more advanced stitches and techniques to expand your skills.
Fits nicely into a free afternoon — 2 to 5 hours of focused, enjoyable crocheting.
A warm touch for your space that transforms ordinary corners into inviting nooks filled with handmade charm.
This pattern makes a gorgeous statement piece for your home—it's sophisticated enough for a formal living room but cozy enough for a heirloom nursery blanket.
I honestly loved the way the colors play together in this design. Using the post stitches to create that 3D floral effect is so satisfying—you really get to see the 'forget-me-not' bloom as you work through the layers!
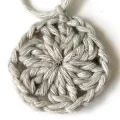
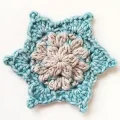
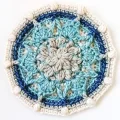
There’s something so grounding about working on a project that requires your full attention, and the Miosotis square is exactly that for me. I first picked up this pattern during a particularly rainy week, and honestly, the rhythmic dance of post stitches and clusters was the perfect distraction. Ana Morais Soares has such a gift for creating these 'blooming' designs where the texture feels almost architectural.
When you're working on the central flower, don't be afraid if it looks a bit 'ruffly' at first—that’s just the nature of these high-relief stitches! Once you transition into the squaring-off rounds, everything begins to settle and flatten out beautifully. I personally chose to use a slightly tighter tension than usual to really make those puff stitches stand out like little pearls. If you're planning to make a full blanket, I’d suggest blocking each square as you go. It makes the final joining process so much more satisfying when every edge is crisp and every corner is perfectly square. This pattern is a wonderful way to play with a gradient of blues, but it would look equally stunning in autumnal rusts and creams if you want a different vibe!
I've always loved how a simple hook and some yarn can turn into something as intricate as this Miosotis square. It’s inspired by the delicate forget-me-not flower, and you'll find yourself falling for the way the textures build up round by round. Your hands will stay busy with all those lovely post stitches and puff details, making it a truly engaging project. It’s one of those pieces that feels like a real accomplishment once that final border is finished, and it looks absolutely stunning as the centerpiece of a handmade blanket.
(color A) Start with a magic ring, ch3 & a 2dc-CL (this acts as your first 3dc-CL). Work (ch2, 3dc-CL) 5 times. Finish with ch2 & sl st to the top of the first cluster. Keep your yarn attached. (6 3dc-CL, 6 ch2-sp)
(color A) sl st into the first ch2-sp. ch3 & 2dc-CL (acts as your first 3dc-CL). ch2, then work another 3dc-CL in that same space. ch2, skip the next st. *(3dc-CL, ch2, 3dc-CL) in the next ch2-sp, ch2, skip next st.** Repeat from * to ** 5 times. sl st to the first cluster. Fasten off. (12 3dc-CL, 12 ch2-sp)
(color B) Join with a standing FPsc around the first cluster of the previous round that was worked into a Round 1 space. *Work 2 sc into the next ch2-sp, then a FPsc around the next st. Now, work a tr around the 3dc-CL from Round 1 directly below (keep this stitch behind the ch2-sp). FPsc around the next 3dc-CL.** Repeat from * to ** 5 more times, but leave off that last FPsc. sl st to join. Keep yarn attached. (12 FPsc, 6 tr, 12 sc)
(color B) ch1 (doesn't count as a st), sc in the same st. *ch3, skip 2 sts, sc in the next st. In the next st (the tr from Round 3), work (3 dc, Picot, 3 dc). sc in the next st.** Repeat from * to ** 5 times, omitting the final sc. sl st to join. Fasten off. (12 sc, 36 dc, 6 Picots, 6 ch3-sp)
(color C) Join with a standing sc in the first skipped st from the pair worked in Round 3. sc in the next skipped st. Note: these are worked in front of the ch3-sp. ch5. *sc in the next 2 skipped sts from the previous round.** Repeat from * to ** 5 times, omitting the last 2 sc. sl st to join. Push the Round 4 petals forward in front of the ch5-sp. Keep yarn attached. (12 sc, 6 ch5-sp)
(color C) ch3 (counts as first dc), dc in the same st. 2 dc in the next st. *Work 6 dc in the ch5-sp, then 2 dc in each of the next 2 sts.** Repeat from * to ** 5 times, omitting the last 4 dc. sl st to the top of the ch3. Fasten off. (60 dc)
(color B) Join with a standing sc in the first dc of any 2-dc group. sc in the next st. *Work a FPtr2tog by placing the first leg around the sc after a Picot from Round 4, and the second leg around the sc before the next Picot. Do not skip the st behind. sc in the next 10 sts.** Repeat from * to ** 5 times, omitting the last 2 sc. sl st to join. Fasten off. (6 FPtr2tog, 60 sc)
(color D) Work this entire round in BLO. Join with a standing sc in the st just before any FPtr2tog. *FPsc around the next st (the FPtr2tog), then BLO sc in the next 10 sts.** Repeat from * to ** 5 times, omitting the last BLO sc. sl st to join. Fasten off. (6 FPsc, 60 BLO sc)
(color A) Work this entire round in BLO. Join with a standing sc in any FPsc. BLO sc in the next 5 sts. *dc in the Picot from Round 5 (don't skip any sts). BLO sc in the next 11 sts.** Repeat from * to ** 5 times, omitting the last 6 BLO sc. sl st to join. Fasten off. (6 dc, 66 BLO sc)
(color C) Work in BLO except for the puffs. Join with a standing Puff-st in any dc from Round 9. *BLO sc in the next 5 sts, Puff-st in the next st.** Repeat from * to ** 11 times, omitting the last Puff-st. sl st to join. Fasten off. (12 Puff-st, 60 BLO sc)
(color A) Join with a standing dc in the 3rd sc after any puff (worked into a dc from Round 9). In that same st, work (ch2, dc, ch2, dc) to create your first corner. *ch2, skip 2 sts, FPhdc around the puff, ch2, skip 2 sts, Puff-st in next st, ch2, skip 2 sts, FPsc around the next puff, ch2, skip 2 sts, Puff-st in next st, ch2, skip 2 sts, FPhdc around the next puff, ch2, skip 2 sts. In the next st, work a corner of (dc, ch2, dc, ch2, dc).** Repeat from * to ** 3 times, skipping the final corner. sl st to join. Keep yarn attached. (8 Puff-st, 4 FPsc, 8 FPhdc, 24 ch2-sp, 4 corners)
(color A) ch3 (counts as first dc). 2 dc in the next ch2-sp. In the next st, work (2 dc, ch2, 2 dc) for the corner. *2 dc in the next ch2-sp, dc in the next st, 2 dc in the next ch2-sp, hdc in the next st, 2 hdc in the next ch2-sp, FPhdc around the puff, 2 hdc in the next ch2-sp, hdc in the next st, 2 hdc in the next ch2-sp, FPhdc around the puff, 2 hdc in the next ch2-sp, hdc in the next st, 2 dc in the next ch2-sp, dc in the next st, 2 dc in the next ch2-sp. Work (2 dc, ch2, 2 dc) in the corner st.** Repeat from * to ** 3 times, omitting the final 3 dc and corner. sl st to join. Fasten off. (44 hdc, 56 dc, 8 FPhdc, 4 ch2 corners)
(color D) Work this entire round in BLO. Join with a standing dc in any ch2 corner sp. Work (dc, ch2, 2 dc) in that same space. *BLO dc in the next 9 sts, BLO hdc in the next 9 sts, BLO dc in the next 9 sts. Work (2 dc, ch2, 2 dc) into the next corner space.** Repeat from * to ** 3 times, skipping the final corner. sl st to join. Fasten off. (36 BLO hdc, 80 BLO dc, 8 dc, 4 ch2 corners)
(color C) Join with a standing hdc in any ch2 corner. In the same sp, work (ch2, hdc). *BPhdc in the next 31 sts. In the next corner, work (hdc, ch2, hdc).** Repeat from * to ** 3 times, skipping the final corner. sl st to join. Fasten off. (8 hdc, 124 BPhdc, 4 ch2 corners)
(color B) Join with a standing sc in any ch2 corner. In the same sp, work (ch2, sc). *(ch1, skip 1 st, sc in next st) 16 times. ch1, skip the last st. In the corner, work (sc, ch2, sc).** Repeat from * to ** 3 times, skipping the final corner. sl st to join. Fasten off. (72 sc, 68 ch1-sp, 4 ch2 corners)
(color A) Join with a standing sc in any ch2 corner. In the same sp, work (ch2, sc). *(ch1, skip 1 st, sc in next ch1-sp) 17 times. ch1, skip the last st. In the corner, work (sc, ch2, sc).** Repeat from * to ** 3 times, skipping the final corner. sl st to join. Fasten off. (76 sc, 72 ch1-sp, 4 ch2 corners)
(color C) Join with a standing sc in any ch2 corner. In the same sp, work (ch2, sc). *(ch1, skip 1 st, sc in next ch1-sp) 18 times. ch1, skip the last st. In the corner, work (sc, ch2, sc).** Repeat from * to ** 3 times, skipping the final corner. sl st to join. Fasten off. (80 sc, 76 ch1-sp, 4 ch2 corners)
(color B) Join with a standing 2dc-CL in any ch2 corner. Work (ch3, 2dc-CL) in that same space. *ch1, skip 1 st. (Work a Puff-st in the next ch1-sp, ch1, skip 1 st) 19 times. In the next corner, work (2dc-CL, ch3, 2dc-CL).** Repeat from * to ** 3 times, skipping the final corner. sl st to join. Fasten off. (76 Puff-st, 8 2dc-CL, 80 ch1-sp, 4 ch3 corners)
(color D) Join with a standing 2dc-CL in any ch3 corner. Work (ch3, 2dc-CL) in the same space. *FPdc around the next cluster, skip the ch1-sp, FPdc around the first puff. (Work hdc in the ch1-sp, then a FPdc around the next puff) 19 times. In the next corner, work (2dc-CL, ch3, 2dc-CL).** Repeat from * to ** 3 times, skipping the final corner. sl st to join and fasten off. (76 hdc, 8 2dc-CL, 84 FPdc, 4 ch3 corners)
I hope you enjoy every single stitch of this Miosotis square as much as I did. There’s a real sense of pride that comes from finishing a piece with this much detail and texture! Once you’ve mastered the post stitches and those lovely puff rounds, you’ll have a versatile block that can be turned into anything from a chic bag to a full-sized heirloom afghan. Don't forget to take a moment to admire your work under good lighting—the shadows created by those raised stitches are just breathtaking. Happy crafting, and may your hook always find its way through the loops! 🧶✨
Yes, but using a DK or Sport weight yarn will result in a much smaller square, likely around 8-9 inches instead of the intended 12 inches.
Don't worry! The squaring-off doesn't happen until Round 11. It’s designed to be circular for the first half to create the floral motif before becoming a square.
It’s a great way to learn! Just take it slow and use the photos as a guide to see exactly where the hook should be inserted around the stitch post.
I recommend a flat slip stitch join or a mattress stitch through the back loops to keep the focus on the heavy texture of the squares themselves.
