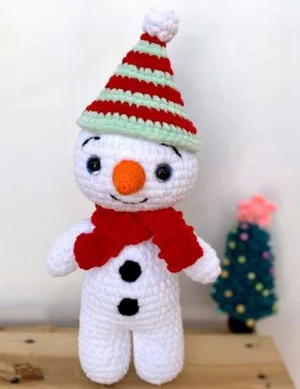
There is something so incredibly satisfying about working with plush yarn, and this cuddly snowman is the perfect way to spend a chilly afternoon. You will love how quickly he works up into a soft, huggable friend that feels like a cloud in your hands. Whether you are decorating your mantel for the season or making a special gift for a little one, this project brings all the winter magic without the cold. Grab your favorite squishy yarn and let's get making!
Progress Tracker
0% Complete
— 1. Head :
Round 1 :
Start with a magic ring and place 6 sc into the center (6)
Round 2 :
Work 2 sc into every stitch around (12)
Round 3 :
Repeat a sequence of 1 sc followed by an inc 6 times (18)
Round 4 :
Repeat a sequence of 2 sc followed by an inc 6 times (24)
Round 5 :
Repeat a sequence of 3 sc followed by an inc 6 times (30)
Round 6 :
Repeat a sequence of 4 sc followed by an inc 6 times (36)
Round 7 :
Repeat a sequence of 5 sc followed by an inc 6 times (42)
Round 8 :
Repeat a sequence of 6 sc followed by an inc 6 times (48)
Round 9-15 :
Work 1 sc in every stitch around (48)
Info :
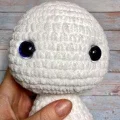
If you are using 16mm safety eyes, place them now between rounds 11 and 12, leaving 9 stitches between them.
Round 16 :
Repeat a sequence of 6 sc followed by a dec 6 times (42)
Round 17 :
Repeat a sequence of 5 sc followed by a dec 6 times (36)
Round 18 :
Repeat a sequence of 4 sc followed by a dec 6 times (30)
Round 19 :
Repeat a sequence of 3 sc followed by a dec 6 times (24)
Round 20 :
Repeat a sequence of 2 sc followed by a dec 6 times (18)
Info :
Stuff the head firmly with fiberfill.
Round 21 :
Repeat a sequence of 1 sc followed by a dec 6 times (12)
Round 22 :
Work 6 dec around (6)
Info :
Fasten off and hide the yarn tail inside the head.
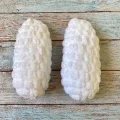
— 2. Legs and Body :
Round 1 :
Using white plush yarn, work 6 sc into a magic ring (6)
Round 2 :
Work 2 sc into every stitch around (12)
Round 3 :
Repeat a sequence of 1 sc followed by an inc 6 times (18)
Round 4-10 :
Work 1 sc in every stitch around (18)
Info :
Fasten off the first leg, leaving a 10cm tail. Repeat rounds 1-10 for the second leg, but do not cut the yarn.
Round 11 :
From the second leg, work 18 sc around the first leg, then work 18 sc around the second leg to join them (36)
Info :
Using the tail from the first leg, make 1 sl st on the inside of the join to close any gap between the legs.
Round 12-18 :
Work 1 sc in every stitch around (36)
Info :
Stuff both legs firmly now before the body narrows.
Round 19 :
Repeat a sequence of 4 sc followed by a dec 6 times (30)
Round 20 :
Work 1 sc in every stitch around (30)
Round 21 :
Repeat a sequence of 3 sc followed by a dec 6 times (24)
Round 22 :
Work 1 sc in every stitch around (24)
Round 23 :
Repeat a sequence of 2 sc followed by a dec 6 times (18)
Info :
Stuff the body firmly.
Round 24 :
Repeat a sequence of 1 sc followed by a dec 6 times (12)
Round 25 :
Work 1 sc in every stitch around (12)
Info :
Fasten off and leave a long tail if needed for sewing.
— 3. Arms (Make 2) :
Round 1 :
With white plush yarn, make 6 sc into a magic ring (6)
Round 2 :
Work 2 sc into every stitch around (12)
Round 3-8 :
Work 1 sc in every stitch around (12)
Round 9 :
Repeat a sequence of 4 sc followed by a dec 2 times (10)
Info :
Add a small amount of stuffing to the arm, keeping it light.
Round 10 :
Repeat a sequence of 3 sc followed by a dec 2 times (8)
Round 11 :
Repeat a sequence of 2 sc followed by a dec 2 times (6)
Info :
Flatten the top of the arm and work 2 sc through both layers to close the opening.
Info :
Fasten off and weave in your ends.
— 4. Buttons (Make 2) :
Round 1 :
Using black cotton yarn and the 3mm hook, work 6 sc into a magic ring (6)
Round 2 :
Work 2 sc into every stitch around (12)
Info :
Fasten off and leave a long tail for sewing onto the belly.
— 5. Nose :
Round 1 :
Using orange cotton yarn and the 3mm hook, work 6 sc into a magic ring (6)
Round 2 :
Work 1 sc in every stitch around (6)
Round 3 :
Repeat a sequence of 1 sc followed by an inc 3 times (9)
Round 4 :
Work 1 sc in every stitch around (9)
Round 5 :
Repeat a sequence of 2 sc followed by an inc 3 times (12)
Round 6 :
Work 1 sc in every stitch around (12)
Round 7 :
Repeat a sequence of 3 sc followed by an inc 3 times (15)
Round 8 :
Work 1 sc in every stitch around (15)
Round 9 :
Repeat a sequence of 4 sc followed by an inc 3 times (18)
Info :
Fasten off and leave a long tail for attachment.
— 6. Optional Crochet Eyes :
Round 1 :
With black yarn and the 3mm hook, work 6 sc into a magic ring (6)
Round 2 :
Work 2 sc into every stitch around (12)
Info :
Sl st to join, fasten off, and leave a tail. Add a small white stitch for a highlight.
— 7. Striped Hat (Variant 1) :
Round 1 :
With red plush yarn, work 6 sc into a magic ring (6)
Round 2 :
Work 1 sc in every stitch around (6)
Colour Change :
Switch to green yarn, but do not cut the red yarn.
Round 3 :
Work 2 sc into every stitch around (12)
Round 4 :
Work 1 sc in every stitch around (12)
Colour Change :
Switch back to red yarn.
Round 5 :
Repeat a sequence of 1 sc followed by an inc 6 times (18)
Round 6 :
Work 1 sc in every stitch around (18)
Colour Change :
Switch back to green yarn.
Round 7 :
Repeat a sequence of 2 sc followed by an inc 6 times (24)
Round 8 :
Work 1 sc in every stitch around (24)
Colour Change :
Switch back to red yarn.
Round 9 :
Repeat a sequence of 3 sc followed by an inc 6 times (30)
Round 10 :
Work 1 sc in every stitch around (30)
Colour Change :
Switch back to green yarn.
Round 11 :
Repeat a sequence of 4 sc followed by an inc 6 times (36)
Round 12 :
Work 1 sc in every stitch around (36)
Colour Change :
Switch back to red yarn.
Round 13 :
Repeat a sequence of 5 sc followed by an inc 6 times (42)
Round 14 :
Work 1 sc in every stitch around (42)
Colour Change :
Switch back to green yarn for the final stripe.
Round 15 :
Repeat a sequence of 6 sc followed by an inc 6 times (48)
Round 16 :
Work 1 sc in every stitch around (48)
Info :
Fasten off and weave in all yarn ends.
— 8. Beret Hat (Variant 2) :
Round 1 :
Using black plush yarn, work 6 sc into a magic ring (6)
Round 2 :
Work 2 sc into every stitch around (12)
Round 3 :
Repeat a sequence of 1 sc followed by an inc 6 times (18)
Round 4 :
Repeat a sequence of 2 sc followed by an inc 6 times (24)
Round 5 :
Repeat a sequence of 3 sc followed by an inc 6 times (30)
Round 6 :
Repeat a sequence of 4 sc followed by an inc 6 times (36)
Round 7 :
Working in BLO, sc in every stitch around (36)
Round 8-9 :
Work 1 sc in every stitch around (36)
Info :
Fasten off and weave in ends.
— 9. Hat Pompom :
Round 1 :
With white plush yarn, work 6 sc into a magic ring (6)
Round 2 :
Work 2 sc into every stitch around (12)
Round 3 :
Work 1 sc in every stitch around (12)
Round 4 :
Work 6 dec around (6)
Info :
Fasten off, leave a tail, and sew to the top of either hat.
— 10. Scarf :
Row 1 :
With red plush yarn, ch 5. Sc in the 2nd ch from the hook and the next 3 sts, ch 1, turn (4)
Row 2-39 :
Work 1 sc in each of the 4 sts across, ch 1, turn (4)
Row 40 :
Work 1 sc in each of the 4 sts across (4)
Info :
Fasten off and weave in your ends.
I hope you enjoyed creating this little frosty friend as much as I did! There is something so magical about seeing a simple pile of yarn transform into a character with so much personality. He is the perfect project for snuggling up on the couch with a hot cocoa. Once you have mastered the needle sculpting, you will find yourself using it on all your amigurumi! Don't forget to share your finished snowmen with the community—I love seeing the different hat and color combinations you all come up with. Happy crafting and stay cozy! 🧶 🧵 ✨