About This Christmas Reindeer Amigurumi Pattern

He makes the most thoughtful handmade Christmas gift — personal enough to feel special, but achievable enough to whip up a few before the holiday rush hits.
Ideal for those with basic crocheting experience, featuring slightly more advanced stitches and techniques to expand your skills.
Fits nicely into a free afternoon — 2 to 5 hours of focused, enjoyable crocheting.
Festive fun for the season, bringing handmade magic to celebrations and creating new family traditions.
He makes the most thoughtful handmade Christmas gift — personal enough to feel special, but achievable enough to whip up a few before the holiday rush hits.
I'll be honest — I picked up this pattern expecting a quick seasonal make and ended up falling completely in love with the process. There's something so satisfying about the way the legs merge into the body in one continuous piece; it just feels clever. And working with plush yarn is such a treat — it hides any little tension wobbles beautifully, which takes so much pressure off. The antlers are my absolute favorite part. They're tiny two-part constructions that join together in the most satisfying way, and every time I've made a pair I end up smiling at how perfectly deer-like they look. This one's a keeper.

I made my first version of this reindeer in early November, thinking I'd just test the pattern quickly and move on to other holiday projects. Three hours later I had a fully assembled deer sitting on my desk and absolutely no desire to put him away. That's how this one gets you.
The thing I keep coming back to is how the plush yarn hides so much. If you've been nervous about amigurumi because you think your tension is too uneven, this is genuinely the pattern to try. The yarn's texture is incredibly forgiving — little inconsistencies just disappear into the fluff. What you're left with is this soft, chunky, completely charming toy that looks like it took way more skill than it actually did.
For the antlers, I'd really suggest trying the two-strand medium yarn option if you don't have dark brown plush on hand. I actually prefer the slightly firmer texture it gives — the antlers hold their shape a bit better and stand up more confidently on top of the head. Small thing, but it makes a visual difference.
Color-wise, the light brown and red combination is a classic for good reason, but I've made a version in a creamy oat color with a deep forest green scarf and it was stunning. A pale blue scarf on an ivory deer gives you a winter wonderland vibe that feels a little more modern. The pattern structure stays exactly the same — you're just swapping the yarn colors, which takes about 30 seconds of planning.
If you want to gift this, make two and display them together. There's something about a matching pair of reindeer that just looks intentional and lovely, and the second one always works up faster than the first once you've got the rhythm down.
This little reindeer has stolen my heart, and I have a feeling he's about to steal yours too. Worked up in the coziest plush yarn, he comes together with a chunky, huggable body, dark brown antlers, a sweet white muzzle, and a jaunty red scarf tied around his neck. Whether you're making him as a holiday decoration, a Christmas gift, or just because — he's the kind of project that makes you want to drop everything and cast on right now. The construction is wonderfully approachable, starting from the legs up, so you build the whole deer piece by piece before bringing him to life in assembly. Trust me, the moment you add those sparkly glitter eyes, you'll be completely smitten.
Start with light brown plush yarn and a 4 mm hook. Make a magic ring. Work in a continuous spiral — no slip stitch to close rounds and no starting chain unless noted. Make two legs following Rounds 1–10; fasten off after the first leg leaving a 10 cm tail, but do NOT cut yarn after the second leg. The body continues from there.
Place 6 sc into the magic ring = 6 sts
Work 2 sc in every st around = 12 sts
(sc in next st, 2 sc in next st) rep 6 times = 18 sts
sc in each st around = 18 sts
sc in each st around = 18 sts
sc in each st around = 18 sts
sc in each st around = 18 sts
sc in each st around = 18 sts
sc in each st around = 18 sts
sc in each st around = 18 sts. Fasten off the first leg leaving a 10 cm tail. For the second leg, do NOT cut yarn.
Joining the legs: continuing with the working yarn from the second leg, sc 18 around all sts of the first leg, then sc 18 around all sts of the second leg to connect them = 36 sts. Using the yarn tail from the first leg and your tapestry needle, work 1 sl st on the inside between the legs to close any gap.
18 sc around all sts of the first leg, then 18 sc around the second leg's sts = 36 sts
sc in each st around = 36 sts
sc in each st around = 36 sts
sc in each st around = 36 sts
sc in each st around = 36 sts
sc in each st around = 36 sts
sc in each st around = 36 sts
sc in each st around = 36 sts. Stuff both legs now before continuing.
(sc in next 4 sts, dec) rep 6 times = 30 sts
sc in each st around = 30 sts
(sc in next 3 sts, dec) rep 6 times = 24 sts
sc in each st around = 24 sts
(sc in next 2 sts, dec) rep 6 times = 18 sts. Stuff the body firmly now.
(sc in next st, dec) rep 6 times = 12 sts
sc in each st around = 12 sts. Fasten off.
Using light brown plush yarn and a 4 mm hook, start with a magic ring. Work in a continuous spiral.
6 sc into the magic ring = 6 sts
2 sc in every st around = 12 sts
(sc in next st, 2 sc in next st) rep 6 times = 18 sts
(sc in next 2 sts, 2 sc in next st) rep 6 times = 24 sts
(sc in next 3 sts, 2 sc in next st) rep 6 times = 30 sts
(sc in next 4 sts, 2 sc in next st) rep 6 times = 36 sts
(sc in next 5 sts, 2 sc in next st) rep 6 times = 42 sts
(sc in next 6 sts, 2 sc in next st) rep 6 times = 48 sts
sc in each st around = 48 sts
sc in each st around = 48 sts
sc in each st around = 48 sts
IMPORTANT: If you are using 16 mm safety eyes, insert them now — position them between Rounds 11 and 12 with 7 stitches of space between the two eyes.
sc in each st around = 48 sts
sc in each st around = 48 sts
sc in each st around = 48 sts
sc in each st around = 48 sts
(sc in next 6 sts, dec) rep 6 times = 42 sts
(sc in next 5 sts, dec) rep 6 times = 36 sts
(sc in next 4 sts, dec) rep 6 times = 30 sts
(sc in next 3 sts, dec) rep 6 times = 24 sts
(sc in next 2 sts, dec) rep 6 times = 18 sts. Stuff the head firmly now.
(sc in next st, dec) rep 6 times = 12 sts
dec 6 times around = 6 sts. Fasten off.
With light brown plush yarn and a 4 mm hook, start with a magic ring. Work in a continuous spiral. Make two arms total.
6 sc into the magic ring = 6 sts
2 sc in every st around = 12 sts
sc in each st around = 12 sts
sc in each st around = 12 sts
sc in each st around = 12 sts
sc in each st around = 12 sts
sc in each st around = 12 sts
sc in each st around = 12 sts
(sc in next 4 sts, dec) rep 2 times = 10 sts. Lightly stuff the arm now — don't overfill.
(sc in next 3 sts, dec) rep 2 times = 8 sts
(sc in next 2 sts, dec) rep 2 times = 6 sts. Close the opening by working 2 sc along the edge. Fasten off, cut yarn, and weave in the end. Rep Rounds 1–11 for the second arm.
With white plush yarn and a 4 mm hook, start with a magic ring (or ch2 and work into the second ch from hook). Work in a continuous spiral.
6 sc into the magic ring = 6 sts
2 sc in every st around = 12 sts
(sc in next st, 2 sc in next st) rep 6 times = 18 sts
sc in each st around = 18 sts. Fasten off.
With dark brown cotton yarn and a 3 mm hook, start with a magic ring (or ch2 and work into the second ch from hook).
6 sc into the magic ring = 6 sts
2 sc in every st around = 12 sts
(sc in next st, 2 sc in next st) rep 6 times = 18 sts. Fasten off and leave a long yarn tail for sewing.
With light brown plush yarn and a 4 mm hook, begin with a magic ring. Make two ears total.
6 sc into the magic ring = 6 sts
sc in each st around = 6 sts
2 sc in every st around = 12 sts
sc in each st around = 12 sts
(sc in next st, 2 sc in next st) rep 6 times = 18 sts
sc in each st around = 18 sts
(sc in next st, dec) rep 6 times = 12 sts. Fasten off, cut yarn, and weave in ends. Rep Rounds 1–7 for the second ear.
Each antler is made from two separate small pieces that are then joined together. Use dark brown plush yarn and a 4 mm hook. Alternatively, you can hold two strands of dark brown medium-weight yarn together instead of plush yarn.
Start with a magic ring. Round 1: 6 sc into the ring = 6 sts. Round 2: sc in each st around = 6 sts. Fasten off and cut yarn.
Start with a magic ring. Round 1: 6 sc into the ring = 6 sts. Round 2: sc in each st around = 6 sts. Round 3: sc in each st around = 6 sts. Do NOT cut yarn — you'll use this working yarn to join both parts.
Using the working yarn from the second part, begin crocheting around the first antler part: work 1 sc, dec, 1 sc, dec across the first part, then continue on the second part with 1 sc, dec, 1 sc, dec = 8 sts total
1 sc, dec, 2 sc, dec, 1 sc = 6 sts. Fasten off, cut yarn, and weave in ends. One antler complete. Rep all steps for the second antler.
With white plush yarn and a 4 mm hook, begin with a magic ring.
6 sc into the magic ring = 6 sts
(sc in next st, 2 sc in next st) rep 3 times = 9 sts
sc in each st around = 9 sts. Fasten off, cut yarn, and weave in ends.
This patch is worked flat, back and forth in rows with a turning chain at the end of each row. Use white plush yarn and a 4 mm hook. Chain 5 to begin.
sc starting in the 2nd ch from the hook, then sc in the following 3 ch, ch1, turn = 4 sts
sc in each of the 4 sts, ch1, turn = 4 sts
sc in each of the 4 sts, ch1, turn = 4 sts
sc in each of the 4 sts = 4 sts. Fasten off.
Work with plush yarn in pink or red. Start with a magic ring.
sc in next st, 3 dc in next st, 2 sc in next st, 1 hdc in next st, 2 sc in next st, 3 dc in next st, sl st = 12 sts. Fasten off.
The scarf is worked flat in rows with a turning chain at the end of each row. Use red plush yarn and a 4 mm hook. Chain 5 to begin.
sc starting in the 2nd ch from the hook, then sc in the next 3 ch, ch1, turn = 4 sts
sc in each of the 4 sts, ch1, turn = 4 sts
sc in each of the 4 sts, ch1, turn = 4 sts
sc in each of the 4 sts, ch1, turn = 4 sts
sc in each of the 4 sts, ch1, turn = 4 sts
sc in each of the 4 sts, ch1, turn = 4 sts
sc in each of the 4 sts, ch1, turn = 4 sts
sc in each of the 4 sts, ch1, turn = 4 sts
sc in each of the 4 sts, ch1, turn = 4 sts
sc in each of the 4 sts, ch1, turn = 4 sts
sc in each of the 4 sts, ch1, turn = 4 sts
sc in each of the 4 sts, ch1, turn = 4 sts
sc in each of the 4 sts, ch1, turn = 4 sts
sc in each of the 4 sts, ch1, turn = 4 sts
sc in each of the 4 sts, ch1, turn = 4 sts
sc in each of the 4 sts, ch1, turn = 4 sts
sc in each of the 4 sts, ch1, turn = 4 sts
sc in each of the 4 sts, ch1, turn = 4 sts
sc in each of the 4 sts, ch1, turn = 4 sts
sc in each of the 4 sts, ch1, turn = 4 sts
sc in each of the 4 sts, ch1, turn = 4 sts
sc in each of the 4 sts, ch1, turn = 4 sts
sc in each of the 4 sts, ch1, turn = 4 sts
sc in each of the 4 sts, ch1, turn = 4 sts
sc in each of the 4 sts, ch1, turn = 4 sts
sc in each of the 4 sts, ch1, turn = 4 sts
sc in each of the 4 sts, ch1, turn = 4 sts
sc in each of the 4 sts, ch1, turn = 4 sts
sc in each of the 4 sts, ch1, turn = 4 sts
sc in each of the 4 sts, ch1, turn = 4 sts
sc in each of the 4 sts, ch1, turn = 4 sts
sc in each of the 4 sts, ch1, turn = 4 sts
sc in each of the 4 sts, ch1, turn = 4 sts
sc in each of the 4 sts, ch1, turn = 4 sts
sc in each of the 4 sts, ch1, turn = 4 sts
sc in each of the 4 sts, ch1, turn = 4 sts
sc in each of the 4 sts, ch1, turn = 4 sts
sc in each of the 4 sts, ch1, turn = 4 sts
sc in each of the 4 sts, ch1, turn = 4 sts
sc in each of the 4 sts = 4 sts. Fasten off, cut yarn, and weave in ends.
There is something genuinely magical about watching this little reindeer come together stitch by stitch. One moment you have a pile of yarn and a hook, and then — round by round — this chubby, glitter-eyed, scarf-wearing deer appears in your hands. 🦌 He's the kind of handmade gift people actually hold onto, the kind of holiday decoration that gets pulled out every December and placed somewhere special. Whether you make him for yourself or tuck him into a gift bag, he carries a little bit of that handmade warmth that no store-bought toy can replicate. I hope you have the best time making him! 🧶✨
Yes! The pattern is designed for bulky plush yarn with a 4 mm hook, which gives you a 28 cm (about 12 inch) deer. If you swap to a DK weight yarn with a 3 mm hook, you'll get a deer roughly 40–50% smaller while keeping the same proportions. The stitch counts stay identical — only the finished size changes.
Absolutely. The pattern specifically notes that any bulky yarn can substitute for the plush. You'll lose the ultra-soft, velvety texture, but the construction and stitch counts work perfectly with standard bulky acrylic or wool. The main difference is that regular yarn shows your stitches more clearly, so tension consistency matters a bit more.
Not at all — safety eyes are optional here. The pattern suggests crocheting eyes in black yarn or sewing on buttons as alternatives. For babies and toddlers, the safest route is embroidering the eyes directly onto the head with black yarn; it's also a really charming look on the finished toy.
Yes, that's right. Each leg ends at 18 sts, and when you crochet around both legs in one continuous round you get 18 + 18 = 36 sts. The body then decreases from 36 sts down to 12 over the following rounds.
Yes — the pattern offers both as options and you pick whichever you prefer. The square patch is worked in rows using white plush yarn. The heart patch is a single-round piece worked in pink or red plush yarn from a magic ring. Both attach to the same spot on the belly; it's purely a style choice.
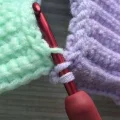
At Round 4 of the antler, you hold both crocheted mini-cylinders together and use the working yarn still attached to the second part to crochet across all the stitches of the first part, then continue back onto the second part. Think of it like joining granny squares — you're stitching over the edge of the first piece and decreasing as you go to merge them into one Y-shaped antler form.
