🧢 Beautiful ✨ Detailed πŸ’ Adorable

Chunky Bull Pillow Amigurumi Pattern

Chunky Bull Pillow Amigurumi Pattern
4.1β˜…Rating
5-7 HoursTime Needed
1.1KMade This
βœ‚οΈ

Intermediate Level

Ideal for those with basic crocheting experience, featuring slightly more advanced stitches and techniques to expand your skills.

⏱️

Weekend Treat

Takes 5-7 hours, making it an enjoyable project to finish over a couple of days.

🧸

Cute Companion

An adorable friend to cherish, handcrafted with love to bring comfort and joy for years to come.

About This Chunky Bull Pillow Amigurumi Pattern

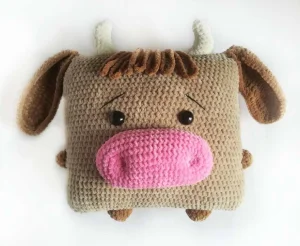
Chunky Bull Pillow Amigurumi Pattern crochet pattern - detailed view

This squishy bull pillow makes a wonderful handmade addition to a nursery or a playful accent for your living room couch. It is also the perfect, unforgettable gift for cow lovers of all ages!

Why You'll Love This Chunky Bull Pillow Amigurumi Pattern

I absolutely adore how quickly this project comes together despite its impressive size! The combination of simple stitches and thick, velvety yarn makes it an incredibly relaxing make. Plus, sculpting the muzzle and seeing those cute little nostrils appear is such a satisfying technique that brings the whole character to life.

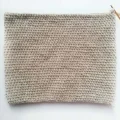
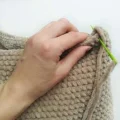
Chunky Bull Pillow Amigurumi Pattern step 1 Chunky Bull Pillow Amigurumi Pattern step 2 Chunky Bull Pillow Amigurumi Pattern step 3 Chunky Bull Pillow Amigurumi Pattern step 4

Switch Things Up

There is something incredibly satisfying about turning a simple skein of super bulky yarn into a huggable home accent. When I first designed this sweet bull pillow, I wanted to create a piece that felt like a giant, soft hug. Plush yarn can sometimes be a little intimidating because it hides your stitches, but once you get into the rhythm of feeling for your loops rather than just looking at them, it becomes pure magic.\n\nI highly recommend experimenting with colors here! While the classic beige and pink muzzle look absolutely darling, imagine a beautiful highland cow version in rusty orange with cream horns, or even a whimsical pastel purple bull. The possibilities are truly endless when you let your creativity run wild. If you find your hands getting tired from working with thick yarn, remember to take frequent breaks and stretch your fingers. Your wrists will thank you, and your stitches will stay beautifully even. Happy crocheting, my friends!

Common Mistakes & How to Fix Them

βœ— Using brown yarn for the nose as written in the original text instead of the pink yarn shown in the photos can ruin the iconic look of the bull.βœ— Under-stuffing the corners of the flat pillow body will make them collapse and look droopy rather than keeping a nice, crisp square shape.βœ— Placing the safety buttons too close together or too far apart can completely alter the cute expression of the bull's face.βœ— Sewing the ears flat along the top seam instead of slightly forward on the front panel will prevent them from draping naturally over the sides.

Chunky Bull Pillow Amigurumi Pattern

Bring a touch of handmade whimsy into your home with this incredibly soft bull pillow! Working with plush yarn is an absolute joy, and this project comes together surprisingly quickly thanks to the chunky stitches. You will love watching this sweet character come to life as you add the floppy ears, sturdy horns, and that signature squishy muzzle. It is the ultimate cozy companion for movie nights or a cute decorative accent for any bedroom.

Intermediate 5-7 Hours

Materials Needed for Chunky Bull Pillow Amigurumi Pattern

β€” Main Fabric

  • 01
    Super bulky chenille yarn (120m/100g) in Beige (approx. 2 skeins)
  • 02
    Super bulky chenille yarn (120m/100g) in Pink (small amount for muzzle)
  • 03
    Super bulky chenille yarn (120m/100g) in Brown (for ears, hair, arms, and legs)
  • 04
    Super bulky chenille yarn (120m/100g) in White (for horns)
  • 05
    Fine black acrylic yarn or embroidery thread for eyebrows

β€” Tools Required

  • 01
    Crochet hook size 3.5 mm to 5.0 mm (matching your yarn gauge)
  • 02
    Two 22 mm black buttons or safety eyes
  • 03
    High-quality polyester fiberfill stuffing (hollofayber)
  • 04
    Large-eye darning needle
  • 05
    Stitch markers
  • 06
    Scissors

Progress Tracker

0% Complete

β€” 1. Pillow Body :

Round 1 :

ch 90, join with a sl st to the first ch to form a large ring.

Round 2-37 :

sc in each of the 90 sts around (90)

Info :

Leave a long tail for sewing. Secure your work, then sew the top edge of the pillow closed. Stuff the body firmly, making sure to push plenty of fiberfill into the corners so they keep their shape. Once stuffed, sew the bottom edge shut and weave in your ends.

β€” 2. Ears (Make 2) :

Round 1 :

ch 21

Round 2 :

Starting in the second ch from your hook, work 1 sc, 1 hdc, 17 dc, then work 6 dc all into the last ch. Working along the opposite side of the foundation chain, work 18 dc, 1 hdc, 1 sc, sl st, ch 1.

Round 3 :

Starting in the second loop from your hook, work 1 sc, 1 hdc, 1 dc, inc, 17 dc, inc, inc, inc, 18 dc, inc, 1 dc, 1 hdc, 1 sc, sl st, ch 1.

Round 4 :

Starting in the second loop from your hook, work 1 sc, 1 hdc, 19 dc, inc, 1 dc, inc, inc, inc, inc, inc, 1 dc, inc, 18 dc, inc, 1 dc, 1 hdc, 1 sc, sl st.

Info :

Fasten off, leaving a generous tail for sewing.

β€” 3. Legs (Make 2) :

Round 1 :

Work 6 sc into a magic ring (6)

Round 2 :

inc in each of the 6 sts around (12)

Round 3 :

repeat (1 sc, inc) 6 times (18)

Round 4 :

sc in each of the 18 sts around (18)

Info :

Fasten off and leave a long yarn tail for assembly.

β€” 4. Arms (Make 2) :

Round 1 :

Work 6 sc into a magic ring (6)

Round 2 :

inc in each of the 6 sts around (12)

Round 3 :

sc in each of the 12 sts around (12)

Info :

Fasten off and leave a long yarn tail for assembly.

β€” 5. Nose :

Note :

The PDF text specifies brown yarn for the nose, but the photos clearly show pink yarn. We highly recommend using pink plush yarn for a classic look!

Round 1 :

ch 20

Round 2 :

Starting in the second ch from your hook, work 18 sc, then work 3 sc in the last ch. Working down the opposite side of the chain, work 18 sc (39)

Round 3 :

Work 3 sc in the first st, 18 sc, inc, 1 sc, inc, 17 sc, inc (45)

Round 4 :

1 sc, inc, 19 sc, inc, 2 sc, inc, 19 sc, inc (49)

Round 5 :

3 sc, inc, 20 sc, inc, 2 sc, inc, 20 sc, inc (53)

Round 6 :

4 sc, inc, 20 sc, inc, 4 sc, inc, 21 sc, inc (57)

Round 7-9 :

sc in each of the 57 sts around (57)

Info :

Fasten off, leaving a long tail for sewing.

β€” 6. Horns (Make 2) :

Round 1 :

Work 6 sc into a magic ring (6)

Round 2 :

repeat (2 sc, inc) 2 times (8)

Round 3 :

repeat (3 sc, inc) 2 times (10)

Round 4 :

inc, 4 sc, dec, 3 sc (10)

Round 5 :

inc, inc, 2 sc, dec, dec, 2 sc (10)

Round 6 :

inc, inc, inc, 7 sc (13)

Round 7 :

1 sc, inc, inc, inc, inc, 8 sc (17)

Round 8 :

2 sc, inc, inc, inc, inc, inc, 5 sc, dec, dec, 1 sc (20)

Round 9 :

4 sc, inc, 4 sc, inc, 6 sc, dec, dec (20)

Info :

Stuff the horns firmly and leave a long tail for sewing.

β€” 7. Hair :

Step 1 :

ch 30, then sl st into the first ch to form a loop.

Step 2 :

ch 30, then sl st into the first ch of this new chain to form a second loop.

Step 3 :

ch 30, then sl st into the first ch of this new chain to form a third loop.

Step 4-7 :

Repeat the process of making a ch 30 and joining with a sl st to create a total of 7 loops. If you prefer a fuller look, feel free to add more loops!

Info :

Fasten off, leaving a long thread for sewing.

Assembly Instructions

  • Position the pink nose between Rounds 9 and 17 of the pillow body. Sew it down, stuffing it firmly before closing the seam completely.
  • Create the nostril definition by inserting a needle with pink yarn through the unstitched bottom of the nose, pulling it up to where the nostrils should be (spaced about 14 stitches apart), stitching down slightly, and pulling tight to sculpt the shape before knotting.
  • Attach the ears to the top corners of the pillow, sewing them securely to the front side so they drape forward nicely.
  • Sew the stuffed white horns onto the top edge of the pillow, positioning them just inside the ears.
  • Attach the button eyes at Round 19, spacing them about 10 to 11 stitches apart, just above the muzzle.
  • Sew the hair loop piece right between the horns on the top of the head, letting the loops fall forward like a fringe.
  • Sew the arms to the sides around Round 13 and the legs to the bottom edge around Round 10, spacing them about 14 stitches apart. Embroider sweet little eyebrows above the eyes with black yarn.

Important Notes

  • πŸ’‘Always use a stitch marker or a piece of contrasting scrap yarn to mark the start of each round, especially since plush yarn makes it tricky to see stitches.
  • πŸ’‘When stuffing the main pillow body, pay extra attention to the four corners. Pack them firmly so they don't fold or look floppy once the pillow is finished.
  • πŸ’‘Ensure you use a strong thread or matching yarn for the facial sculpting (tightening) so it doesn't snap when you pull to shape the muzzle.
  • πŸ’‘If using safety eyes instead of sew-on buttons, remember to attach them before sewing the main pillow body completely shut.

I can't wait to see your finished bull pillows! There's nothing quite like the feeling of sewing on that last little detail and seeing a pile of plush stitches transform into a character with so much personality. Whether this cuddly guy is destined to guard your favorite armchair or bring a smile to a loved one's face, I hope you enjoyed every single stitch of this creative journey. Keep your hooks busy, stay cozy, and happy crocheting! 🧢✨

You ask,

we answer.

FAQs

Can I use a regular worsted weight yarn instead of plush yarn?

Yes, you can! Just keep in mind that using worsted weight yarn will make a much smaller pillow. You'll also need to scale down your hook size (around 3.5mm to 4.0mm) and use smaller safety eyes to match the new proportions.

How do I clean this plush bull pillow once it's finished?

Since it's made with polyester plush yarn and stuffed with fiberfill, hand washing in cool water with a mild detergent is best. Gently squeeze out excess water without twisting, and let it air dry flat to keep its shape.

My corners look a bit empty even though I stuffed the pillow. What did I do wrong?

Plush yarn can be quite bulky, which sometimes blocks stuffing from reaching the very tips. Try using the back of your crochet hook or a chopstick to gently push small clumps of fiberfill directly into the corners before sewing the edges closed.

Is it hard to do the muzzle sculpting if I've never done it before?

Not at all! Just take your time and use a strong, non-stretchy yarn (like acrylic or cotton) in a matching pink color. Pulling gently but firmly is the key to getting those cute indentations without snapping your thread.