About This Chunky Unicorn Pillow Amigurumi Pattern
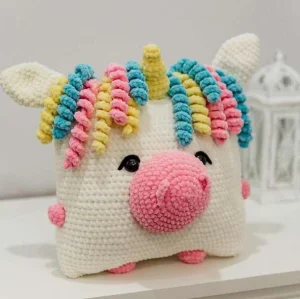
This whimsical cushion makes a wonderful addition to a nursery or a playful accent piece for your living room, bringing a touch of handmade charm to any cozy corner.
Ideal for those with basic crocheting experience, featuring slightly more advanced stitches and techniques to expand your skills.
Takes 5-7 hours, making it an enjoyable project to finish over a couple of days.
Playful characters full of personality, designed to spark imagination and become cherished playtime favorites.
This whimsical cushion makes a wonderful addition to a nursery or a playful accent piece for your living room, bringing a touch of handmade charm to any cozy corner.
I fell head over heels for this design because of how quickly it comes together using chunky yarn! The curly mane pieces are incredibly satisfying to make, and watching those springy spirals take shape is pure crochet magic. Plus, sewing the ears directly over the pillow corners is a brilliant construction trick that makes assembly a breeze.
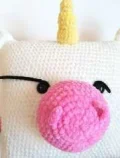
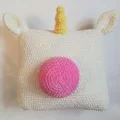
When I first sat down to design this magical unicorn cushion, I wanted to create something that felt like a giant, warm hug. Using super bulky chenille yarn makes this project work up incredibly fast, and the texture is out of this world! What I love most about this pattern is how customizable the curly mane is. I went with a classic soft pastel trio of pink, yellow, and blue, but you can easily raid your stash and use whatever scrap yarn colors you have on hand. Imagine a vibrant rainbow mane, or even a monochrome metallic vibe!
One little secret from my crochet hook to yours: when you are sewing the ears onto the corners of the pillow, tuck the actual corners of the cushion slightly inside the ears before stitching. This gives them that perfect, perky upright look instead of letting them flop forward. Take your time stuffing the corners of the main body too, as that really defines the cute square shape. I hope this sweet project brings a little bit of magic and comfort to your home!
Bring some whimsy into your home with this incredibly soft and huggable unicorn cushion! Designed with plush blanket yarn, this project is a joy to stitch and makes a wonderful companion for both kids and kids-at-heart. You will love watching this sweet character come to life, from the squishy square body to the bouncy, colorful curls of the mane.
Using white yarn, ch 90, then join to the first chain with a sl st to form a large ring, making sure the chain is not twisted. (90)
Work 1 sc into each stitch around. (90)
Leave a long yarn tail for seaming. Align the tube flat so it forms a square. Sew the top edge closed. Fill the pillow firmly and evenly, paying special attention to pushing the stuffing deep into the bottom corners. Once stuffed, sew the bottom edge closed and secure the yarn, hiding the tail inside the body.
Using white yarn, make 6 sc into a magic ring. (6)
Work 1 inc in each stitch around. (12)
Work 1 sc in each stitch around. (12)
Repeat the pattern of (1 sc, 1 inc) 6 times around. (18)
Work 1 sc in each stitch around. (18)
Repeat the pattern of (2 sc, 1 inc) 6 times around. (24)
Work 1 sc in each stitch around. (24)
Repeat the pattern of (2 sc, 1 dec) 6 times around. (18)
Work 1 sc in each stitch around. (18)
Repeat the pattern of (1 sc, 1 dec) 6 times around. (12)
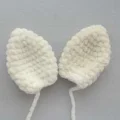
Fasten off, leaving a long tail for sewing. Do not stuff the ears.
Using pink yarn, make 6 sc into a magic ring. (6)
Work 1 inc in each stitch around. (12)
Repeat the pattern of (1 sc, 1 inc) 6 times around. (18)
Repeat the pattern of (2 sc, 1 inc) 6 times around. (24)
Repeat the pattern of (3 sc, 1 inc) 6 times around. (30)
Repeat the pattern of (4 sc, 1 inc) 6 times around. (36)
Repeat the pattern of (5 sc, 1 inc) 6 times around. (42)
Repeat the pattern of (6 sc, 1 inc) 6 times around. (48)
Work 1 sc in each stitch around. (48)
Fasten off, leaving a long tail for sewing.
Using pink yarn, ch 5. (5)
Starting in the second chain from your hook, work: 1 sc, 1 hdc, 1 hdc, 1 sl st. (4)
Fasten off, leaving a long tail for sewing.
Using yellow yarn, make 6 sc into a magic ring. (6)
Work 1 inc in each stitch around. (12)
Work 1 dec in each stitch around. (6)
Working in the front loops only, work 1 inc in each stitch around. (12)
Work 1 sc in each stitch around. (12)
Repeat the pattern of (1 sc, 1 inc) 6 times around. (18)
Repeat the pattern of (1 sc, 1 dec) 6 times around. (12)
Working in the front loops only, repeat the pattern of (1 sc, 1 inc) 6 times around. (18)
Work 1 sc in each stitch around. (18)
Repeat the pattern of (1 sc, 1 dec) 6 times around. (12)
Fasten off, leaving a long tail for sewing.
Make 5 curls in yellow, 5 in pink, and 5 in blue. If you want a longer mane, simply increase the starting chain count.
ch 25. (25)
Starting in the second chain from your hook, work 3 sc in each chain across to the end. (72)
Fasten off, leaving a tail to attach each curl to the head.
Using pink yarn, make 6 sc into a magic ring. (6)
Work 1 inc in each stitch around. (12)
Repeat the pattern of (1 sc, 1 inc) 6 times around. (18)
Work 1 sc in each stitch around. (18)
Fasten off, leaving a long tail for sewing.
Using blue yarn, make 6 sc into a magic ring. (6)
Work 1 inc in each stitch around. (12)
Work 1 sc in each stitch around. (12)
Fasten off, leaving a long tail for sewing.
I absolutely cannot wait to see your finished unicorn pillows lighting up your favorite cozy spaces! There is nothing quite like the feeling of squishing a freshly stuffed plushie that you made with your own two hands. Don't forget to play around with different pastel shades for the curly mane to make yours completely unique. Happy crocheting, my lovely crafting friends, and may your stitches be filled with magic! 🧶✨
Absolutely! If you choose to use 22 mm safety eyes, just make sure to secure them with their plastic backings inside the pillow before you sew the final top seam closed.
It is super simple! Just increase your starting chain length for each curl. For example, chain 35 or 40 instead of 25, then work 3 single crochets into each chain as usual.
Take small clumps of fiberfill and push them firmly into the bottom corners first. When sewing the top seam, do the same for the top corners to keep the square shape nice and crisp.
You can, but keep in mind that your finished unicorn will be much smaller—more like a mini toy than a functional couch cushion! You would also need to scale down your hook size.
