🧢 Beautiful ✨ Detailed πŸ’ Adorable

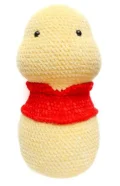
Classic Honey Bear Amigurumi Pattern

Classic Honey Bear Amigurumi Pattern
4.9β˜…Rating
5-8 HoursTime Needed
2.5KMade This
βœ‚οΈ

Intermediate Level

Ideal for those with basic crocheting experience, featuring slightly more advanced stitches and techniques to expand your skills.

⏱️

All-Day Adventure

Requires 8-10 hours, ideal for a full day of immersive crocheting.

🐰

Whimsical Buddy

Playful characters full of personality, designed to spark imagination and become cherished playtime favorites.

About This Classic Honey Bear Amigurumi Pattern

Classic Honey Bear Amigurumi Pattern crochet pattern - detailed view

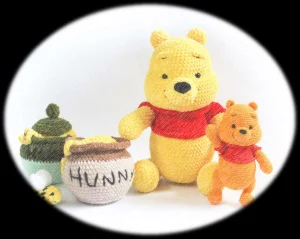
This bear makes a wonderful heirloom gift that will be cherished for years, or a standout piece for your next craft fair display. He is perfectly sized for cuddling and looks amazing as a centerpiece in a themed nursery.

Why You'll Love This Classic Honey Bear Amigurumi Pattern

I absolutely love the way the thread-mounted limbs allow him to sit or stand, giving him so much personality! Plus, working with plush yarn is so satisfyingly fast; you will see his round little body take shape in no time at all.

Classic Honey Bear Amigurumi Pattern step 1 Classic Honey Bear Amigurumi Pattern step 2 Classic Honey Bear Amigurumi Pattern step 3 Classic Honey Bear Amigurumi Pattern step 4

Switch Things Up

I still remember the first time I made a bear like this. There is something so nostalgic about that iconic yellow and red combo, isn't there? It takes me right back to Saturday morning cartoons and storybooks. When I was writing this pattern, I really wanted to make sure he had that slightly well-loved look, which is why the thread mounting is so key. It gives him such a range of motion and personality!

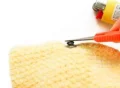
If you are new to working with plush yarn, my biggest tip is to feel for your stitches rather than just looking for them. It can be a bit tricky to see the definition with all that fluff, but once you get the rhythm, it is like magic. I also suggest using a contrasting scrap of yarn as a marker instead of a plastic oneβ€”it won't snag the fibers as much.

For the 'Hunny' pot, do not worry about making the embroidery perfect. In fact, it looks much more authentic if the letters are a little wobbly and charmingly hand-written. I can't wait to see your little bears sitting on your shelves! It's the little details like the bee wings and the honey smudge that really make this project special.

Common Mistakes & How to Fix Them

βœ— When you are doing the eye tightening, be careful not to pull the yarn too hard or it might snap through the plush fibers; use a strong backing thread if needed.βœ— If you miss the BLO instructions on Round 31, your collar won't have the right ridge to attach to, and it might sit awkwardly on the shoulders.βœ— The thread mount for the paws requires a very long needle; if yours is too short, you will struggle to pass through the thick stuffing of the body.βœ— Don't skip the marker shift in Round 29, as it keeps the increases for the belly centered correctlyβ€”without it, your bear might look a bit lopsided.

Classic Honey Bear Amigurumi Pattern

If you have been looking for a project that feels like a warm hug, this chubby yellow bear is exactly what you need. I designed him to have that perfect squishy feel, making him the ultimate gift for a nursery or a nostalgic treat for yourself. We will be working with plush yarn to get that velvety texture, and I will guide you through every increase and decrease to make sure his round belly and sweet cheeks look just right. You are going to love seeing his friendly personality come to life with every stitch.

Intermediate 5-8 Hours

Materials Needed for Classic Honey Bear Amigurumi Pattern

β€” Main Fabric

  • 01
    Approximately 1.5 balls of yellow plush yarn (YarnArt Velour) for the main body
  • 02
    Less than half a ball of red plush yarn for the signature sweater
  • 03
    Small amount of black semi-cotton yarn for the nose and facial details
  • 04
    Scrap amounts of white and black plush yarn for the bee accessories
  • 05
    Green or brown plush yarn for the honey pot and lid

β€” Tools Required

  • 01
    3.0mm crochet hook for the plush yarn
  • 02
    2.0mm crochet hook for the semi-cotton details
  • 03
    10mm safety eyes
  • 04
    Fiberfill stuffing
  • 05
    Long tapestry needle for thread mounting
  • 06
    Stitch markers
  • 07
    Straight pins with large heads
  • 08
    Scissors

Progress Tracker

0% Complete

β€” 1. Head & Body :

Info :

Begin with your yellow plush yarn and a 3.0mm hook.

Round 0 :

ch 6

Round 1 :

Starting in the second ch from your hook, work 4 sc, then 3 sc into the final ch. Turn to work along the back of the ch: 3 sc, inc (12)

Round 2 :

inc, 3 sc, 3 inc, 3 sc, 2 inc (18)

Round 3 :

sc, inc, 3 sc, (sc, inc) x 3, 3 sc, (sc, inc) x 2 (24)

Round 4 :

2 sc, inc, 3 sc, (2 sc, inc) x 3, 3 sc, (2 sc, inc) x 2 (30)

Round 5 :

3 sc, inc, 3 sc, (3 sc, inc) x 3, 3 sc, (3 sc, inc) x 2 (36)

Round 6 :

4 sc, inc, 3 sc, (4 sc, inc) x 3, 3 sc, (4 sc, inc) x 2 (42)

Round 7 :

5 sc, inc, 3 sc, (5 sc, inc) x 3, 3 sc, (5 sc, inc) x 2 (48)

Round 8 :

6 sc, inc, 3 sc, (6 sc, inc) x 3, 3 sc, (6 sc, inc) x 2 (54)

Round 9 :

54 sc (54)

Round 10 :

54 sc (54)

Round 11 :

54 sc (54)

Round 12 :

54 sc (54)

Round 13 :

54 sc (54)

Round 14 :

54 sc (54)

Round 15 :

54 sc (54)

Round 16 :

8 inc, 10 sc, 8 inc, 28 sc (70)

Round 17 :

70 sc (70)

Round 18 :

70 sc (70)

Round 19 :

70 sc (70)

Round 20 :

70 sc (70)

Round 21 :

70 sc (70)

Round 22 :

70 sc (70)

Round 23 :

70 sc (70)

Round 24 :

70 sc (70)

Round 25 :

70 sc (70)

Info :

Place safety eyes between rounds 14 and 15, leaving about 10 stitches of space between them.

Round 26 :

Work 3 sc, then move your marker forward to this new spot. 8 dec, 10 sc, 8 dec, 28 sc (54)

Round 27 :

(7 sc, dec) x 6 (48)

Round 28 :

(6 sc, dec) x 6 (42)

Round 29 :

42 sc (42). Stop 2 stitches early, and move your marker 2 stitches back.

Colour Change :

Switch to red yarn.

Round 30 :

(13 sc, inc) x 3 (45)

Round 31 :

blo: (14 sc, inc) x 3 (48)

Info :

Begin stuffing the head, focusing on the cheeks and back while keeping the top flat with your hand.

Round 32 :

(15 sc, inc) x 3 (51)

Round 33 :

(16 sc, inc) x 3 (54)

Round 34 :

(17 sc, inc) x 3 (57)

Round 35 :

(18 sc, inc) x 3 (60)

Round 36 :

10 sc, (inc, 2 sc) x 5, inc, 34 sc (66)

Round 37 :

66 sc (66)

Colour Change :

Switch back to yellow yarn.

Round 38 :

blo: 66 sc (66)

Round 39 :

(10 sc, inc) x 6 (72)

Round 40 :

72 sc (72)

Round 41 :

72 sc (72)

Round 42 :

72 sc (72)

Round 43 :

72 sc (72)

Round 44 :

72 sc (72)

Round 45 :

72 sc (72)

Round 46 :

72 sc (72)

Round 47 :

72 sc (72)

Round 48 :

72 sc (72)

Round 49 :

72 sc (72)

Round 50 :

72 sc (72)

Round 51 :

72 sc (72)

Round 52 :

(10 sc, dec) x 6 (66)

Round 53 :

(9 sc, dec) x 6 (60)

Round 54 :

(8 sc, dec) x 6 (54)

Round 55 :

(7 sc, dec) x 6 (48)

Round 56 :

(6 sc, dec) x 6 (42)

Round 57 :

(5 sc, dec) x 6 (36)

Round 58 :

(4 sc, dec) x 6 (30)

Round 59 :

(3 sc, dec) x 6 (24)

Round 60 :

(2 sc, dec) x 6 (18)

Round 61 :

(sc, dec) x 6 (12)

Round 62 :

6 dec (6). Fasten off and close the hole.

β€” 2. Collar Details :

Info :

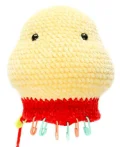
Turn the bear upside down and join red yarn to the front loops of Round 31.

Round 1 :

flo: 7 sc, inc, 14 sc, inc, 14 sc, inc, 7 sc, ch 1 and turn (48)

Round 2 :

skip the first st, 45 sc, dec, ch 1 and turn (46)

Round 3 :

skip the first st, 43 sc, dec (44). Fasten off and weave in ends.

Shirt Edge :

Join red yarn to the front loops of Round 38. ch 1, work 66 sc around, ss to join. Fasten off.

β€” 3. Ears (Make 2) :

Round 1 :

6 sc in mr (6)

Round 2 :

6 inc (12)

Round 3 :

12 sc (12)

Round 4 :

12 sc (12)

Round 5 :

12 sc (12)

Join :

ch 1, flatten the ear and sc through both layers to close (6 sc). Fasten off leaving a tail.

β€” 4. Muzzle & Nose :

Muzzle Round 1 :

6 sc in mr (6)

Muzzle Round 2 :

6 inc (12)

Muzzle Round 3 :

6 sc, (sc, inc) x 3 (15)

Muzzle Round 4 :

6 sc, (2 sc, inc) x 3 (18)

Muzzle Round 5 :

6 sc, (3 sc, inc) x 3 (21)

Muzzle Round 6 :

6 sc, (4 sc, inc) x 3 (24). ss to finish, leave a long tail.

Nose Round 0 :

Using black semi-cotton: ch 6

Nose Round 1 :

Starting in 2nd ch: 4 sc, 3 sc in last ch. Turn: sc, 3 sc in same st, sc, inc (14). ss to finish.

β€” 5. Upper Paws (Make 2) :

Round 1 :

6 sc in mr (6)

Round 2 :

6 inc (12)

Round 3 :

(3 sc, inc) x 3 (15)

Round 4 :

(2 sc, inc) x 5 (20)

Round 5 :

20 sc (20)

Round 6 :

20 sc (20)

Round 7 :

11 sc, (sc, dec) x 3 (17)

Round 8-17 :

Work 10 rounds of 17 sc (17)

Colour Change :

Switch to red.

Round 18 :

(3 sc, inc) x 4, sc (21)

Round 19 :

blo: 21 sc (21)

Round 20 :

21 sc (21)

Round 21 :

21 sc (21)

Round 22 :

(sc, dec) x 7 (14)

Round 23 :

7 dec (7). Close hole. Join red to flo of Round 19, ch 1, 21 sc, ss to join.

β€” 6. Bottom Paws (Make 2) :

Round 0 :

ch 7

Round 1 :

Starting in 2nd ch: 5 sc, 3 sc in last ch. Turn: 4 sc, inc (14)

Round 2 :

inc, 4 sc, 3 inc, 4 sc, 2 inc (20)

Round 3 :

sc, inc, 4 sc, (sc, inc) x 3, 4 sc, (sc, inc) x 2 (26)

Round 4 :

26 bpsc (26)

Round 5-7 :

Work 3 rounds of 26 sc (26)

Round 8 :

5 sc, 7 dec, 7 sc (19)

Round 9 :

4 sc, 5 dec, 5 sc (14)

Round 10 :

14 sc (14)

Round 11 :

6 sc, inc, 7 sc (15)

Round 12 :

7 sc, inc, 7 sc (16)

Round 13 :

8 sc, inc, 7 sc (17)

Round 14 :

9 sc, inc, 7 sc (18)

Round 15 :

10 sc, inc, 7 sc (19)

Round 16 :

11 sc, inc, 7 sc (20)

Round 17-21 :

Work 5 rounds of 20 sc (20)

Round 22 :

(sc, dec) x 6, dec (13)

Round 23 :

6 dec + 1 dec from next round (7). Close hole and fasten off.

β€” 7. Honey Pot & Lid :

Round 1 :

Pot: 8 sc in mr (8)

Round 2 :

8 inc (16)

Round 3 :

(sc, inc) x 8 (24)

Round 4 :

(2 sc, inc) x 8 (32)

Round 5 :

(3 sc, inc) x 8 (40)

Round 6 :

40 bpsc (40)

Round 7 :

(7 sc, inc) x 5 (45)

Round 8 :

45 sc (45)

Round 9 :

(8 sc, inc) x 5 (50)

Round 10 :

50 sc (50)

Round 11 :

(9 sc, inc) x 5 (55)

Round 12 :

55 sc (55)

Round 13 :

(10 sc, inc) x 5 (60)

Round 14 :

60 sc (60)

Round 15 :

(10 sc, dec) x 5 (55)

Colour Change :

Switch colors for the pot rim.

Round 16 :

55 sc (55)

Round 17 :

(9 sc, dec) x 5 (50)

Round 18 :

50 sc (50)

Round 19 :

(8 sc, dec) x 5 (45)

Round 20 :

(7 sc, dec) x 5 (40)

Round 21 :

(6 sc, dec) x 5 (35)

Round 22 :

35 inc (70)

Round 23 :

70 ss. Fasten off.

Lid Round 1 :

4 sc in mr (4)

Lid Round 2 :

4 inc (8)

Lid Round 3-4 :

2 rounds of 8 sc (8)

Lid Round 5 :

4 dec (4)

Lid Round 6 :

4 inc (8)

Lid Round 7 :

8 inc (16)

Lid Round 8 :

(sc, inc) x 8 (24)

Lid Round 9 :

(2 sc, inc) x 8 (32)

Lid Round 10 :

(3 sc, inc) x 8 (40)

Lid Round 11 :

40 sc (40)

Lid Round 12 :

40 ss. Fasten off.

Assembly Instructions

  • Perform eye sculpting by drawing a strong thread from the collar line up to the sides of each eye, pulling gently to create deep sockets.
  • Sew the muzzle between Rounds 15 and 24, stuffing it firmly as you attach it so it protrudes nicely.
  • Attach the black nose to the top center of the muzzle and embroider a wide, cheerful smile using black thread.
  • Position the ears in an arc between Rounds 6 and 8 on the head, about 7 stitches apart.
  • Use a long needle and strong thread to mount the upper paws to the sides of the body at the shoulder level, passing through the body to make them movable.
  • Attach the bottom paws using the same thread-mounting technique, positioning them so the bear can sit balanced on its own.
  • Embroider the word 'Hunny' on the side of the pot and sew the yellow honey detail inside the rim so it looks like it is overflowing.

Important Notes

  • πŸ’‘Stuff the head very firmly, especially the cheek area, to ensure the sculpting holds its shape over time.
  • πŸ’‘When switching colors for the shirt, do the change in the last stitch of the previous round for a cleaner transition.
  • πŸ’‘Use a scrap of yarn as a stitch marker; plastic markers can sometimes get lost or snag the plush fibers.
  • πŸ’‘If you find the pot bottom is too soft, you can cut a small circle of plastic from a container lid to reinforce it.
  • πŸ’‘Thread mounting the limbs is easier if you use a very long doll-making needle to span the width of the body.
  • πŸ’‘The bees are small, so keep your tension tight to prevent the stuffing from peeking through the stitches.

I hope you enjoyed making this classic bear as much as I did! There is something truly special about creating a character that brings back so many happy memories. Whether he is sitting on a shelf with his honey pot or being cuddled by a little one, he is sure to bring a smile to anyone's face. Don't forget to share your finished photos with our communityβ€”I love seeing the unique personalities each crafter gives their bears! Happy stitching, and may your days be as sweet as honey. 🧢 ✨ 🍯

You ask,

we answer.

FAQs

Can I use a different yarn weight for this pattern?

What is thread mounting and why is it used?

How do I make the 'Hunny' letters look right?

My bear's head is tilting forward, how can I fix it?