🧢 Beautiful ✨ Detailed πŸ’ Adorable

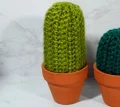
Mini Ribbed Cactus Amigurumi Pattern

Mini Ribbed Cactus Amigurumi Pattern
3.9β˜…Rating
2-3 HoursTime Needed
2.8KMade This
βœ‚οΈ

Beginner Friendly Level

Perfect for those just starting their crocheting journey, with clear instructions and simple techniques

⏱️

Quick Craft

Fits nicely into a free afternoon β€” 2 to 5 hours of focused, enjoyable crocheting.

🎁

Tiny Treasure

Small, sweet, and gift-worthy creations that fit perfectly in the palm of your hand with detailed charm.

About This Mini Ribbed Cactus Amigurumi Pattern

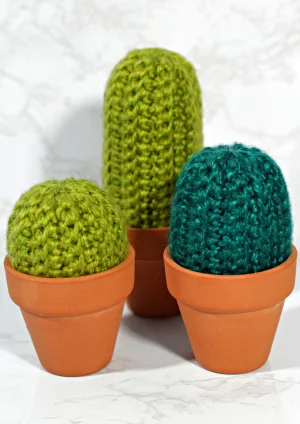
Mini Ribbed Cactus Amigurumi Pattern crochet pattern - detailed view

These make the sweetest little gifts for teachers or coworkers who might not have a green thumb. They add a pop of cheerful color to any shelf or windowsill without any maintenance required.

Why You'll Love This Mini Ribbed Cactus Amigurumi Pattern

I honestly love how satisfying it is to see the texture develop as you work the rows. It's one of those projects where you don't have to overthink the shaping, yet the result looks so professional once it's seamed and stuffed. Plus, there's no sewing on tiny limbs, which is always a win in my book!

Mini Ribbed Cactus Amigurumi Pattern step 1 Mini Ribbed Cactus Amigurumi Pattern step 2 Mini Ribbed Cactus Amigurumi Pattern step 3 Mini Ribbed Cactus Amigurumi Pattern step 4

Switch Things Up

I've always had a bit of a "black thumb" when it comes to real plants. No matter how much I try, succulents just don't seem to thrive under my care. That's why I absolutely fell in love with these crocheted versions! They give me all the aesthetic vibes of a desert garden without the heartbreak of a withered leaf. When I first made these, I was surprised by how much the 3.25mm hook matteredβ€”it really keeps those stitches tight and crisp, which is exactly what you want so that the stuffing doesn't peek through the ridges.

I actually keep a trio of these on my desk right next to my computer. They're such a great conversation starter during video calls! If you want to customize yours, try adding tiny pink or yellow flowers to the top using a bit of embroidery thread. It takes just two minutes but adds so much personality to the little guys. Another fun trick is to use a slightly darker green yarn for the seam to give it a bit of natural shading. Whether you're making these for a housewarming gift or just to brighten up your own space, they are pure joy to create. Just be warned: once you make one, you'll probably want to make an entire greenhouse full of them! They're just that addictive to hook up.

Common Mistakes & How to Fix Them

βœ— If you don't work strictly in the back loops, you'll lose that deep ribbed texture that makes it look like a cactus, so double-check your hook placement every row.βœ— Stuffing too lightly will cause the cactus to look limp or wrinkled; make sure to pack the fiberfill firmly so the ridges really pop out.βœ— When cinching the top closed, pulling too hard on the yarn tail can cause it to snapβ€”use a sturdy yarn and pull steadily but gently.βœ— If your seam is too loose when joining the first and last rows, the stuffing might peek through, so keep your sewing stitches tight and even.

Mini Ribbed Cactus Amigurumi Pattern

These little cacti are the perfect desk companions because they never need watering and always stay green! You'll love how the ribbed texture mimics a real cactus, and since they work up so fast, you can make a whole desert's worth in just one afternoon. They're a fantastic way to use up those green yarn scraps you've been saving while creating something truly adorable for your home.

Beginner Friendly 2-3 Hours

Materials Needed for Mini Ribbed Cactus Amigurumi Pattern

β€” Main Fabric

  • 01
    Worsted weight yarn in your favorite shade of green (like Caron Simply Soft Heather)
  • 02
    A small amount of scrap yarn in a contrasting color if you choose to add a tiny decorative flower

β€” Tools Required

  • 01
    3.25mm (D/3) crochet hook
  • 02
    Polyester fiberfill for stuffing the body
  • 03
    Darning needle for assembly and cinching
  • 04
    Sharp scissors for cutting yarn
  • 05
    Small terracotta pots for displaying your finished cacti

Progress Tracker

0% Complete

β€” 1. Small Cactus :

Row 1 :

Start by making 11 ch, then skip the first ch from your hook and work 1 sc into each of the next 10 ch. (10)

Row 2 :

ch 1 and turn your work, then work 1 sc into the blo of every st across the row. (10)

Row 3 :

ch 1 and turn your work, then work 1 sc into the blo of every st across the row. (10)

Row 4 :

ch 1 and turn your work, then work 1 sc into the blo of every st across the row. (10)

Row 5 :

ch 1 and turn your work, then work 1 sc into the blo of every st across the row. (10)

Row 6 :

ch 1 and turn your work, then work 1 sc into the blo of every st across the row. (10)

Row 7 :

ch 1 and turn your work, then work 1 sc into the blo of every st across the row. (10)

Row 8 :

ch 1 and turn your work, then work 1 sc into the blo of every st across the row. (10)

Row 9 :

ch 1 and turn your work, then work 1 sc into the blo of every st across the row. (10)

Row 10 :

ch 1 and turn your work, then work 1 sc into the blo of every st across the row. (10)

Row 11 :

ch 1 and turn your work, then work 1 sc into the blo of every st across the row. (10)

Row 12 :

ch 1 and turn your work, then work 1 sc into the blo of every st across the row. (10)

Row 13 :

ch 1 and turn your work, then work 1 sc into the blo of every st across the row. (10)

Row 14 :

ch 1 and turn your work, then work 1 sc into the blo of every st across the row. (10)

Row 15 :

ch 1 and turn your work, then work 1 sc into the blo of every st across the row. (10)

Row 16 :

ch 1 and turn your work, then work 1 sc into the blo of every st across the row. (10)

Row 17 :

ch 1 and turn your work, then work 1 sc into the blo of every st across the row. (10)

Row 18 :

ch 1 and turn your work, then work 1 sc into the blo of every st across the row. (10)

Info :

Fasten off and leave a long tail for seaming the sides and cinching the ends.

β€” 2. Medium Cactus :

Row 1 :

Start by making 16 ch, then skip the first ch from your hook and work 1 sc into each of the next 15 ch. (15)

Row 2 :

ch 1 and turn your work, then work 1 sc into the blo of every st across the row. (15)

Row 3 :

ch 1 and turn your work, then work 1 sc into the blo of every st across the row. (15)

Row 4 :

ch 1 and turn your work, then work 1 sc into the blo of every st across the row. (15)

Row 5 :

ch 1 and turn your work, then work 1 sc into the blo of every st across the row. (15)

Row 6 :

ch 1 and turn your work, then work 1 sc into the blo of every st across the row. (15)

Row 7 :

ch 1 and turn your work, then work 1 sc into the blo of every st across the row. (15)

Row 8 :

ch 1 and turn your work, then work 1 sc into the blo of every st across the row. (15)

Row 9 :

ch 1 and turn your work, then work 1 sc into the blo of every st across the row. (15)

Row 10 :

ch 1 and turn your work, then work 1 sc into the blo of every st across the row. (15)

Row 11 :

ch 1 and turn your work, then work 1 sc into the blo of every st across the row. (15)

Row 12 :

ch 1 and turn your work, then work 1 sc into the blo of every st across the row. (15)

Row 13 :

ch 1 and turn your work, then work 1 sc into the blo of every st across the row. (15)

Row 14 :

ch 1 and turn your work, then work 1 sc into the blo of every st across the row. (15)

Row 15 :

ch 1 and turn your work, then work 1 sc into the blo of every st across the row. (15)

Row 16 :

ch 1 and turn your work, then work 1 sc into the blo of every st across the row. (15)

Row 17 :

ch 1 and turn your work, then work 1 sc into the blo of every st across the row. (15)

Row 18 :

ch 1 and turn your work, then work 1 sc into the blo of every st across the row. (15)

Info :

Fasten off and leave a long tail for seaming the sides and cinching the ends.

β€” 3. Large Cactus :

Row 1 :

Start by making 21 ch, then skip the first ch from your hook and work 1 sc into each of the next 20 ch. (20)

Row 2 :

ch 1 and turn your work, then work 1 sc into the blo of every st across the row. (20)

Row 3 :

ch 1 and turn your work, then work 1 sc into the blo of every st across the row. (20)

Row 4 :

ch 1 and turn your work, then work 1 sc into the blo of every st across the row. (20)

Row 5 :

ch 1 and turn your work, then work 1 sc into the blo of every st across the row. (20)

Row 6 :

ch 1 and turn your work, then work 1 sc into the blo of every st across the row. (20)

Row 7 :

ch 1 and turn your work, then work 1 sc into the blo of every st across the row. (20)

Row 8 :

ch 1 and turn your work, then work 1 sc into the blo of every st across the row. (20)

Row 9 :

ch 1 and turn your work, then work 1 sc into the blo of every st across the row. (20)

Row 10 :

ch 1 and turn your work, then work 1 sc into the blo of every st across the row. (20)

Row 11 :

ch 1 and turn your work, then work 1 sc into the blo of every st across the row. (20)

Row 12 :

ch 1 and turn your work, then work 1 sc into the blo of every st across the row. (20)

Row 13 :

ch 1 and turn your work, then work 1 sc into the blo of every st across the row. (20)

Row 14 :

ch 1 and turn your work, then work 1 sc into the blo of every st across the row. (20)

Row 15 :

ch 1 and turn your work, then work 1 sc into the blo of every st across the row. (20)

Row 16 :

ch 1 and turn your work, then work 1 sc into the blo of every st across the row. (20)

Row 17 :

ch 1 and turn your work, then work 1 sc into the blo of every st across the row. (20)

Row 18 :

ch 1 and turn your work, then work 1 sc into the blo of every st across the row. (20)

Info :

Fasten off and leave a long tail for seaming the sides and cinching the ends.

Assembly Instructions

  • Match up the short ends of your rectangular piece and sew the foundation row to the last row using the back loops to create a ribbed tube.
  • Thread your yarn tail onto a darning needle and weave it through the top stitch of every other row around the opening.
  • Pull the yarn tail firmly to cinch the top of the cactus closed, then secure it with a few sturdy stitches.
  • Stuff the cactus body firmly with polyester fiberfill, making sure it holds its cylindrical shape well.
  • Repeat the same weaving and cinching technique on the bottom opening to seal the stuffing inside.
  • If desired, stitch a small crochet flower to the top center of the cactus for a pop of color.
  • Nestle the finished cactus into a small terracotta pot to complete your handmade desert display.

Important Notes

  • πŸ’‘Maintain a tight tension while crocheting to ensure the stuffing doesn't show through the ridges once the cactus is filled.
  • πŸ’‘If you want to customize the height, simply change the number of starting chainsβ€”the row count remains the same.
  • πŸ’‘The decorative flower mentioned in the finishing steps is optional and can be made with any simple flower pattern and scrap yarn.
  • πŸ’‘Using a heathered or multi-tonal green yarn can give your cactus a more natural and realistic appearance.
  • πŸ’‘Be careful not to over-stuff to the point where the seams begin to pull apart or look distorted.

I hope you have as much fun making these little desert plants as I did! They are such a joy to whip up, especially when you need a quick win or a palate cleanser between bigger projects. Don't be afraid to experiment with different shades of green or even different yarn weights to create a whole variety of sizes for your windowsill. They look so charming when grouped together in different heights. Happy hooking, and may your home always be filled with handmade greenery! 🧢 ✨

You ask,

we answer.

FAQs

Why does my cactus look more like a flat rectangle than a plant?

The shape comes entirely from the assembly! Once you sew the sides together and cinch the top and bottom, the stuffing will puff it out into that classic cactus cylinder.

Can I use a larger hook if I don't have a 3.25mm?

You can, but you'll need to use a thicker yarn to match. If you use a larger hook with worsted yarn, the stitches will be too loose and the stuffing will leak out between the ridges.

How do I make the cactus stay upright in the terracotta pot?

If it feels a bit wobbly, you can add a drop of hot glue to the bottom or stuff the bottom of the pot with a little extra yarn or fabric before popping the cactus in.

Do I have to work in the back loops for every single row?

Yes! The back loop only (blo) technique is what creates the deep vertical ridges. If you work through both loops, you'll end up with a smooth fabric instead of the cactus texture.