About This Colorful Crochet Flexagon Fidget Toy Pattern
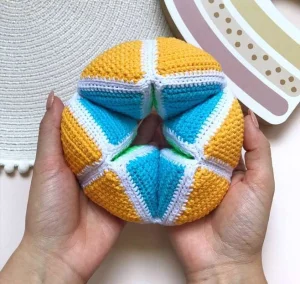
This fidget toy is a lifesaver for restless hands and makes a unique, thoughtful gift for anyone who needs a little stress relief or just loves cool geometric shapes.
Ideal for those with basic crocheting experience, featuring slightly more advanced stitches and techniques to expand your skills.
Takes 5-7 hours, making it an enjoyable project to finish over a couple of days.
Playful characters full of personality, designed to spark imagination and become cherished playtime favorites.
This fidget toy is a lifesaver for restless hands and makes a unique, thoughtful gift for anyone who needs a little stress relief or just loves cool geometric shapes.
I honestly couldn't put this down once I finished it! There's something so satisfying about the way the colors shift as you flip it. As a maker, I loved that I could work on the small triangles while watching a movie, and the assembly felt like solving a really fun 3D puzzle. It's the perfect project to clear your mind between bigger, more demanding works.
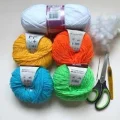
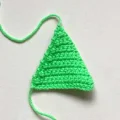
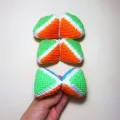
I have always been fascinated by mathematical crafts, and this flexagon is the absolute peak of that for me. It’s one of those projects that looks incredibly complex when it's finished, but when you break it down, it’s just a series of simple, meditative triangles. I remember making my first one and being so nervous about the assembly, but once you get that first pyramid together, it all just clicks!
If you want to try something a bit different, you could try a monochrome version using four different shades of the same color for a sophisticated gradient look. Or, if you're feeling adventurous, try using a variegated yarn for the triangles and a solid black for the borders—it creates a stained-glass effect that is absolutely stunning. One little tip from my own trial and error: use a slightly longer tail than you think you need when finishing the white borders. Having that extra length makes the sewing process so much smoother because you won't have to join new yarn mid-seam. This toy has become my go-to gift for my friends' kids, and honestly, the adults usually end up playing with it just as much!
If you're looking for a project that's as fun to play with as it is to make, you've found it! This crochet flexagon is a geometric wonder that twists and turns endlessly. It's a fantastic way to use up your colorful yarn scraps while creating a tactile, soothing fidget toy that both kids and adults will absolutely love. You'll enjoy the rhythmic repetition of the triangles and the magic of seeing it all come together into a squishy, movable masterpiece.
You need to make 6 triangles in each of your four main colors (Blue, Orange, Light Green, and Yellow), giving you a total of 24 triangles.
Start by making 17 ch, then work 1 sc into the second ch from your hook and in every remaining ch across, finish with 1 ch and turn your work (16)
Work 1 dec over the first two stitches, then 12 sc, and finish with 1 dec over the last two stitches, ch 1, turn (14)
Place 1 sc in every stitch across the row, ch 1, turn (14)
Work 1 dec, then 10 sc, followed by 1 dec, ch 1, turn (12)
Place 1 sc in every stitch across the row, ch 1, turn (12)
Work 1 dec, then 8 sc, followed by 1 dec, ch 1, turn (10)
Place 1 sc in every stitch across the row, ch 1, turn (10)
Work 1 dec, then 6 sc, followed by 1 dec, ch 1, turn (8)
Place 1 sc in every stitch across the row, ch 1, turn (8)
Work 1 dec, then 4 sc, followed by 1 dec, ch 1, turn (6)
Place 1 sc in every stitch across the row, ch 1, turn (6)
Work 1 dec, then 2 sc, followed by 1 dec, ch 1, turn (4)
Place 1 sc in every stitch across the row, ch 1, turn (4)
Work 2 dec across the row, ch 1, turn (2)
Work 1 dec to finish the point of the triangle (1)
Fasten off your yarn and trim the thread. Repeat this for all 24 triangles.
Join your white yarn to any side. Work sc evenly around the edges: place 14 sc along each of the three sides and work 1 inc3 into each of the three corner points. Secure with a needle join for a clean finish. (51)
Take one triangle of each color. Arrange them so Blue is in the center, with Orange, Yellow, and Light Green surrounding it. Sew the edges together using white yarn and a half-cross stitch through the back loops. Stuff lightly before closing. Make 3 of these.
Take one triangle of each color. Arrange them so Orange is in the center, with Blue, Yellow, and Light Green surrounding it. Sew the edges together using white yarn and a half-cross stitch through the back loops. Stuff lightly before closing. Make 3 of these.
Take one Pyramid A and one Pyramid B. Align them along an orange-faced edge and sew them together using the existing seam as a guide. Repeat this until you have three pairs.
Lay your three pairs out and connect them into a long strip by sewing the adjacent edges together as shown in the assembly photos.
Bring the two ends of the strip together to form a ring and sew the final seam to complete your flexagon.
I really hope you have a blast making this colorful flexagon! It’s such a rewarding project because it challenges your brain with its construction but keeps your hands happy with simple stitches. Once you finish that final seam, you won’t be able to stop flipping it through all the different color combinations. It’s the perfect desk accessory or a wonderful quiet toy for kids. I can't wait to see the color palettes you choose—don't be afraid to go bold with your scrap stash! Happy crafting and enjoy your new favorite fidget! 🧶✨🌈
Yes, you can! Just be aware that using a thicker yarn like worsted will result in a much larger flexagon, and you'll need to increase your hook size accordingly (try a 3.5mm or 4.0mm).
I know it sounds like a lot, but yes! Each of the 6 pyramids requires 4 triangles to create its 3D shape, so 24 is the magic number for a full ring.
The flexagon works by hiding and revealing faces as it turns. If the colors aren't placed in the specific A and B patterns, the colors won't align into solid faces when you flip it.
Aim for 'medium-soft.' If you overstuff, the pyramids become too round and won't sit flat against each other, which prevents the toy from rotating smoothly.
A little bit of curl is normal! Once you add the white sc border and sew them into pyramids, the structure of the 3D shape will pull them flat.
