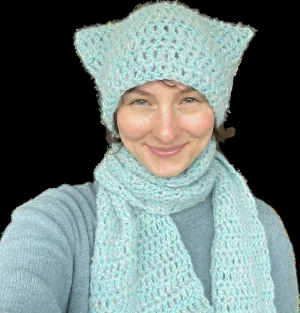
Looking for something that's both a snuggly scarf and a cute accessory? You've found it! This project is all about comfort and character, combining a classic winter staple with those adorable cat ears we all love. It's the kind of piece you'll want to wear every time the temperature drops, and the best part is how customizable it is to your own style. You'll find the process incredibly relaxing as the simple shapes transform into a whimsical wardrobe favorite.
Progress Tracker
0% Complete
— 1. The Scarf :
Row 1 :
Start by making a foundation ch of 22. Work 1 dc into the 3rd ch from your hook, then work 1 dc into every remaining ch across (20)
Row 2 :
ch 2 and turn your work. Work 1 dc into every st across the row (20)
Row 3 :
ch 2 and turn your work. Work 1 dc into every st across the row (20)
Row 4 :
ch 2 and turn your work. Work 1 dc into every st across the row (20)
Row 5 :
ch 2 and turn your work. Work 1 dc into every st across the row (20)
Row 6 :
ch 2 and turn your work. Work 1 dc into every st across the row (20)
Row 7 :
ch 2 and turn your work. Work 1 dc into every st across the row (20)
Row 8 :
ch 2 and turn your work. Work 1 dc into every st across the row (20)
Row 9 :
ch 2 and turn your work. Work 1 dc into every st across the row (20)
Row 10 :
ch 2 and turn your work. Work 1 dc into every st across the row (20)
Row 11 :
ch 2 and turn your work. Work 1 dc into every st across the row (20)
Row 12 :
ch 2 and turn your work. Work 1 dc into every st across the row (20)
Row 13 :
ch 2 and turn your work. Work 1 dc into every st across the row (20)
Row 14 :
ch 2 and turn your work. Work 1 dc into every st across the row (20)
Row 15 :
ch 2 and turn your work. Work 1 dc into every st across the row (20)
Row 16 :
ch 2 and turn your work. Work 1 dc into every st across the row (20)
Row 17 :
ch 2 and turn your work. Work 1 dc into every st across the row (20)
Row 18 :
ch 2 and turn your work. Work 1 dc into every st across the row (20)
Row 19 :
ch 2 and turn your work. Work 1 dc into every st across the row (20)
Row 20 :
ch 2 and turn your work. Work 1 dc into every st across the row (20)
Row 21 :
ch 2 and turn your work. Work 1 dc into every st across the row (20)
Row 22 :
ch 2 and turn your work. Work 1 dc into every st across the row (20)
Row 23 :
ch 2 and turn your work. Work 1 dc into every st across the row (20)
Row 24 :
ch 2 and turn your work. Work 1 dc into every st across the row (20)
Row 25 :
ch 2 and turn your work. Work 1 dc into every st across the row (20)
Row 26 :
ch 2 and turn your work. Work 1 dc into every st across the row (20)
Row 27 :
ch 2 and turn your work. Work 1 dc into every st across the row (20)
Row 28 :
ch 2 and turn your work. Work 1 dc into every st across the row (20)
Row 29 :
ch 2 and turn your work. Work 1 dc into every st across the row (20)
Row 30 :
ch 2 and turn your work. Work 1 dc into every st across the row (20)
Row 31 :
ch 2 and turn your work. Work 1 dc into every st across the row (20)
Row 32 :
ch 2 and turn your work. Work 1 dc into every st across the row (20)
Row 33 :
ch 2 and turn your work. Work 1 dc into every st across the row (20)
Row 34 :
ch 2 and turn your work. Work 1 dc into every st across the row (20)
Row 35 :
ch 2 and turn your work. Work 1 dc into every st across the row (20)
Row 36 :
ch 2 and turn your work. Work 1 dc into every st across the row (20)
Row 37 :
ch 2 and turn your work. Work 1 dc into every st across the row (20)
Row 38 :
ch 2 and turn your work. Work 1 dc into every st across the row (20)
Row 39 :
ch 2 and turn your work. Work 1 dc into every st across the row (20)
Row 40 :
ch 2 and turn your work. Work 1 dc into every st across the row (20)
Row 41 :
ch 2 and turn your work. Work 1 dc into every st across the row (20)
Row 42 :
ch 2 and turn your work. Work 1 dc into every st across the row (20)
Row 43 :
ch 2 and turn your work. Work 1 dc into every st across the row (20)
Row 44 :
ch 2 and turn your work. Work 1 dc into every st across the row (20)
Row 45 :
ch 2 and turn your work. Work 1 dc into every st across the row (20)
Row 46 :
ch 2 and turn your work. Work 1 dc into every st across the row (20)
Row 47 :
ch 2 and turn your work. Work 1 dc into every st across the row (20)
Row 48 :
ch 2 and turn your work. Work 1 dc into every st across the row (20)
Row 49 :
ch 2 and turn your work. Work 1 dc into every st across the row (20)
Row 50 :
ch 2 and turn your work. Work 1 dc into every st across the row (20)
Row 51 :
ch 2 and turn your work. Work 1 dc into every st across the row (20)
Row 52 :
ch 2 and turn your work. Work 1 dc into every st across the row (20)
Row 53 :
ch 2 and turn your work. Work 1 dc into every st across the row (20)
Row 54 :
ch 2 and turn your work. Work 1 dc into every st across the row (20)
Row 55 :
ch 2 and turn your work. Work 1 dc into every st across the row (20)
Row 56 :
ch 2 and turn your work. Work 1 dc into every st across the row (20)
Row 57 :
ch 2 and turn your work. Work 1 dc into every st across the row (20)
Row 58 :
ch 2 and turn your work. Work 1 dc into every st across the row (20)
Row 59 :
ch 2 and turn your work. Work 1 dc into every st across the row (20)
Row 60 :
ch 2 and turn your work. Work 1 dc into every st across the row (20)
Row 61 :
ch 2 and turn your work. Work 1 dc into every st across the row (20)
Row 62 :
ch 2 and turn your work. Work 1 dc into every st across the row (20)
Row 63 :
ch 2 and turn your work. Work 1 dc into every st across the row (20)
Row 64 :
ch 2 and turn your work. Work 1 dc into every st across the row (20)
Row 65 :
ch 2 and turn your work. Work 1 dc into every st across the row (20). Fasten off your yarn
— 2. The Hat :
Info :
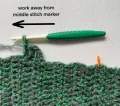
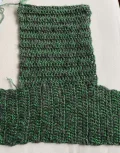
Find the exact midpoint of your scarf and mark it. Place a second marker roughly 11cm away from that center point on either side
Row 1 :
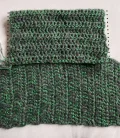
Join your yarn at the second marker. Work dc stitches along the long edge of the scarf, moving away from the center marker. Place 2 dc into the side of each scarf row until you have a total of 28 stitches
Row 2 :
ch 2 and turn. Work 1 dc into every st across (28)
Row 3 :
ch 2 and turn. Work 1 dc into every st across (28)
Row 4 :
ch 2 and turn. Work 1 dc into every st across (28)
Row 5 :
ch 2 and turn. Work 1 dc into every st across (28)
Row 6 :
ch 2 and turn. Work 1 dc into every st across (28)
Row 7 :
ch 2 and turn. Work 1 dc into every st across (28)
Row 8 :
ch 2 and turn. Work 1 dc into every st across (28)
Row 9 :
ch 2 and turn. Work 1 dc into every st across (28)
Row 10 :
ch 2 and turn. Work 1 dc into every st across (28)
Row 11 :
ch 2 and turn. Work 1 dc into every st across (28)
Row 12 :
ch 2 and turn. Work 1 dc into every st across (28)
Row 13 :
ch 2 and turn. Work 1 dc into every st across (28)
Row 14 :
ch 2 and turn. Work 1 dc into every st across (28)
Row 15 :
ch 2 and turn. Work 1 dc into every st across (28)
Row 16 :
ch 2 and turn. Work 1 dc into every st across (28)
Row 17 :
ch 2 and turn. Work 1 dc into every st across (28)
Row 18 :
ch 2 and turn. Work 1 dc into every st across (28). Fasten off
I can't wait for you to try this one! It’s such a relaxing project to work on while watching a movie or listening to a podcast. Once you've finished, you'll have a cozy, handmade accessory that's sure to get plenty of compliments. Don't forget to play around with colors—a variegated yarn would look stunning here too. Happy hooking, and I hope you enjoy every stitch of your new kitty scarf! 🧶✨