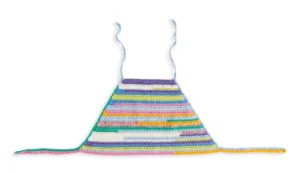
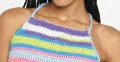
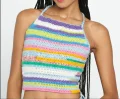
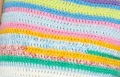
This breezy halter top is exactly what your summer wardrobe needs for those sun-drenched days. It uses self-striping yarn to do all the heavy lifting, letting you enjoy the rhythmic flow of double crochets without worrying about constant color changes. It's a fantastic project for when you want to make something impressive but wearable, perfect for beach trips or music festivals. You'll love how the simple shaping creates such a flattering silhouette for any body type.
Progress Tracker
0% Complete
— 1. Main Body - Size XS/S :
Row 1 :
Using Contrast A, ch 36. Work 1 dc in the 3rd ch from your hook and in every ch across. Turn. (34 dc)
Info :
This row establishes the first row of your 2-row stripe pattern. Switch to Contrast B after Row 2.
Row 2 :
ch 2. 1 dc in the first st. Place 2 dc in the next st. 1 dc in each st until 2 sts rem. 2 dc in the next st. 1 dc in the final st. Turn. (36 dc)
Colour Change :
Switch to Contrast B for the next 2 rows.
Row 3 :
ch 2. 1 dc in the first st. Place 2 dc in the next st. 1 dc in each st until 2 sts rem. 2 dc in the next st. 1 dc in the final st. Turn. (38 dc)
Row 4 :
ch 2. 1 dc in the first st. Place 2 dc in the next st. 1 dc in each st until 2 sts rem. 2 dc in the next st. 1 dc in the final st. Turn. (40 dc)
Colour Change :
Switch to Contrast A for the next 2 rows.
Row 5 :
ch 2. 1 dc in the first st. 2 dc in the next st. dc across to last 2 sts. 2 dc in next st. 1 dc in last st. Turn. (42 dc)
Row 6 :
ch 2. 1 dc in the first st. 2 dc in the next st. dc across to last 2 sts. 2 dc in next st. 1 dc in last st. Turn. (44 dc)
Colour Change :
Switch to Contrast B for the next 2 rows.
Row 7 :
ch 2. 1 dc in the first st. 2 dc in the next st. dc across to last 2 sts. 2 dc in next st. 1 dc in last st. Turn. (46 dc)
Row 8 :
ch 2. 1 dc in the first st. 2 dc in the next st. dc across to last 2 sts. 2 dc in next st. 1 dc in last st. Turn. (48 dc)
Row 9-28 :
Continue repeating the increase pattern as established, adding 2 sts every row and alternating colors every 2 rows. You will finish Row 28 with 88 dc. Do not fasten off.
— 2. Main Body - Size M :
Row 1 :
Using Contrast A, ch 40. Work 1 dc in the 3rd ch from your hook and in every ch across. Turn. (38 dc)
Row 2 :
ch 2. 1 dc in the first st. 3 dc in the next st. dc across to last 2 sts. 3 dc in next st. 1 dc in last st. Turn. (42 dc)
Row 3-5 :
Repeat the previous row 3 more times, remembering to change colors every 2 rows. Row 5 will have 54 dc.
Row 6 :
ch 2. 1 dc in the first st. 2 dc in the next st. dc across to last 2 sts. 2 dc in next st. 1 dc in last st. Turn. (56 dc)
Row 7-29 :
Repeat the Row 6 increase pattern 23 more times, keeping up with your 2-row color stripes. You will finish Row 29 with 102 dc. Do not fasten off.
— 3. Main Body - Size L :
Row 1 :
Using Contrast A, ch 43. Work 1 dc in the 3rd ch from your hook and in every ch across. Turn. (41 dc)
Row 2 :
ch 2. 1 dc in the first st. 3 dc in the next st. dc across to last 2 sts. 3 dc in next st. 1 dc in last st. Turn. (45 dc)
Row 3-9 :
Repeat the previous row 7 more times, changing colors every 2 rows. Row 9 will have 73 dc.
Row 10 :
ch 2. 1 dc in the first st. 2 dc in the next st. dc across to last 2 sts. 2 dc in next st. 1 dc in last st. Turn. (75 dc)
Row 11-31 :
Repeat the Row 10 increase pattern 21 more times, maintaining the 2-row color stripes. You will finish Row 31 with 117 dc. Do not fasten off.
— 4. Main Body - Size XL :
Row 1 :
Using Contrast A, ch 47. Work 1 dc in the 3rd ch from your hook and in every ch across. Turn. (45 dc)
Row 2 :
ch 2. 1 dc in the first st. 3 dc in the next st. dc across to last 2 sts. 3 dc in next st. 1 dc in last st. Turn. (49 dc)
Row 3-12 :
Repeat the previous row 10 more times, changing colors every 2 rows. Row 12 will have 89 dc.
Row 13 :
ch 2. 1 dc in the first st. 2 dc in the next st. dc across to last 2 sts. 2 dc in next st. 1 dc in last st. Turn. (91 dc)
Row 14-33 :
Repeat the Row 13 increase pattern 20 more times, keeping up with your color stripes. You will finish Row 33 with 131 dc. Do not fasten off.
— 5. Main Body - Size 2/3XL :
Row 1 :
Using Contrast A, ch 49. Work 1 dc in the 3rd ch from your hook and in every ch across. Turn. (47 dc)
Row 2 :
ch 2. 1 dc in the first st. 3 dc in the next st. dc across to last 2 sts. 3 dc in next st. 1 dc in last st. Turn. (51 dc)
Row 3-17 :
Repeat the previous row 15 more times, changing colors every 2 rows. Row 17 will have 111 dc.
Row 18 :
ch 2. 1 dc in the first st. 2 dc in the next st. dc across to last 2 sts. 2 dc in next st. 1 dc in last st. Turn. (113 dc)
Row 19-35 :
Repeat the Row 18 increase pattern 17 more times, maintaining the 2-row stripes. You will finish Row 35 with 147 dc. Do not fasten off.
— 6. Main Body - Size 4/5XL :
Row 1 :
Using Contrast A, ch 51. Work 1 dc in the 3rd ch from your hook and in every ch across. Turn. (49 dc)
Row 2 :
ch 2. 1 dc in the first st. 3 dc in the next st. dc across to last 2 sts. 3 dc in next st. 1 dc in last st. Turn. (53 dc)
Row 3-24 :
Repeat the previous row 22 more times, changing colors every 2 rows. Row 24 will have 141 dc.
Row 25 :
ch 2. 1 dc in the first st. 2 dc in the next st. dc across to last 2 sts. 2 dc in next st. 1 dc in last st. Turn. (143 dc)
Row 26-38 :
Repeat the Row 25 increase pattern 13 more times, keeping up with your color stripes. You will finish Row 38 with 169 dc. Do not fasten off.
— 7. Side Ties :
Info :
At the end of your last body row, do not turn.
Step 1 :
ch 45 (45-51-60-68-75). Cut your yarn and fasten off. Do not turn.
Step 2 :
With the same side facing you, join the appropriate color with a sl st to the very first dc of the last row. ch 47 (47-53-62-70-77).
Step 3 :
Work 1 dc in the 3rd ch from hook. Work 1 dc in each of the next 44 (44-50-59-67-74) chs.
Step 4 :
Work 1 dc in each of the next 88 (102-117-131-147-169) dc across the body edge.
Step 5 :
Work 1 dc in each of the next 45 (45-51-60-68-75) chs. Fasten off.
— 8. Neck Ties and Edging :
Info :
Ensure the same side is facing you as the last row.
Step 1 :
Using Contrast B, join with a sl st to the top corner of the body.
Step 2 :
ch 46 (46-52-61-69-75) to create the neck tie.
Step 3 :
Work 1 sc in the 2nd ch from hook and in each of the next 44 (44-50-59-67-73) chs.
Step 4 :
Continue working sc evenly down the side of the body until you reach the side tie.
Step 5 :
Work 1 sc in the blo of the next 45 (45-51-60-68-75) foundation chs of the side tie. Fasten off.
Step 6 :
Turn the piece over and repeat the entire neck tie and edging process on the opposite side.
I really hope you enjoy making this halter top as much as I did! There’s something so satisfying about watching those stripes grow and knowing you’re creating a staple piece for your summer wardrobe. Whether you’re heading to a music festival or just soaking up the sun in your backyard, this top is going to be your new go-to. Don’t forget to share your finished photos—I’d love to see the colors you chose! Happy crocheting, and enjoy every single stitch of your new favorite handmade garment! 🧶✨