About This Crochet Giraffe Bookmark Amigurumi Pattern
This makes a genuinely lovely handmade gift for any reader in your life — tuck it into a book with a ribbon and it becomes something people actually keep and use.
Ideal for those with basic crocheting experience, featuring slightly more advanced stitches and techniques to expand your skills.
Fits nicely into a free afternoon — 2 to 5 hours of focused, enjoyable crocheting.
Small, sweet, and gift-worthy creations that fit perfectly in the palm of your hand with detailed charm.
This makes a genuinely lovely handmade gift for any reader in your life — tuck it into a book with a ribbon and it becomes something people actually keep and use.
I fell for this pattern because it's one of those projects where you're genuinely surprised by how much character comes out of something so small. I love how the body and head flow into each other — there's no awkward seam right across the neck, it all just grows naturally. The curled leg technique at rows 29–30 and 51–52 is such a fun little trick, and honestly once you get the hang of folding the head flat and joining those edges at row 19, it feels like magic. This is the kind of pattern I make while watching a film and finish feeling genuinely proud of.

I made my first version of this giraffe bookmark as a gift for my sister, who is absolutely the kind of person who has three books on the go at the same time and loses her place in all of them. I thought — what better solution than a handmade bookmark she'd actually be able to spot between the pages from across the room?
What I didn't expect was how much I'd enjoy the construction. The way the snout grows in the round and then just folds flat and continues growing into the neck and body — it's one of those moments in a pattern where you think 'oh, that's clever.' No separate head to sew on. No neck join to worry about. It just keeps going.
The curled legs are where most people get a little nervous when they first read the instructions. Honestly, just slow down at Rows 29–30 and 51–52 and follow it one step at a time. Chain your 15, turn, work back along them, then carry on with the body row. Once you see the first little leg curling away from the body, you'll immediately understand why it works.
For color variations — I've seen crafters make this in more muted, natural tones (think tan and cream with terracotta spots) for a more grown-up aesthetic, and it's gorgeous. You could also go completely wild and do a rainbow giraffe in gradient yarn. There are really no rules here.
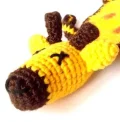
The brown edging at the end is non-negotiable in my opinion. It defines the silhouette so beautifully and makes the whole piece look intentional and polished rather than homemade-in-a-rush. Take your time with it and work it evenly all the way around.
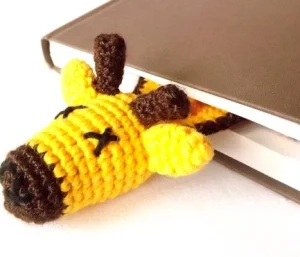
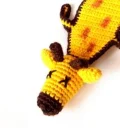
If you've ever wanted your books to have a little personality peeking out from the top, this giraffe bookmark is exactly what you've been looking for. She's tiny, she's charming, and she tucks right into your pages like she belongs there. The construction is really clever — you build the head and body as one continuous piece, then work the little curled legs right into the rows as you go. At just 20 cm tall, she's a satisfying weekend make that doesn't demand a huge time commitment. Whether you're gifting it to a bookworm friend or treating yourself, this pattern is one you'll want to come back to again and again.
Begin with brown yarn. The head and body are worked as one continuous piece — the snout is crocheted in the round first, then shaped flat and extended into the neck and body.
Start with a MR, work 6 sc into the ring. (6)
Work 1 inc in every stitch around. Repeat 6 times total. (12)
Work (1 sc, then 1 inc) — repeat this combination 6 times around. (18)
Work 18 sc around. (18)
Work 18 sc around. (18)
Switch to yellow yarn.
Work 18 sc around. (18)
Work 18 sc around. (18)
Work 18 sc around. (18)
Work (2 sc, then 1 inc) — repeat 6 times around. (24)
Work 24 sc around. (24)
Work 24 sc around. (24)
Work 24 sc around. (24)
Work 24 sc around. (24)
Work 24 sc around. (24)
Work 24 sc around. (24)
Work 24 sc around. (24)
Work (2 sc, then 1 dec) — repeat 6 times around. Stuff the snout with the silicone ball now before continuing. (18)
Work (1 sc, then 1 dec) — repeat 6 times around. (12)
Fold the head in half so the two edges meet. From this point onward, the pattern continues as flat rows rather than rounds in the round.
Ch 1, then work 6 sc joining both folded edges together. (7 stitches including the ch)
Ch 1, work 1 inc, 5 sc, 1 inc. (9)
Ch 1, work 9 sc across. (9)
Ch 1, work 1 inc, 7 sc, 1 inc. (11)
Ch 1, work 11 sc across. (11)
Ch 1, work 1 inc, 9 sc, 1 inc. (13)
Ch 1, work 13 sc across. (13)
Ch 1, work 1 inc, 11 sc, 1 inc. (15)
Ch 1, work 15 sc across. (15)
Ch 1, work 15 sc across. (15)
The front legs are worked at Rows 29–30 by crocheting a short chain and working back along it before continuing along the body. This creates a curled leg effect on each side. Repeat the same technique at Rows 51–52 for the back legs.
Ch 15, turn, work 14 sc back along the chain, then work 15 sc along the body row. (Front leg formed on this side)
Ch 15, turn, work 14 sc back along the chain, then work 15 sc along the body. (Second front leg formed)
Ch 1, work 15 sc across. (15)
Ch 1, work 15 sc across. (15)
Ch 1, work 15 sc across. (15)
Ch 1, work 15 sc across. (15)
Ch 1, work 15 sc across. (15)
Ch 1, work 15 sc across. (15)
Ch 1, work 15 sc across. (15)
Ch 1, work 15 sc across. (15)
Ch 1, work 15 sc across. (15)
Ch 1, work 15 sc across. (15)
Ch 1, work 15 sc across. (15)
Ch 1, work 15 sc across. (15)
Ch 1, work 15 sc across. (15)
Ch 1, work 15 sc across. (15)
Ch 1, work 15 sc across. (15)
Ch 1, work 15 sc across. (15)
Ch 1, work 15 sc across. (15)
Ch 1, work 15 sc across. (15)
Ch 1, work 15 sc across. (15)
Ch 1, work 15 sc across. (15)
Ch 15, turn, work 14 sc back along the chain, then work 15 sc along the body. (First back leg formed)
Ch 15, turn, work 14 sc back along the chain, then work 15 sc along the body. (Second back leg formed)
Ch 1, work 15 sc across. (15)
Ch 1, work 15 sc across. (15)
Ch 1, work 1 dec, 11 sc, 1 dec. (13)
Ch 1, work 1 dec, 9 sc, 1 dec. (11)
Ch 1, work 1 dec, 7 sc, 1 dec. (9)
Ch 1, work 1 dec, 5 sc, 1 dec. (7)
Ch 1, work 1 dec, 3 sc, 1 dec. (5)
Once the body and legs are complete, work sc edging all the way around the body and legs using brown yarn to outline and define the shape.
Work in yellow yarn. Make two ears.
Start with a MR, work 4 sc into the ring. (4)
Work 1 inc in every stitch around. Repeat 4 times total. (8)
Work 8 sc around. (8)
Work 8 sc around. (8)
Work 8 sc around. (8)
Work 8 sc around. (8)
Work in brown yarn. Make two ossicones (the small giraffe horns).
Start with a MR, work 6 sc into the ring. (6)
Work 1 inc in every stitch around. Repeat 6 times total. (12)
Work (1 sc, then 1 inc) — repeat 6 times around. (18)
Work 18 sc around. (18)
Work 18 sc around. (18)
Work (1 sc, then 1 dec) — repeat 6 times around. (12)
Work (2 sc, then 1 dec) — repeat 3 times around. (9)
There's something really special about a handmade bookmark — it's one of those small, thoughtful things that someone will use every single day and think of you every time they pick up their book. This little giraffe has so much personality packed into 20 cm. 🧶 The clever construction, the curled legs, the embroidered face — it all comes together into something that feels far more impressive than the time it takes to make. ✨ I really hope you enjoy every stitch of this one. Happy crocheting! 🧵
The pattern is designed for YarnArt Jeans, which is a fine DK-weight cotton-acrylic blend. You can substitute another yarn in the same weight, but avoid anything too fluffy or textured — you want to be able to see the stitch definition clearly, especially for the decreases and the flat body rows.
The silicone ball is used specifically to fill the rounded snout section, giving it that firm, round shape. Regular polyfill would work in a pinch but may not hold the shape as well — a small amount packed tightly should be fine if you don't have a silicone ball on hand.
If you're comfortable with working in the round, doing increases and decreases, and don't mind sewing small pieces together, you'll be fine. The trickiest part is the fold and join at Row 19 and the curled leg technique — read those steps carefully before you get there and you'll be absolutely okay.
At Rows 29–30 (front legs) and Rows 51–52 (back legs), you chain 15 extra stitches, then immediately turn and work 14 sc back along those chains before continuing the 15 sc across the body row as normal. The chain curls naturally because of the tension difference, forming a small rounded leg shape on each side.
The spots are drawn on with a brown pencil crayon after the piece is fully assembled — not crocheted or embroidered. Just freehand irregular oval shapes scattered across the yellow body. Pressing lightly and building up the color in layers gives a more natural look than pressing hard in one go.
