About This Toothless the Dragon Amigurumi Pattern
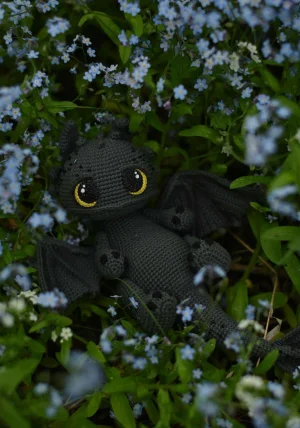
This magnificent dragon makes an unforgettable heirloom gift for fantasy lovers or a show-stopping centerpiece for your own handmade collection.
Designed for experienced crocheters, these patterns involve intricate designs and complex techniques to challenge and inspire.
A 10-12 hour project—great for savoring the process over several sessions.
Delightful animal designs with sweet details that capture the essence of your favorite woodland and farmyard friends.
This magnificent dragon makes an unforgettable heirloom gift for fantasy lovers or a show-stopping centerpiece for your own handmade collection.
I absolutely fell in love with designing the poseable wire wings on this little guy—it completely changes how you can display him! There is something so satisfying about seeing his sweet face come together, especially when you add the custom painted eyes. It's a true labor of love that will make you feel incredibly proud of your crochet skills.

When I first sat down to design this dragon, I knew I wanted to create something truly special that captured his playful, cat-like personality. Crocheting with wire can feel a little intimidating if you've never tried it before, but I promise it's a complete game-changer! It gives the wings such a gorgeous, dramatic structure and lets you pose him in the cutest ways.
For my dragon, I decided to go with a deep charcoal gray instead of a stark black because it really helps all those beautiful stitch details and the spine textures pop. If you want to add a little extra magic, try sewing some tiny black or dark blue iridescent seed beads along his back and head—they catch the light beautifully and look just like night-sky scales!
Take your time with the face detailing. Angling the eyelids even a millimeter can change his expression from sweet and curious to fierce and protective. Play around with the placement using sewing pins before you commit to sewing or gluing anything down. Enjoy every stitch of this journey!
Bring the magic of the night sky into your hands with this absolutely stunning Toothless dragon! If you've been dreaming of crafting your very own loyal, big-eyed companion, this project is going to capture your heart. From his beautifully textured wings to those expressive, hand-painted eyes, every single stitch feels like bringing a beloved character to life. Get your hooks ready for an immersive and deeply rewarding creative adventure!
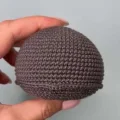
Using dark gray yarn and your 2.0 mm hook, make 6 sc into a MR (6)
Work 6 inc around the ring (12)
Repeat (1 sc, inc) 6 times (18)
Crochet 1 sc, then 1 inc, followed by (2 sc, inc) repeated 5 times, and finish with 1 sc (24)
Repeat (3 sc, inc) 6 times (30)
Crochet 2 sc, then 1 inc, followed by (4 sc, inc) repeated 5 times, and finish with 2 sc (36)
Repeat (5 sc, inc) 6 times (42)
Crochet 3 sc, then 1 inc, followed by (6 sc, inc) repeated 5 times, and finish with 3 sc (48)
Repeat (7 sc, inc) 6 times (54)
Crochet 4 sc, then 1 inc, followed by (8 sc, inc) repeated 5 times, and finish with 4 sc (60)
Repeat (9 sc, inc) 6 times (66)
Work 66 sc evenly around (66)
Crochet 5 sc, then 1 inc, followed by (10 sc, inc) repeated 5 times, and finish with 5 sc (72)
Work 72 sc around for each of these 8 rounds (72)
Crochet 18 sc, then work 36 sc in BLO, and finish with 18 sc (72)
Crochet 5 sc, then 1 dec, followed by (10 sc, dec) repeated 5 times, and finish with 5 sc (66)
Repeat (9 sc, dec) 6 times (60)
Crochet 4 sc, then 1 dec, followed by (8 sc, dec) repeated 5 times, and finish with 4 sc (54)
Repeat (7 sc, dec) 6 times (48)
Crochet 2 sc, 1 dec, then repeat (4 sc, dec) 7 times, and finish by making ch3 (32)
Skip 2 stitches before your stitch marker and 2 stitches after it. Next, crochet 1 sc, 1 dec, repeat (3 sc, dec) 6 times, work 3 sc, then crochet 1 sc directly onto the chain (32)
Work 2 sc along the chain, then 1 dec, and repeat (2 sc, dec) 7 times (24)
Repeat (2 sc, dec) 6 times (18)
Repeat (1 sc, dec) 6 times (12)
Work 6 dec to close (6)
Snip your yarn and fasten off, then pull the opening tight to close. We will use the opening created in rounds 27-28 to run the wire support from the body up into the head.
Attach dark gray yarn to the first unworked front loop from round 21, keeping the opening facing away from you, and work: 17 sc, 2 hdcinc, 17 sc. Cut the yarn, fasten off, and weave in all loose ends inside the head.
Using yellow lace weight yarn and your 1.25 mm hook, work 6 sc into a MR (6)
Work 6 inc around (12)
Repeat (1 sc, inc) 6 times (18)
Repeat (inc, 2 sc) 6 times (24)
Work 3 sc, 2 hdcinc, then 2 sc (this is a partial round to shape the eye)
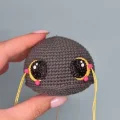
Cut the yarn and fasten off, leaving a tail. Bring all tails to the front. We will attach the eyes to the head with the wrong side facing out, as it has a smoother, less textured look.
On the textured wrong side of each eye, paint a large black pupil and small white light glares using textile paint. Note that the hdcinc stitches from round 5 should end up in the top inner corners of the eyes when positioned.
Using dark gray yarn and your 2.0 mm hook, ch9. Starting in the second chain from your hook, work: sl st, 6 sc, sl st. Cut the yarn, leaving a long tail for sewing.
Using dark gray yarn and your 2.0 mm hook, work 6 sc into a MR (6)
Repeat (1 sc, inc) 3 times (9)
Work 4 sc, 1 inc, then 4 sc (10)
Work 4 sc, 1 inc, then 5 sc (11)
Work 5 sc, 1 inc, then 5 sc (12)
Repeat (inc, 5 sc) 2 times (14)
Work 14 sc around for these 2 rounds (14)
Work 6 sc, 1 dec, then 6 sc (13)
Work 5 sc, 1 dec, then 6 sc (12)
Flatten the ear and crochet through both layers at once with 6 sc to close the bottom. Fasten off, leaving a long tail for assembly.
Using dark gray yarn and your 2.0 mm hook, work 6 sc into a MR (6)
Work 6 sc around (6)
Fasten off and leave a long tail for sewing. Pin these small spines to the head.
Using dark gray yarn and your 2.0 mm hook, work 6 sc into a MR (6)
Repeat (2 sc, inc) 2 times (8)
Work 8 sc around (8)
Flatten the spine and crochet through both layers with 4 sc to close. Fasten off and leave a long tail for sewing.
Using dark gray yarn and your 2.0 mm hook, work 6 sc into a MR (6)
Work 6 sc around (6)
Repeat (1 sc, dec) 2 times (4)
Fasten off and leave a long tail for sewing. Pin these to the head.
Using dark gray yarn and your 2.0 mm hook, ch8. Starting in the second chain from your hook, work: 6 sc, 4 sc in the last chain. Turning to work along the opposite side of the chain, work: 5 sc, inc (17)
Work 1 inc, 5 sc, 4 inc, 5 sc, 2 inc (24)
Crochet 1 sc, 1 inc, 5 sc, repeat (1 hdc, hdcinc) 4 times, work 5 sc, then repeat (1 sc, inc) 2 times (31)
Work 9 sc, then repeat (one 3-dc Bobble st in black yarn, 2 sc in dark gray yarn) 4 times, and finish with 9 sc (31)
Shift your stitch marker. It needs to run straight up the back center of the heel, aligned with the foundation chain. Adjust this alignment by working extra shift stitches as you go.
Work 31 sc around (31)
Repeat (4 sc, dec) 2 times, work 7 sc, then repeat (dec, 4 sc) 2 times (27)
Work 6 sc, 1 dec, 5 sc, 1 dec, 4 sc, 1 dec, then 6 sc (24)
Work 6 sc, 6 dec, then 6 sc (18)
Work 18 sc around for each of these 5 rounds (18)
Gradually fill the leg with fiberfill. Stuff the lower foot section firmly, but keep the upper leg section stuffed very lightly.
Repeat (5 sc, inc) 3 times (21)
Work 21 sc around for these 2 rounds (21)
Choose whether you are using plastic safety joints or cotter pins. Follow the corresponding steps below.
Work 13 sc, ch2, skip 2 stitches, then work 6 sc (21)
Work 13 sc, then work 2 sc directly onto the chain, and finish with 6 sc (21)
Work 21 sc around (21)
Work 21 sc around for each of these 3 rounds (21)
Choose whether you are using plastic safety joints or cotter pins. Follow the corresponding steps below.
Work 6 sc, ch2, skip 2 stitches, then work 13 sc (21)
Work 6 sc, then work 2 sc directly onto the chain, and finish with 13 sc (21)
Work 21 sc around (21)
Work 21 sc around for each of these 3 rounds (21)
If using cotter pins, count 2 rounds down from the marker and away from it (7 sc to the left for the right leg, or 7 sc to the right for the left leg). Insert the disc and cotter pin here. Continue stuffing the upper leg lightly.
Repeat (5 sc, dec) 3 times (18)
Repeat (1 sc, dec) 6 times (12)
Work 6 dec to close (6)
Cut the yarn, pull the opening closed tightly, and hide the yarn tail inside the leg.
Using dark gray yarn and your 2.0 mm hook, work 6 sc into a MR (6)
Work 6 inc around (12)
Repeat (1 sc, inc) 6 times (18)
Work 5 sc, then repeat (one 3-dc Bobble st in black, 2 sc in dark gray) 3 times, and finish with 4 sc (18)
Work 18 sc around for these 3 rounds (18)
Work 8 sc, 1 dec, then 8 sc (17)
Work 17 sc around (17)
Work 5 sc, 1 dec, 3 sc, 1 dec, then 5 sc (15)
Work 15 sc around (15)
Work 6 sc, 1 dec, then 7 sc (14)
Work 6 sc, 2 inc, then 6 sc (16)
Work 1 dec, 12 sc, then 1 dec (14)
Work 6 sc, 2 inc, then 6 sc (16)
Work 1 dec, 12 sc, then 1 dec (14)
Gradually stuff the lower part of the leg firmly, and the upper part lightly.
Follow the steps below depending on your choice of jointing method.
Work 6 sc, 2 inc, 1 sc, ch2, skip 2 stitches, then work 3 sc (16)
Work 1 dec, 9 sc, 2 sc on the chain, 1 sc, then 1 dec (14)
Work 6 sc, 2 inc, then 6 sc (16)
Work 1 dec, 12 sc, then 1 dec (14)
Follow the steps below depending on your choice of jointing method.
Work 3 sc, ch2, skip 2 stitches, 1 sc, 2 inc, then 6 sc (16)
Work 1 dec, 1 sc, 2 sc on the chain, 9 sc, then 1 dec (14)
Work 6 sc, 2 inc, then 6 sc (16)
Work 1 dec, 12 sc, then 1 dec (14)
If using cotter pins, count 1 round down from the marker and away from it (4 sc to the left for the right leg, or 4 sc to the right for the left leg along round 17). Insert the 15 mm disc and cotter pin. Continue stuffing lightly.
Repeat (5 sc, dec) 2 times (12)
Work 6 dec to close (6)
Cut the yarn, pull the opening closed tightly, and hide the tail inside the leg.
We will use dark gray yarn, a 2.0 mm hook, and three different lengths of 0.9 mm wire (23cm, 19cm, and 13cm). Bend the tip of each wire safely. We will crochet in rows, working over the wire when specified. Always turn your work at the end of each row.
Ch28. Working over the 23cm wire starting from the bend, crochet: 27 sc (27), turn. (Do not work over this wire in the following rows)
Starting in the second stitch from your hook, work: 8 sc, 1 dec, 12 sc, 1 dec (22), turn
Starting in the second stitch from your hook, work: 11 sc, 1 dec, 6 sc (18), turn
Starting in the second stitch from your hook, work: 16 sc (16), turn
Starting in the second stitch from your hook, work: 13 sc (13), turn
Starting in the second stitch from your hook, work: 12 sc (12), turn
Starting in the second stitch from your hook, work: 9 sc (9), turn
Starting in the second stitch from your hook, work: 8 sc (8), turn
Starting in the second stitch from your hook, work: 4 sc (4), turn
Starting in the second stitch from your hook, work: 3 sc (3), then ch3 and turn
Now prepare a 19cm wire, starting from its bent end.
Starting in the second chain from your hook, work: 2 sc, then 3 sc, work 1 sc into the corner, 3 sc along the previous row's stitches, 1 sc into the corner, 2 sc along the previous row's stitches, 1 sc into the corner, 2 sc along the previous row's stitches, 1 sc into the corner, and 2 sc along the previous row's stitches (18), turn
Starting in the second stitch from your hook, work: 15 sc, 1 dec (16), turn
Starting in the second stitch from your hook, work: 7 sc (7), turn
Starting in the second stitch from your hook, work: 6 sc (6), turn
Starting in the second stitch from your hook, work: 5 sc, 1 sc into the corner, then 4 sc along the stitches of the previous row (10), turn
Starting in the second stitch from your hook, work: 9 sc (9), then work 1 t-ch and turn
Starting in the second stitch from your hook, work: 9 sc, 1 sc into the corner, then 3 sc along the previous row's stitches (13), turn (note that 1 stitch of the previous row remains unworked)
Starting in the second stitch from your hook, work: 12 sc (12), then work 1 t-ch and turn
Starting in the second stitch from your hook, work: 9 sc (9), turn
Starting in the second stitch from your hook, work: 8 sc (8), then work 1 t-ch and turn
Starting in the second stitch from your hook, work: 5 sc (5), turn
Starting in the second stitch from your hook, work: 3 sc, 1 inc (5), then ch3 and turn
Prepare the second 19cm wire piece, starting from its bent end.
Starting in the second chain from your hook, work: 2 sc, then 5 sc, work 1 sc into the corner, 3 sc along the previous row's stitches, 1 sc into the corner, 3 sc along the previous row's stitches, 1 sc into the corner, 1 sc along the previous row's stitch, and 2 sc into the corners of the previous rows (19), turn
Starting in the second stitch from your hook, work: 18 sc (18), turn
Starting in the second stitch from your hook, work: 17 sc (17), turn
Starting in the second stitch from your hook, work: 16 sc (16), turn
Starting in the second stitch from your hook, work: 14 sc (14), turn
Starting in the second stitch from your hook, work: 13 sc (13), then work 1 t-ch and turn
Starting in the second stitch from your hook, work: 11 sc (11), turn
Starting in the second stitch from your hook, work: 9 sc, 1 inc (11), then work 1 t-ch and turn
Starting in the second stitch from your hook, work: 9 sc (9), turn
Starting in the second stitch from your hook, work: 7 sc, 1 inc (9), then ch3 and turn
Prepare the final 13cm wire piece, starting from its bent end.
Starting in the second chain from your hook, work: 2 sc, then 8 sc (8), turn
Starting in the second stitch from your hook, work: 4 sc (4), turn
Starting in the second stitch from your hook, work: 3 sc (3), turn
Starting in the second stitch from your hook, work: 2 sc, 1 sc into the corner, then 4 sc along the stitches of the previous row (7), turn
Starting in the second stitch from your hook, work: 4 sc, 1 dec (5), then work 1 t-ch and turn
Starting in the second stitch from your hook, work: 5 sc (5), then work 1 t-ch and turn
Starting in the second stitch from your hook, work: 5 sc (5)
Cut your yarn, leaving a long tail for sewing. Carefully bend the wire frame along the top edge of each wing. Create a clean border by attaching dark gray yarn to the exit point of the first wire and crocheting sc along the top edge of the wing.
Using dark gray yarn and your 2.0 mm hook, work 4 sc into a MR (4)
Work 4 sc around for each of these 3 rounds (4)
Repeat (1 sc, inc) 2 times (6)
Work 6 sc around for each of these 3 rounds (6)
Repeat (2 sc, inc) 2 times (8)
Work 8 sc around for each of these 2 rounds (8)
Repeat (3 sc, inc) 2 times (10)
Work 10 sc around (10)
Work 2 sc, 1 inc, 4 sc, 1 inc, then 2 sc (12)
Work 12 sc around (12)
Repeat (5 sc, inc) 2 times (14)
Work 14 sc around (14)
Work 3 sc, 1 inc, 6 sc, 1 inc, then 3 sc (16)
Work 16 sc around (16)
Repeat (7 sc, inc) 2 times (18)
Work 18 sc around for each of these 2 rounds (18)
Work 4 sc, 1 inc, 8 sc, 1 inc, then 4 sc (20)
Work 20 sc around for each of these 3 rounds (20)
Repeat (9 sc, inc) 2 times (22)
Work 22 sc around for each of these 3 rounds (22)
Work 5 sc, 1 inc, 10 sc, 1 inc, then 5 sc (24)
Work 24 sc around for each of these 2 rounds (24)
Repeat (11 sc, inc) 2 times (26)
Work 26 sc around for each of these 2 rounds (26)
Work 6 sc, 1 inc, 12 sc, 1 inc, then 6 sc (28)
Work 28 sc around (28)
Repeat (13 sc, inc) 2 times (30)
Do not cut the yarn! We will continue directly into the body. Prepare your main wire frame using a 45cm piece of 1.6 mm wire. Bend one end smoothly, insert it into the tail, and stuff the tail with fiberfill.
Continuing from the tail, work: 11 sc, 1 inc, 1 sc, 4 inc, 1 sc, 1 inc, then 11 sc (36)
Work 6 sc, 1 inc, 22 sc, 1 inc, then 6 sc (38)
Work 14 sc, 1 inc, 8 sc, 1 inc, then 14 sc (40)
Work 10 sc, 1 inc, 18 sc, 1 inc, then 10 sc (42)
Work 3 sc, 1 inc, then repeat (6 sc, inc) 5 times, and finish with 3 sc (48)
Work 48 sc around (48)
Repeat (7 sc, inc) 6 times (54)
Work 54 sc around for each of these 2 rounds (54)
In round 10, we will create openings for the hind leg joints or mark their positions.
Work 13 sc, ch2, skip 2 stitches, work 24 sc, ch2, skip 2 stitches, then work 13 sc (54)
Work 13 sc, then work 2 sc directly onto the chain, work 24 sc, work 2 sc directly onto the chain, and finish with 13 sc (54)
Work 54 sc around. Use contrasting scrap yarn to mark the spaces between stitches 14-15 and stitches 40-41 (54)
Work 54 sc around (54)
Work 54 sc around for each of these 5 rounds (54)
Work 8 sc, 1 dec, repeat (16 sc, dec) 2 times, and finish with 8 sc (51)
Work 20 sc, 1 dec, 7 sc, 1 dec, then 20 sc (49)
Insert the cotter pins or plastic joints of the prepared hind legs into the body openings or marked points, and secure them firmly inside.
Work 49 sc around (49)
Work 20 sc, 1 dec, 5 sc, 1 dec, then 20 sc (47)
Work 47 sc around (47)
Work 21 sc, 1 dec, 1 sc, 1 dec, then 21 sc (45)
Repeat (13 sc, dec) 3 times (42)
Work 42 sc around (42)
Work 6 sc, 1 dec, repeat (12 sc, dec) 2 times, and finish with 6 sc (39)
Work 39 sc around (39)
Repeat (11 sc, dec) 3 times (36)
In round 28, we will create the openings for the wings and forelegs.
Work 3 sc, ch1, skip 1 stitch, 4 sc, ch2, skip 2 stitches, 16 sc, ch2, skip 2 stitches, 4 sc, ch1, skip 1 stitch, then 3 sc. (Ch1 is for the wing frame, Ch2 is for the plastic joints) (36)
Work 3 sc, 1 sc on the chain, 4 sc, 2 sc on the chain, 16 sc, 2 sc on the chain, 4 sc, 1 sc on the chain, then 3 sc (36)
Work 3 sc, ch1, skip 1 stitch, 28 sc, ch1, skip 1 stitch, then 3 sc. Mark the spaces between stitches 9-10 and stitches 27-28 with contrasting thread (36)
Work 3 sc, 1 sc on the chain, 28 sc, 1 sc on the chain, then 3 sc (36)
Work 8 sc, 1 dec, 16 sc, 1 dec, then 8 sc (34)
Work 34 sc around (34)
Repeat (15 sc, dec) 2 times (32)
Work 32 sc around (32)
Insert the cotter pins or plastic joints of the prepared forelegs into the body openings or marked points, and secure them firmly inside.
Work 7 sc, 1 dec, 14 sc, 1 dec, then 7 sc (30)
Insert the wing wire frames into the wing holes made in round 28. Connect them to the main body wire frame and wrap the connection securely with insulating tape. Sew the wings neatly to the back. Continue stuffing the body with fiberfill.
Work 4 sc, 1 dec, repeat (8 sc, dec) 2 times, and finish with 4 sc (27)
Repeat (7 sc, dec) 3 times (24)
Work 24 sc around (24)
Do not stuff the neck too firmly. Cut the yarn, leaving a very long tail for assembly. Run the body wire frame up into the head through the opening at rounds 27-28, then sew the head securely to the body.
Using dark gray yarn and your 2.0 mm hook, ch13. We will work in rows, using BLO for all stitches. Always turn your work.
Work 12 sc, then ch3 and turn (12)
Starting in the second chain from your hook, work: 2 sc, then 11 sc (13), turn
Starting in the second stitch from your hook, work: 12 sc, then ch3 and turn (12)
Starting in the second chain from your hook, work: 2 sc, then 11 sc (13), turn
Starting in the second stitch from your hook, work: 12 sc, then ch3 and turn (12)
Starting in the second chain from your hook, work: 2 sc, then 11 sc (13)
Cut your yarn, leaving a long tail. Sew the tail fins securely to the tip of the tail.
Using dark gray yarn and your 2.0 mm hook, work 4 sc into a MR (4)
Pull the ring closed tightly. Cut the yarn, leaving a long tail for sewing. Sew these spines along the tail, body, and head. If desired, sew fine seed beads between the spines using nylon thread or fishing line.
Use black dry pastel or dark eyeshadow to shade the wings and tail fins, highlighting the texture and adding depth.
I hope you absolutely love making your own little Toothless! There is something so incredibly magical about seeing this sweet dragon come together stitch by stitch. Once you finish assembling him and add those final shaded touches to his wings, he'll be ready for all kinds of adventures (or just a cozy spot on your favorite shelf). Don't forget to share your finished creation with our crafting community—I can't wait to see your beautiful dragons! Happy crocheting, my friends! 🧶✨
While you can make him without a wire frame, the wire is what allows his wings and tail to be fully poseable. Without it, the wings will droop and the tail will be floppy rather than holding its iconic shape.
Absolutely! If you prefer not to paint, you can use 25mm colored safety eyes or cut the eye shapes out of colored felt and glue them in place for a clean, vibrant look.
Plastic joints are much easier to install and hold up incredibly well for toys that will be handled. Cotter pins offer a more traditional, super-secure joint but require pliers and a bit more hand strength to bend into place.
Use a soft, dry makeup brush or Q-tip to pick up a small amount of shaved pastel dust. Gently tap off the excess, then build up the color slowly on the wings and tail fins. Work in light layers to avoid smudging.
Yes! You can upscale him using super bulky yarn and a larger hook (like 5mm or 6mm). Just keep in mind you will need much larger safety joints (around 40-45mm) and thicker wire to support the extra weight.
