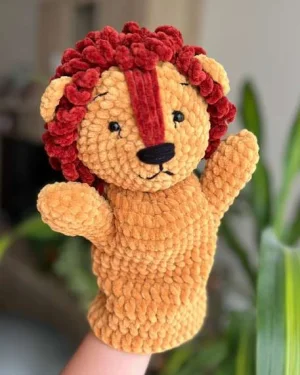
This little lion is ready to put on a show — and honestly, making him is half the fun. You'll work through a satisfying mix of plush yarn and cotton details that come together into something genuinely special. The chunky plush body feels great in your hands as you go, and watching that fluffy mane take shape around his face is one of those crafting moments you'll want to repeat. Whether you're making this for a child's toy box or a nursery shelf, it's the kind of project that feels like play from start to finish. Your hands will love the texture, your heart will love the result.
Progress Tracker
0% Complete
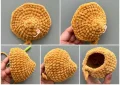
— 1. Head :
Info :
Work with dark yellow plush yarn and a 4.5 mm hook throughout the head section.
Round 1 :
Start with a MR and work 6 sc into it. (6)
Round 2 :
Work 1 inc in each stitch around. (12)
Round 3 :
Work (1 sc, 1 inc) 6 times around. (18)
Round 4 :
Work (1 sc, 1 inc) 6 times, then 6 sc. (24)
Round 5 :
Work (2 sc, 1 inc) 6 times, then 6 sc. (30)
Round 6 :
Work (3 sc, 1 inc) 6 times, then 6 sc. (36)
Round 7 :
Work (4 sc, 1 inc) 6 times, then 6 sc. (42)
Round 8 :
42 sc around. (42)
Round 9 :
42 sc around. (42)
Round 10 :
42 sc around. (42)
Round 11 :
42 sc around. (42)
Round 12 :
42 sc around. (42)
Round 13 :
Work (5 sc, 1 dec) 6 times around. (36)
Round 14 :
Work (4 sc, 1 dec) 6 times around. (30)
Round 15 :
Work (3 sc, 1 dec) 6 times around. (24)
Info :
Insert the 7 mm plastic safety eyes now, positioning them between rounds 5 and 6 counting from the magic ring (on the nose side). Leave 10 sc between the two eyes. Then stuff the head firmly with fiber filling before continuing.
Round 16 :
Work (2 sc, 1 dec) 6 times around. (18)
Round 17 :
Work (1 sc, 1 dec) 6 times around. (12)
Round 18 :
Work 1 dec in each stitch around. (6)
Info :
Thread the yarn tail through the 6 remaining front loops and pull firmly to close the opening. Fasten off and secure.
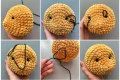
— 2. Eye Indenting (Embroidery) :
Info :
Switch to black cotton yarn and a large needle for this step. Thread the needle and push it through the back of the head, bringing the tip out just above the right eye. Leave a tail at the back.
Info :
Pass the needle from underneath the left eye and bring it out beneath the right eye, keeping the yarn running along the inside of the left eye. Then pass the needle down from above the right eye so the thread sits inside that eye too, and pull the needle back out through the same point at the rear of the head.
Info :
Draw both thread ends firmly so the eyes sink inward. Tie the ends together in a secure knot at the back and bury the tails inside the head.
— 3. Ears (Make 2) :
Info :
Work with dark yellow plush yarn and a 4.5 mm hook. Make two identical ears.
Round 1 :
Work 6 sc into a MR. (6)
Round 2 :
Work 1 inc in each stitch around. (12)
Round 3 :
Work (1 sc, 1 inc) 3 times, then sl st. (9 sc + sl st)
Info :
Leave a long yarn tail for sewing and cut the yarn. Repeat for the second ear.
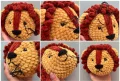
— 4. Mane :
Info :
Work with brown plush yarn and a 4.5 mm hook. Attach the yarn at the stitch between rounds 9 and 10 from the nose side, positioned 5 stitches below the left ear.
Round 1 :
Working across the upper section of the lion's face: *work 8 ch, then sl st into the next stitch*. Repeat from * to * all the way across the upper face. Fasten off and cut the yarn.
Info :
Reattach the brown yarn at the stitch between rounds 11 and 12 from the nose side, 5 stitches below the right ear.
Round 2 :
Working across the upper section of the lion's face: *work 9 ch, then sl st into the next stitch*. Repeat from * to * all the way across the upper face. Fasten off and cut the yarn.
— 5. Nose & Face Embroidery :
Info :
Using brown plush yarn threaded onto a large needle, embroider 4 straight lines radiating outward from the center of the magic ring toward the mane. Fasten off and secure the yarn.
Info :
Switch to black cotton yarn on a large needle. Embroider the black nose shape as shown in the pattern photos, then add the mouth below it.
Info :
Using a thin cotton yarn on the large needle, embroider the eye outlines, eyebrow lines, and mouth detail lines to complete the lion's face.
— 6. Arms (Make 2) :
Info :
Work with dark yellow plush yarn and a 4.5 mm hook. Make two arms. Do not stuff them.
Round 1 :
Work 6 sc into a MR. (6)
Round 2 :
Work 1 inc in each stitch around. (12)
Round 3 :
Work (2 sc, 1 inc) 4 times around. (16)
Round 4 :
16 sc around. (16)
Round 5 :
16 sc around. (16)
Round 6 :
Work (2 sc, 1 dec) 4 times around. (12)
Round 7 :
12 sc around. (12)
Round 8 :
12 sc around. (12)
Round 9 :
12 sc around. (12)
Info :
Work 1 sl st, then cut and fasten off the yarn. Do not stuff. Make a second arm the same way.
— 7. Body :
Info :
Work with dark yellow plush yarn and a 4.5 mm hook. Leave a long starting tail for sewing. Begin without a sl st — chain 24, then sl st into the very first chain to form a ring.
Round 1 :
Work 24 sc around the ring. (24)
Round 2 :
Work (3 sc, 1 inc) 6 times around. (30)
Round 3 :
Work (4 sc, 1 inc) 6 times around. (36)
Round 4 :
Work (5 sc, 1 inc) 6 times around. (42)
Round 5 :
Work this round joining the arms into the body: crochet 7 sc working through both the body and the first arm together, then 13 sc on the body only, then 7 sc working through both the body and the second arm together, then 15 sc on the body only. (42) Work sc2tog at both sides of each sleeve join to close any gaps.
Round 6 :
sc2tog, then 4 sc on the first arm only, sc2tog, 12 sc on the body only, sc2tog, 4 sc on the second arm only, sc2tog, 14 sc on the body only. (38)
Round 7 :
dec, 2 sc, dec, 12 sc, dec, 2 sc, dec, 14 sc. (34)
Round 8 :
34 sc around, then ch 1. (34)
Round 9 :
34 dc around. (34)
Round 10 :
34 dc around. (34)
Round 11 :
34 dc around. (34)
Round 12 :
34 dc around. (34)
Round 13 :
34 dc around. (34)
Round 14 :
34 dc around. (34)
Info :
Work 1 sc, then 1 sl st. Cut the yarn and fasten off securely.
There's something genuinely joyful about finishing a hand puppet — the moment you slip your hand inside and suddenly this little lion comes to life is one of those crafting payoffs that never gets old. 🧶 He's got so much personality packed into that fluffy mane and those sunken eyes, and the tactile pleasure of working with plush yarn makes the whole process feel luxurious from first stitch to last. Whether he ends up as a gift, a prop for storytime, or just the most charming thing sitting on your shelf — he's worth every round. Go make your lion roar! ✨