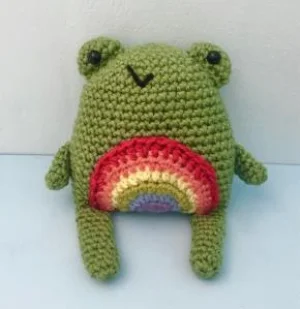
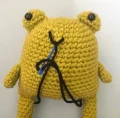
Stitch up a little pocket-sized dose of joy with this adorable crochet frog! Designed to celebrate love and identity, this sweet companion features a customizable pride flag belly patch. You will love watching this chubby little amphibian come to life stitch by stitch as you create a meaningful, handmade treasure for yourself or someone special.
Progress Tracker
0% Complete
— 1. Frog Body :
Round 1 :
Start with green yarn, create an adjustable loop, and work 6 sc into the ring (6)
Round 2 :
Work 2scinc in each of the 6 stitches around (12)
Round 3 :
Repeat the pattern of 2scinc in the first stitch, then 1 sc in the next stitch around (18)
Round 4 :
Repeat the pattern of 2scinc in the first stitch, then 1 sc in each of the next 2 stitches around (24)
Round 5 :
Repeat the pattern of 2scinc in the first stitch, then 1 sc in each of the next 3 stitches around (30)
Round 6 :
Repeat the pattern of 2scinc in the first stitch, then 1 sc in each of the next 4 stitches around (36)
Round 7 :
Repeat the pattern of 2scinc in the first stitch, then 1 sc in each of the next 5 stitches around (42)
Info :
Please note that the original pattern lists a stitch count of 72 for Rounds 8 to 23, which is a misprint. Since Round 7 ends with 42 stitches and Round 24 decreases from 42 to 36, you should maintain a count of 42 stitches for each of these rounds.
Round 8-23 :
Work 1 sc in each stitch around (42)
Round 24 :
Repeat the pattern of 2sctog, then 1 sc in each of the next 5 stitches around (36)
Info :
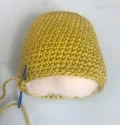
Cut your yarn, leaving a generous 16-inch tail for sewing. Pull the tail through the last loop to secure. Stuff the body firmly with fiberfill, then use your yarn needle to sew the bottom opening flat and closed across the last row.
— 2. Arms (Make 2) :
Round 1 :
Using green yarn, make an adjustable loop and work 8 sc into the ring (8)
Round 2 :
Work 1 sc in each stitch around (8)
Round 3-6 :
Work 1 sc in each stitch around (8)
Info :
Sl st into the next stitch, fasten off leaving a 10-inch tail for assembly, and pull the tail through to secure.
— 3. Legs (Make 2) :
Round 1 :
Using green yarn, make an adjustable loop and work 8 sc into the ring (8)
Round 2 :
Work 1 sc in each stitch around (8)
Round 3-12 :
Work 1 sc in each stitch around (8)
Info :
Sl st into the next stitch, fasten off leaving a 10-inch tail for assembly, and pull the tail through to secure.
— 4. Eyes (Make 2) :
Round 1 :
Using green yarn, make an adjustable loop and work 6 sc into the ring (6)
Round 2 :
Work 2scinc in each stitch around (12)
Round 3-4 :
Work 1 sc in each stitch around (12)
Info :
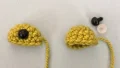
Sl st into the next stitch, fasten off leaving a 10-inch tail, and pull through. Insert the 9.00 mm safety eyes into the center of these pieces and secure them with washers on the inside, then stuff the eye pieces lightly.
— 5. Rainbow Patch :
Row 1 :
Using purple yarn, ch 2. In the second ch from your hook, work 4 sc (4)
Row 2 :
ch 1, turn. Work 2scinc in the first stitch, 2hdcinc in each of the next 2 stitches, and 2scinc in the last stitch (8). Switch to blue yarn.
Row 3 :
ch 1, turn. Work 2scinc in the first stitch, 1 sc in the next stitch, repeat the pattern of 2hdcinc followed by 1 hdc twice, then work 2scinc in the next stitch, and 1 sc in the final stitch (12). Switch to green yarn.
Row 4 :
ch 1, turn. Work 2scinc in the first stitch, 1 sc in each of the next 2 stitches, repeat the pattern of 2hdcinc followed by 1 hdc in each of the next 2 stitches twice, then work 2scinc in the next stitch, and 1 sc in each of the last 2 stitches (16). Switch to yellow yarn.
Row 5 :
ch 1, turn. Work 2scinc in the first stitch, 1 sc in each of the next 3 stitches, repeat the pattern of 2hdcinc followed by 1 hdc in each of the next 3 stitches twice, then work 2scinc in the next stitch, and 1 sc in each of the last 3 stitches (20). Switch to orange yarn.
Row 6 :
ch 1, turn. Work 2scinc in the first stitch, 1 sc in each of the next 4 stitches, repeat the pattern of 2hdcinc followed by 1 hdc in each of the next 4 stitches twice, then work 2scinc in the next stitch, and 1 sc in each of the last 4 stitches (24). Switch to red yarn.
Row 7 :
ch 1, turn. Work 2scinc in the first stitch, 1 sc in each of the next 5 stitches, repeat the pattern of 2hdcinc followed by 1 hdc in each of the next 5 stitches twice, then work 2scinc in the next stitch, and 1 sc in each of the last 5 stitches (28)
Info :
Fasten off, leaving a 20-inch tail of red yarn to sew the patch onto the body.
— 6. Trans Patch :
Row 1 :
Using light blue yarn, ch 2. In the second ch from your hook, work 4 sc (4)
Row 2 :
ch 1, turn. Work 2scinc in the first stitch, 2hdcinc in each of the next 2 stitches, and 2scinc in the last stitch (8). Switch to pink yarn.
Row 3 :
ch 1, turn. Work 2scinc in the first stitch, 1 sc in the next stitch, repeat the pattern of 2hdcinc followed by 1 hdc twice, then work 2scinc in the next stitch, and 1 sc in the final stitch (12). Switch to white yarn.
Row 4 :
ch 1, turn. Work 2scinc in the first stitch, 1 sc in each of the next 2 stitches, repeat the pattern of 2hdcinc followed by 1 hdc in each of the next 2 stitches twice, then work 2scinc in the next stitch, and 1 sc in each of the last 2 stitches (16). Switch to pink yarn.
Row 5 :
ch 1, turn. Work 2scinc in the first stitch, 1 sc in each of the next 3 stitches, repeat the pattern of 2hdcinc followed by 1 hdc in each of the next 3 stitches twice, then work 2scinc in the next stitch, and 1 sc in each of the last 3 stitches (20). Switch to light blue yarn.
Info :
Fasten off, leaving a 20-inch tail of light blue yarn to sew the patch onto the body.
— 7. Non-Binary Patch :
Row 1 :
Using black yarn, ch 2. In the second ch from your hook, work 4 sc (4)
Row 2 :
ch 1, turn. Work 2scinc in the first stitch, 2hdcinc in each of the next 2 stitches, and 2scinc in the last stitch (8). Switch to purple yarn.
Row 3 :
ch 1, turn. Work 2scinc in the first stitch, 1 sc in the next stitch, repeat the pattern of 2hdcinc followed by 1 hdc twice, then work 2scinc in the next stitch, and 1 sc in the final stitch (12)
Row 4 :
ch 1, turn. Work 2scinc in the first stitch, 1 sc in each of the next 2 stitches, repeat the pattern of 2hdcinc followed by 1 hdc in each of the next 2 stitches twice, then work 2scinc in the next stitch, and 1 sc in each of the last 2 stitches (16). Switch to white yarn.
Row 5 :
ch 1, turn. Work 2scinc in the first stitch, 1 sc in each of the next 3 stitches, repeat the pattern of 2hdcinc followed by 1 hdc in each of the next 3 stitches twice, then work 2scinc in the next stitch, and 1 sc in each of the last 3 stitches (20)
Row 6 :
ch 1, turn. Work 2scinc in the first stitch, 1 sc in each of the next 4 stitches, repeat the pattern of 2hdcinc followed by 1 hdc in each of the next 4 stitches twice, then work 2scinc in the next stitch, and 1 sc in each of the last 4 stitches (24). Switch to yellow yarn.
Row 7 :
ch 1, turn. Work 2scinc in the first stitch, 1 sc in each of the next 5 stitches, repeat the pattern of 2hdcinc followed by 1 hdc in each of the next 5 stitches twice, then work 2scinc in the next stitch, and 1 sc in each of the last 5 stitches (28)
Row 8 :
ch 1, turn. Work 2scinc in the first stitch, 1 sc in each of the next 6 stitches, repeat the pattern of 2hdcinc followed by 1 hdc in each of the next 6 stitches twice, then work 2scinc in the next stitch, and 1 sc in each of the last 6 stitches (32)
Info :
Fasten off, leaving a 20-inch tail of yellow yarn to sew the patch onto the body.
I hope you have the absolute best time bringing this sweet little frog to life! There is nothing quite like finishing a project that carries so much meaning and love in every single stitch. I can't wait to see which pride flag you choose to customize your little buddy with. Happy crocheting, and may your days be filled with beautiful stitches! 🧶✨🐸