🧶 Beautiful ✨ Detailed 💝 Adorable

Kawaii Creeper Amigurumi Pattern

Kawaii Creeper Amigurumi Pattern
4.2★Rating
3-5 HoursTime Needed
1.8KMade This
✂️

Intermediate Level

Ideal for those with basic crocheting experience, featuring slightly more advanced stitches and techniques to expand your skills.

⏱️

Quick Craft

Fits nicely into a free afternoon — 2 to 5 hours of focused, enjoyable crocheting.

🐰

Whimsical Buddy

Playful characters full of personality, designed to spark imagination and become cherished playtime favorites.

About This Kawaii Creeper Amigurumi Pattern

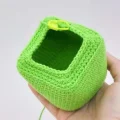
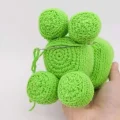
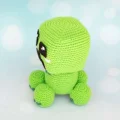
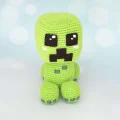
Kawaii Creeper Amigurumi Pattern crochet pattern - detailed view

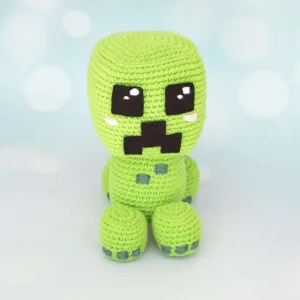
This little companion is the perfect size for a shelf or to sit right next to your monitor. Because he's made of sturdy cotton, he'll hold his blocky shape beautifully while still being soft enough to squeeze.

Why You'll Love This Kawaii Creeper Amigurumi Pattern

I honestly love how the square head comes together! It's so satisfying to see those corners form just by placing your increases in the right spots. Plus, there's something really relaxing about the repetitive rounds of the body—it's the perfect project to work on while catching up on a podcast.

Kawaii Creeper Amigurumi Pattern step 1 Kawaii Creeper Amigurumi Pattern step 2 Kawaii Creeper Amigurumi Pattern step 3 Kawaii Creeper Amigurumi Pattern step 4

Switch Things Up

I’ve always thought that the best part of amigurumi is taking something that’s normally a bit scary—like a Creeper—and making it absolutely huggable. When I first sat down to write this, I wanted to make sure we kept that signature Minecraft blockiness without it feeling too stiff. The secret is all in those BLO rounds! They create these wonderful little ridges that help the corners stay sharp while the stuffing keeps the rest nice and soft.

One thing I really enjoyed while making my own version was playing with the face. Felt is so much easier for these big square eyes than trying to crochet them, and it gives it that clean, graphic look. If you’re feeling extra creative, you could even use different shades of green for the body to give it a more pixelated texture, but I think this lime green really pops! It’s such a satisfying project because it works up relatively quickly, and seeing that big square head finally attached to the body always makes me smile. I can’t wait to see yours!

Common Mistakes & How to Fix Them

✗ When working the BLO rounds on the head and feet, don't pull your stitches too tight or the sharp 'corner' edge will look puckered rather than crisp.✗ It's easy to lose your place during the long stretch of Round 10 to 26 on the head; I highly recommend using a row counter so your Creeper's head doesn't end up too tall.✗ When gluing the felt mouth, make sure it is centered perfectly between the eyes—if it's even one stitch off, the whole face will look lopsided.✗ If you don't stuff the feet firmly enough, the body might lean forward; pack that filling in tight to ensure he has a sturdy, flat base to stand on.

Kawaii Creeper Amigurumi Pattern

If you have a gamer in your life or you’re a fan of pixelated adventures yourself, you’re going to love this squishy little guy. I’ve designed him to be much friendlier than the ones that go boom in the game! He’s got that classic blocky look we all know, but with a sweet, handmade charm that makes him the perfect desk buddy or a thoughtful gift for your favorite player.

Intermediate 3-5 Hours

Materials Needed for Kawaii Creeper Amigurumi Pattern

— Main Fabric

  • 01
    2.5 mm cotton yarn (like Rainbow Cotton 8/6) in Lime Green
  • 02
    Small amounts of Dark Green cotton yarn for embroidery
  • 03
    Small amounts of Pink cotton yarn for the cheeks
  • 04
    Small amount of White cotton yarn for eye reflections

— Tools Required

  • 01
    2.5mm crochet hook
  • 02
    Black felt for the eyes and mouth
  • 03
    Hot glue gun or a needle and thread to attach the felt
  • 04
    Synthetic fiberfill stuffing
  • 05
    Yarn needle for assembly and details
  • 06
    Sharp scissors

Progress Tracker

0% Complete

— 1. Head :

Round 1 :

Start by placing 8 sc into a MR (8)

Round 2 :

Work 8 inc around the circle (16)

Round 3 :

Repeat (2 inc, 2 sc) 4 times (24)

Round 4 :

sc in next st, 2 inc, then repeat (4 sc, 2 inc) 3 times, ending with 3 sc (32)

Round 5 :

sc in next 2 sts, 2 inc, then repeat (6 sc, 2 inc) 3 times, ending with 4 sc (40)

Round 6 :

sc in next 3 sts, 2 inc, then repeat (8 sc, 2 inc) 3 times, ending with 5 sc (48)

Round 7 :

sc in next 4 sts, 2 inc, then repeat (10 sc, 2 inc) 3 times, ending with 6 sc (56)

Round 8 :

sc in next 5 sts, 2 inc, then repeat (12 sc, 2 inc) 3 times, ending with 7 sc (64)

Round 9 :

Work 1 sc in every st around using BLO (64)

Round 10 :

sc in each st around (64)

Round 11 :

sc in each st around (64)

Round 12 :

sc in each st around (64)

Round 13 :

sc in each st around (64)

Round 14 :

sc in each st around (64)

Round 15 :

sc in each st around (64)

Round 16 :

sc in each st around (64)

Round 17 :

sc in each st around (64)

Round 18 :

sc in each st around (64)

Round 19 :

sc in each st around (64)

Round 20 :

sc in each st around (64)

Round 21 :

sc in each st around (64)

Round 22 :

sc in each st around (64)

Round 23 :

sc in each st around (64)

Round 24 :

sc in each st around (64)

Round 25 :

sc in each st around (64)

Round 26 :

sc in each st around (64)

Round 27 :

sc in next 7 sts, 2 dec, then repeat (12 sc, 2 dec) 3 times, ending with 5 sc in BLO (56)

Round 28 :

sc in next 6 sts, 2 dec, then repeat (10 sc, 2 dec) 3 times, ending with 4 sc (48)

Round 29 :

sc in next 5 sts, 2 dec, then repeat (8 sc, 2 dec) 3 times, ending with 3 sc (40)

Round 30 :

sc in next 4 sts, 2 dec, then repeat (6 sc, 2 dec) 3 times, ending with 2 sc (32)

Round 31 :

sc in next 3 sts, 2 dec, then repeat (4 sc, 2 dec) 3 times, ending with 1 sc (24)

Info :

Begin stuffing the head firmly now.

Round 32 :

Repeat (2 sc, 2 dec) around (16)

Round 33 :

Work 8 dec around (8)

Round 34 :

Work 4 dec to close (4)

Info :

Finish with a slst, cut your yarn, and weave in the tail.

— 2. Body :

Round 1 :

Create a MR and work 8 sc into it (8)

Round 2 :

Work 8 inc around (16)

Round 3 :

Repeat (2 inc, 2 sc) 4 times (24)

Round 4 :

sc in next st, 2 inc, then repeat (4 sc, 2 inc) 3 times, ending with 3 sc (32)

Round 5 :

sc in next 2 sts, 2 inc, then repeat (6 sc, 2 inc) 3 times, ending with 4 sc (40)

Round 6 :

Work 1 sc in each st around in BLO (40)

Round 7 :

sc in each st around (40)

Round 8 :

sc in each st around (40)

Round 9 :

sc in each st around (40)

Round 10 :

sc in each st around (40)

Round 11 :

sc in each st around (40)

Round 12 :

sc in each st around (40)

Round 13 :

sc in each st around (40)

Round 14 :

sc in each st around (40)

Round 15 :

sc in each st around (40)

Round 16 :

sc in each st around (40)

Round 17 :

sc in each st around (40)

Round 18 :

sc in each st around (40)

Round 19 :

sc in next 2 sts, 2 dec, then repeat (6 sc, 2 dec) 3 times, ending with 4 sc in BLO (32)

Round 20 :

sc in next st, 2 dec, then repeat (4 sc, 2 dec) 3 times, ending with 3 sc (24)

Info :

Fill the body with stuffing.

Round 21 :

Repeat (2 sc, 2 dec) around (16)

Round 22 :

Work 8 dec around (8)

Round 23 :

Work 4 dec to finish (4)

Info :

Fasten off with a slst and leave a long tail for sewing.

— 3. Feet :

Info :

Make four identical feet using lime green yarn.

Round 1 :

Work 8 sc into a MR (8)

Round 2 :

Work 8 inc around (16)

Round 3 :

Repeat (2 inc, 2 sc) 4 times (24)

Round 4 :

Work 1 sc in each st around in BLO (24)

Round 5 :

sc in each st around (24)

Round 6 :

sc in each st around (24)

Round 7 :

sc in each st around (24)

Round 8 :

sc in each st around (24)

Round 9 :

sc in each st around (24)

Round 10 :

sc in each st around (24)

Round 11 :

Repeat (2 sc, 2 dec) around (16)

Info :

Stuff the foot firmly.

Round 12 :

Work 8 dec around (8)

Round 13 :

Work 4 dec to close (4)

Info :

Fasten off and leave a long yarn tail for assembly.

Assembly Instructions

  • Using your yarn needle, sew the body to the head by matching Round 19 of the body to Round 29 of the head.
  • Attach the four feet to the body by sewing Rounds 4-6 of each foot to Rounds 6-8 of the body, placing two in front and two in back.
  • Take your dark green yarn and embroider three small pixel-style squares onto the front of each foot at Round 9.
  • Add two more dark green squares to the front of the body: place one on Round 14 and the other on Round 16.
  • Cut two 2.5cm squares from black felt and glue them as eyes between Rounds 13 and 17 of the head, adding white yarn reflections.
  • Cut a black felt mouth (4.5cm wide and 3cm high) and glue it centered between Rounds 19 and 25.
  • Finish the face by embroidering two small pink blush lines on Round 19, positioned just under the eyes.

Important Notes

  • 💡Always use a stitch marker at the start of your rounds to avoid losing your place in the straight sections.
  • 💡To get the best 'pixel' effect with the embroidery, make several small straight stitches close together to form a solid block.
  • 💡I recommend cutting paper templates for the felt eyes and mouth first to check the placement before cutting your fabric.
  • 💡Make sure all four feet are stuffed to the same firmness so your Creeper stands perfectly level on his own.
  • 💡If you want a more durable toy for a child, you can sew the felt pieces on with a whipstitch instead of using glue.

I'm so happy for you to finish your little Creeper! There’s something so rewarding about turning a few balls of yarn into such a recognizable character. Whether he’s going to live on your bookshelf or be gifted to a fellow gamer, he’s definitely going to bring a smile to anyone who sees him. Don't forget to snap a photo of your finished work—I'd love to see how your embroidery and felt details turned out! Happy stitching, and I hope you enjoyed every single loop of this project. 🧶✨
You ask,

we answer.

FAQs

Can I use acrylic yarn instead of cotton?

Yes, but be aware that acrylic is more elastic. You'll need to stuff it very carefully to keep that sharp 'blocky' shape without the fabric stretching and showing the filling.

My Creeper keeps tipping over, how can I fix it?

This usually means the feet aren't stuffed enough or they aren't level. Try adding more stuffing to the feet and ensure they are all sewn to the body at the exact same round height.

What is the best way to attach the felt pieces?

Hot glue is the fastest method, but for a cleaner and more professional look, you can use a needle and matching black sewing thread to whipstitch around the edges.

How do I make the 'corner' edges look sharper?

The BLO (Back Loop Only) rounds are designed to create those edges. Make sure your tension is nice and even on those specific rounds to help the shape pop out.