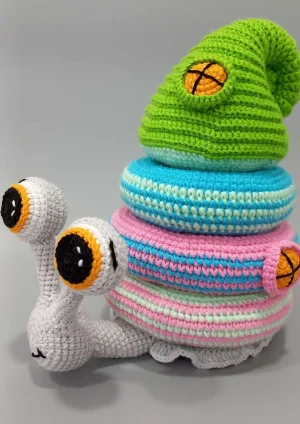
This crochet snail stacking toy is one of those projects that genuinely stops people in their tracks — it's playful, colorful, and way more impressive than the skill level it requires. You'll build a sweet little snail body with expressive bug eyes, then crochet a whole tower of stuffed rings and a pointed roof that all stack neatly on top. The pastel stripes, the chunky little base, the tiny arched door — every detail makes it feel like a handmade heirloom. Whether you're making it for a nursery shelf or gifting it to a toddler who loves toys with a bit of whimsy, this pattern delivers something truly special. Your finished snail will be one of those pieces people ask about every single time.
Progress Tracker
0% Complete
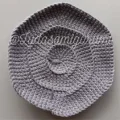
— 1. Base (make 2 pieces) :
Info :
Work both base pieces separately in gray yarn. They will be joined together later through their back loops.
Round 1 :
Work 6 sc into a MR. (6)
Round 2 :
Work 1 inc in each stitch around. (12)
Round 3 :
(1 sc, inc) — repeat 6 times. (18)
Round 4 :
(2 sc, inc) — repeat 6 times. (24)
Round 5 :
(3 sc, inc) — repeat 6 times. (30)
Round 6 :
Working in FLO only: (4 sc, inc) — repeat 6 times. (36)
Round 7 :
(5 sc, inc) — repeat 6 times. (42)
Round 8 :
3 sc, inc, (6 sc, inc) — repeat 5 times, 3 sc. (48)
Round 9 :
(7 sc, inc) — repeat 6 times. (54)
Round 10 :
4 sc, inc, (8 sc, inc) — repeat 5 times, 4 sc. (60)
Round 11 :
Working in FLO only: (9 sc, inc) — repeat 6 times. (66)
Round 12 :
5 sc, inc, (10 sc, inc) — repeat 5 times, 5 sc. (72)
Round 13 :
(11 sc, inc) — repeat 6 times. (78)
Round 14 :
6 sc, inc, (12 sc, inc) — repeat 5 times, 6 sc. (84)
Round 15 :
(13 sc, inc) — repeat 6 times. (90)
Round 16 :
90 sc across. (90)
Round 17 :
90 sc across. (90) Cut yarn and weave in the tail.
Info :
Place the two base pieces together and sew them through the back loops of Round 6 on one piece to Round 6 on the other, and Round 11 to Round 11. Stuff as you go. Once joined, there will be a 20-stitch opening at the top — this is where the neck begins.
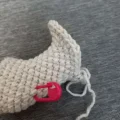
— 2. Tail :
Info :
The tail is crocheted by picking up stitches from both base pieces — 10 sc from one piece and 10 sc from the other — to join them and form a continuous round of 20 stitches. Continue working in rounds. Use gray yarn. Stuff as you go.
Round 1 :
Pick up 10 sc from the first base piece and 10 sc from the second base piece to create a joined round. (20)
Round 2 :
20 sc around. (20)
Round 3 :
(dec, 8 sc) — repeat 2 times. (18)
Round 4 :
18 sc around. (18)
Round 5 :
(dec, 7 sc) — repeat 2 times. (16)
Round 6 :
16 sc around. (16)
Round 7 :
(dec, 6 sc) — repeat 2 times. (14)
Round 8 :
14 sc around. (14)
Round 9 :
(dec, 5 sc) — repeat 2 times. (12)
Round 10 :
12 sc around. (12)
Round 11 :
(2 sc, dec) — repeat 3 times. (9)
Round 12 :
9 sc around. (9)
Round 13 :
(1 sc, dec) — repeat 3 times. (6) Fasten off.
Info :
Before closing the tail, connect the two base halves along the tail join edge using 35 sc. Then turn and work (dc inc) in each of those 35 stitches to create a ruffled edge of 70 stitches. Work this ruffle from both sides of the tail join. Stuff as you go.
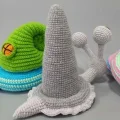
— 3. Neck & Head :
Info :
Begin working from the 20-stitch opening left at the top of the joined base. Use gray yarn and work in continuous rounds.
Round 1 :
Pick up 10 sc from one side of the opening and 10 sc from the other side to work into the round. (20)
Round 2 :
20 sc around. (20)
Round 3 :
20 sc around. (20)
Round 4 :
20 sc around. (20)
Round 5 :
20 sc around. (20)
Round 6 :
3 sc, 4 inc, 4 sc, 4 dec, 1 sc. (20)
Round 7 :
15 sc, 4 hdc, 1 sc. (20)
Round 8 :
4 sc, 4 inc, 4 sc, 4 dec. (20)
Round 9 :
16 sc, 4 hdc. (20)
Round 10 :
6 sc, 4 inc, 4 sc, 4 dec. Note: the stitch count reflects decreases carried over from the start of this round — see pattern note below. (22*)
Round 11 :
16 sc, 4 hdc. (20)
Round 12 :
6 sc, 4 inc, 4 sc, 4 dec. (22*)
Info :
Rounds 10 and 12 are marked with an asterisk in the source pattern. The note states the count includes decreases carried over from the beginning of the adjacent round. Verify your stitch count at these rounds carefully before continuing.
Round 13 :
(1 sc, inc) — repeat 10 times. (30)
Round 14 :
(4 sc, inc) — repeat 6 times. (36)
Round 15 :
36 sc around. (36)
Round 16 :
36 sc around. (36)
Round 17 :
36 sc around. (36)
Round 18 :
36 sc around. (36)
Round 19 :
36 sc around. (36)
Round 20 :
36 sc around. (36)
Round 21 :
36 sc around. (36)
Round 22 :
(4 sc, dec) — repeat 6 times. (30)
Round 23 :
(3 sc, dec) — repeat 6 times. (24)
Round 24 :
(2 sc, dec) — repeat 6 times. (18)
Round 25 :
(1 sc, dec) — repeat 6 times. (12)
Round 26 :
Work 6 dec around. (6) Cut yarn, close the hole, and weave in the tail.
— 4. Pole :
Info :
The pole is the central stacking column. Work in gray yarn from a magic ring. After finishing, sew it to the base at Round 11 as shown in the reference photos.
Round 1 :
6 sc into a MR. (6)
Round 2 :
6 inc around. (12)
Round 3 :
12 sc around. (12)
Round 4 :
(1 sc, inc) — repeat 6 times. (18)
Round 5 :
18 sc around. (18)
Round 6 :
18 sc around. (18)
Round 7 :
(2 sc, inc) — repeat 6 times. (24)
Round 8 :
24 sc around. (24)
Round 9 :
24 sc around. (24)
Round 10 :
24 sc around. (24)
Round 11 :
(3 sc, inc) — repeat 6 times. (30)
Round 12 :
30 sc around. (30)
Round 13 :
30 sc around. (30)
Round 14 :
30 sc around. (30)
Round 15 :
30 sc around. (30)
Round 16 :
(4 sc, inc) — repeat 6 times. (36)
Round 17 :
36 sc around. (36)
Round 18 :
36 sc around. (36)
Round 19 :
36 sc around. (36)
Round 20 :
36 sc around. (36)
Round 21 :
36 sc around. (36)
Round 22 :
(5 sc, inc) — repeat 6 times. (42)
Round 23 :
42 sc around. (42)
Round 24 :
42 sc around. (42)
Round 25 :
42 sc around. (42)
Round 26 :
42 sc around. (42)
Round 27 :
42 sc around. (42)
Round 28 :
42 sc around. (42)
Round 29 :
(6 sc, inc) — repeat 6 times. (48)
Round 30 :
48 sc around. (48)
Round 31 :
48 sc around. (48)
Round 32 :
48 sc around. (48)
Round 33 :
48 sc around. (48)
Round 34 :
48 sc around. (48)
Round 35 :
48 sc around. (48)
Round 36 :
48 sc around. (48)
Round 37 :
(7 sc, inc) — repeat 6 times. (54)
Round 38 :
54 sc around. (54)
Round 39 :
54 sc around. (54)
Round 40 :
54 sc around. (54)
Round 41 :
54 sc around. (54)
Round 42 :
54 sc around. (54)
Round 43 :
54 sc around. (54)
Round 44 :
54 sc around. (54)
Round 45 :
54 sc around. (54)
Round 46 :
(8 sc, inc) — repeat 6 times. (60) Cut yarn, leaving a long tail for sewing. Sew the pole to the base centered over Round 11.
— 5. Eyes — Part 1 (make 2) :
Info :
Start with black yarn.
Round 1 :
6 sc into a MR. (6)
Round 2 :
6 inc around. (12)
Round 3 :
(1 sc, inc) — repeat 6 times. (18)
Round 4 :
18 sl st around. (18) Change to yellow yarn.
Round 5 :
Working in BLO: (2 sc, inc) — repeat 6 times. (24)
Round 6 :
24 sl st around. (24) Change to white yarn.
Round 7 :
(3 sc, inc) — repeat 6 times. (30)
Round 8 :
30 sc around. (30)
Round 9 :
30 sc around. (30)
Round 10 :
30 sc around. (30) Fasten off.
— 6. Eyes — Part 2 (make 2) :
Info :
Use gray yarn. This piece forms the back cup of the eye that connects to the head.
Round 1 :
6 sc into a MR. (6)
Round 2 :
6 inc around. (12)
Round 3 :
(1 sc, inc) — repeat 6 times. (18)
Round 4 :
(2 sc, inc) — repeat 6 times. (24)
Round 5 :
(3 sc, inc) — repeat 6 times. (30)
Round 6 :
30 sc around. (30)
Round 7 :
Join to Round 10 of Eye Part 1 using 30 sc around. (30)
Round 8 :
30 sc around. (30)
Round 9 :
30 sc around. (30) Fasten off.
— 7. Eyes — Part 3 / Eye Stalks (make 2) :
Info :
Use gray yarn. These are the tubular stalks that hold the eyes above the head.
Round 1 :
Ch 13, then join with 1 sl st to the first chain to form a loop. (12 working stitches)
Round 2 :
12 sc around. (12)
Round 3 :
(1 sc, dec) — repeat 6 times. (8) [This narrows the stalk at the base of the eye]
Round 4 :
8 sc around. (8)
Round 5 :
8 sc around. (8)
Round 6 :
8 sc around. (8)
Round 7 :
8 sc around. (8)
Round 8 :
8 sc around. (8)
Round 9 :
8 sc around. (8)
Round 10 :
8 sc around. (8)
Round 11 :
8 sc around. (8)
Round 12 :
8 sc around. (8)
Round 13 :
(1 sc, inc) — repeat 6 times. (12) [Flares slightly to connect to eye assembly]
Round 14 :
12 sc around. (12) Cut yarn, leave a long sewing tail. Attach the eye assembly as shown in the reference photos.
— 8. Large Ring :
Info :
Start with light green yarn. This is the biggest of the three stacking rings.
Round 1 :
Ch 60, join with a sl st to the first chain to form a ring. (60)
Round 2 :
(9 sc, inc) — repeat 6 times. (66)
Round 3 :
5 sc, inc, (10 sc, inc) — repeat 5 times, 5 sc. (72)
Round 4 :
(11 sc, inc) — repeat 6 times. (78)
Round 5 :
6 sc, inc, (12 sc, inc) — repeat 5 times, 6 sc. (84)
Round 6 :
(13 sc, inc) — repeat 6 times. (90)
Round 7 :
7 sc, inc, (14 sc, inc) — repeat 5 times, 7 sc. (96)
Round 8 :
(15 sc, inc) — repeat 6 times. (102)
Round 9 :
102 sc around. (102) Change to pink yarn.
Round 10 :
102 sc around. (102) Change to light green yarn.
Round 11 :
102 sc around. (102) Change to pink yarn.
Round 12 :
102 sc around. (102) Change to light green yarn.
Round 13 :
102 sc around. (102) Change to pink yarn.
Round 14 :
102 sc around. (102) Change to light green yarn.
Round 15 :
102 sc around. (102)
Round 16 :
(15 sc, dec) — repeat 6 times. (96)
Round 17 :
7 sc, dec, (14 sc, dec) — repeat 5 times, 7 sc. (90)
Round 18 :
(13 sc, dec) — repeat 6 times. (84)
Round 19 :
6 sc, dec, (12 sc, dec) — repeat 5 times, 6 sc. (78)
Round 20 :
(11 sc, dec) — repeat 6 times. (72)
Round 21 :
5 sc, dec, (10 sc, dec) — repeat 5 times, 5 sc. (66)
Round 22 :
(9 sc, dec) — repeat 6 times. (60) Cut yarn, leaving a long tail. Sew Round 22 to Round 1 to close the donut shape, stuffing as you go.
— 9. Middle Ring :
Info :
Start with pink yarn. This is the medium-sized stacking ring.
Round 1 :
Ch 48, join with a sl st to the first chain to form a ring. (48)
Round 2 :
(7 sc, inc) — repeat 6 times. (54)
Round 3 :
4 sc, inc, (8 sc, inc) — repeat 5 times, 4 sc. (60)
Round 4 :
(9 sc, inc) — repeat 6 times. (66)
Round 5 :
5 sc, inc, (10 sc, inc) — repeat 5 times, 5 sc. (72)
Round 6 :
(11 sc, inc) — repeat 6 times. (78)
Round 7 :
6 sc, inc, (12 sc, inc) — repeat 5 times, 6 sc. (84) Change to blue yarn.
Round 8 :
(13 sc, inc) — repeat 6 times. (90) Change to pink yarn.
Round 9 :
90 sc around. (90) Change to blue yarn.
Round 10 :
90 sc around. (90) Change to pink yarn.
Round 11 :
90 sc around. (90) Change to blue yarn.
Round 12 :
90 sc around. (90) Change to pink yarn.
Round 13 :
90 sc around. (90) Change to blue yarn.
Round 14 :
90 sc around. (90) Change to pink yarn.
Round 15 :
90 sc around. (90)
Round 16 :
(13 sc, dec) — repeat 6 times. (84)
Round 17 :
6 sc, dec, (12 sc, dec) — repeat 5 times, 6 sc. (78)
Round 18 :
(11 sc, dec) — repeat 6 times. (72)
Round 19 :
5 sc, dec, (10 sc, dec) — repeat 5 times, 5 sc. (66)
Round 20 :
(9 sc, dec) — repeat 6 times. (60)
Round 21 :
4 sc, dec, (8 sc, dec) — repeat 5 times, 4 sc. (54)
Round 22 :
(7 sc, dec) — repeat 6 times. (48) Sew Round 22 to Round 1 to close, stuffing as you go.
— 10. Small Ring :
Info :
Start with blue yarn. This is the smallest of the three stacking rings.
Round 1 :
Ch 36, join with a sl st to the first chain to form a ring. (36)
Round 2 :
(5 sc, inc) — repeat 6 times. (42)
Round 3 :
3 sc, inc, (6 sc, inc) — repeat 5 times, 3 sc. (48)
Round 4 :
(7 sc, inc) — repeat 6 times. (54)
Round 5 :
4 sc, inc, (8 sc, inc) — repeat 5 times, 4 sc. (60)
Round 6 :
(9 sc, inc) — repeat 6 times. (66)
Round 7 :
5 sc, inc, (10 sc, inc) — repeat 5 times, 5 sc. (72)
Round 8 :
(11 sc, inc) — repeat 6 times. (78)
Round 9 :
78 sc around. (78) Change to light green yarn.
Round 10 :
78 sc around. (78) Change to blue yarn.
Round 11 :
78 sc around. (78) Change to light green yarn.
Round 12 :
78 sc around. (78) Change to blue yarn.
Round 13 :
78 sc around. (78) Change to light green yarn.
Round 14 :
78 sc around. (78) Change to blue yarn.
Round 15 :
78 sc around. (78)
Round 16 :
(11 sc, dec) — repeat 6 times. (72)
Round 17 :
5 sc, dec, (10 sc, dec) — repeat 5 times, 5 sc. (66)
Round 18 :
(9 sc, dec) — repeat 6 times. (60)
Round 19 :
4 sc, dec, (8 sc, dec) — repeat 5 times, 4 sc. (54)
Round 20 :
(7 sc, dec) — repeat 6 times. (48)
Round 21 :
3 sc, dec, (6 sc, dec) — repeat 5 times, 3 sc. (42)
Round 22 :
(5 sc, dec) — repeat 6 times. (36) Sew Round 22 to Round 1 to close, stuffing as you go.
— 11. Windows (make 3) :
Info :
Start with yellow yarn. Each window gets a different border color when finished: one in blue (for the small ring), one in pink (for the middle ring), and one in green (for the roof). Work all three the same way through Round 5 then change to the appropriate color.
Round 1 :
6 sc into a MR. (6)
Round 2 :
6 inc around. (12)
Round 3 :
(1 sc, inc) — repeat 6 times. (18)
Round 4 :
(2 sc, inc) — repeat 6 times. (24)
Round 5 :
24 sc around. (24) Change to the appropriate border color (blue, pink, or green).
Round 6 :
Working in FLO: 24 sc around. (24)
Round 7 :
(3 sc, inc) — repeat 6 times. (30) Cut yarn, leave a long tail for sewing. Sew one window each to the middle ring, small ring, and roof.
— 12. Door :
Info :
Start with black yarn. This piece is worked in rows, not rounds. The door attaches to the large ring.
Row 1 :
Ch 7, turn. (6 working stitches)
Row 2 :
5 sc, 3 sc into 1 stitch, 5 sc, turn. (13)
Row 3 :
Ch 1, 5 sc, 3 inc, 5 sc, turn. (16)
Row 4 :
Ch 1, 5 sc, (1 sc, inc) — repeat 3 times, 5 sc, turn. (13) Change to light green yarn.
Row 5 :
Ch 1, working in BLO: 16 sc, turn. (16)
Row 6 :
Ch 1, working in BLO: 16 sc. (16) Cut yarn, leave a long tail. Sew the door to the large ring.
— 13. Roof :
Info :
Start with green yarn. Rows 3 through 62 are all worked in BLO. The roof begins flat and spirals into a tall cone shape through gradual increases. After Row 62, switch to light green and continue working in rounds to finish the cone tip and base rim.
Row 3 :
BLO ch 1, 2 sc, inc, 2 sc, turn. (6)
Row 4 :
BLO ch 1, 6 sc, turn. (6)
Row 5 :
BLO ch 1, 3 sc, inc, 2 sc, turn. (7)
Row 6 :
BLO ch 1, 7 sc, turn. (7)
Row 7 :
BLO ch 1, 3 sc, inc, 3 sc, turn. (8)
Row 8 :
BLO ch 1, 8 sc, turn. (8)
Row 9 :
BLO ch 1, 4 sc, inc, 3 sc, turn. (9)
Row 10 :
BLO ch 1, 9 sc, turn. (9)
Row 11 :
BLO ch 1, 4 sc, inc, 4 sc, turn. (10)
Row 12 :
BLO ch 1, 10 sc, turn. (10)
Row 13 :
BLO ch 1, 5 sc, inc, 4 sc, turn. (11)
Row 14 :
BLO ch 1, 11 sc, turn. (11)
Row 15 :
BLO ch 1, 5 sc, inc, 5 sc, turn. (12)
Row 16 :
BLO ch 1, 12 sc, turn. (12)
Row 17 :
BLO ch 1, 6 sc, inc, 5 sc, turn. (13)
Row 18 :
BLO ch 1, 13 sc, turn. (13)
Row 19 :
BLO ch 1, 6 sc, inc, 6 sc, turn. (14)
Row 20 :
BLO ch 1, 14 sc, turn. (14)
Row 21 :
BLO ch 1, 7 sc, inc, 6 sc, turn. (15)
Row 22 :
BLO ch 1, 15 sc, turn. (15)
Row 23 :
BLO ch 1, 7 sc, inc, 7 sc, turn. (16)
Row 24 :
BLO ch 1, 16 sc, turn. (16)
Row 25 :
BLO ch 1, 8 sc, inc, 7 sc, turn. (17)
Row 26 :
BLO ch 1, 17 sc, turn. (17)
Row 27 :
BLO ch 1, 8 sc, inc, 8 sc, turn. (18)
Row 28 :
BLO ch 1, 18 sc, turn. (18)
Row 29 :
BLO ch 1, 9 sc, inc, 8 sc, turn. (19)
Row 30 :
BLO ch 1, 19 sc, turn. (19)
Row 31 :
BLO ch 1, 9 sc, inc, 9 sc, turn. (20)
Row 32 :
BLO ch 1, 20 sc, turn. (20)
Row 33 :
BLO ch 1, 10 sc, inc, 9 sc, turn. (21)
Row 34 :
BLO ch 1, 21 sc, turn. (21)
Row 35 :
BLO ch 1, 10 sc, inc, 10 sc, turn. (22)
Row 36 :
BLO ch 1, 22 sc, turn. (22)
Row 37 :
BLO ch 1, 11 sc, inc, 10 sc, turn. (23)
Row 38 :
BLO ch 1, 23 sc, turn. (23)
Row 39 :
BLO ch 1, 11 sc, inc, 11 sc, turn. (24)
Row 40 :
BLO ch 1, 24 sc, turn. (24)
Row 41 :
BLO ch 1, (3 sc, inc) — repeat 6 times, turn. (30)
Row 42 :
BLO ch 1, 30 sc, turn. (30)
Row 43 :
BLO ch 1, (4 sc, inc) — repeat 6 times, turn. (36)
Row 44 :
BLO ch 1, 36 sc, turn. (36)
Row 45 :
BLO ch 1, (5 sc, inc) — repeat 6 times, turn. (42)
Row 46 :
BLO ch 1, 42 sc, turn. (42)
Row 47 :
BLO ch 1, (6 sc, inc) — repeat 6 times, turn. (48)
Row 48 :
BLO ch 1, 48 sc, turn. (48)
Row 49 :
BLO ch 1, (7 sc, inc) — repeat 6 times, turn. (54)
Row 50 :
BLO ch 1, 54 sc, turn. (54)
Row 51 :
BLO ch 1, (8 sc, inc) — repeat 6 times, turn. (60)
Row 52 :
BLO ch 1, 60 sc, turn. (60)
Row 53 :
BLO ch 1, (9 sc, inc) — repeat 6 times, turn. (66)
Row 54 :
BLO ch 1, 66 sc, turn. (66)
Row 55 :
BLO ch 1, (10 sc, inc) — repeat 6 times, turn. (72)
Row 56 :
BLO ch 1, 72 sc, turn. (72)
Row 57 :
BLO ch 1, (11 sc, inc) — repeat 6 times, turn. (78)
Row 58 :
BLO ch 1, 78 sc, turn. (78)
Row 59 :
BLO ch 1, (12 sc, inc) — repeat 6 times, turn. (84)
Row 60 :
BLO ch 1, 84 sc, turn. (84)
Row 61 :
BLO ch 1, (13 sc, inc) — repeat 6 times, turn. (90)
Row 62 :
BLO ch 1, 90 sc, turn. (90) Change to light green yarn. From this point, continue working in rounds rather than rows.
Round 63 :
BLO ch 1, (13 sc, dec) — repeat 6 times. (84)
Round 64 :
6 sc, dec, (12 sc, dec) — repeat 5 times, 6 sc. (78)
Round 65 :
(11 sc, dec) — repeat 6 times. (72)
Round 66 :
5 sc, dec, (10 sc, dec) — repeat 5 times, 5 sc. (66)
Round 67 :
(9 sc, dec) — repeat 6 times. (60)
Round 68 :
4 sc, dec, (8 sc, dec) — repeat 5 times, 4 sc. (54)
Round 69 :
(7 sc, dec) — repeat 6 times. (48)
Round 70 :
3 sc, dec, (6 sc, dec) — repeat 5 times, 3 sc. (42)
Round 71 :
(5 sc, dec) — repeat 6 times. (36)
Round 72 :
Working in BLO: 36 sc around. (36)
Round 73 :
36 sc around. (36)
Round 74 :
36 sc around. (36)
Round 75 :
36 sc around. (36)
Round 76 :
(4 sc, dec) — repeat 6 times. (30)
Round 77 :
30 sc around. (30)
Round 78 :
30 sc around. (30)
Round 79 :
(3 sc, dec) — repeat 6 times. (24)
Round 80 :
24 sc around. (24)
Round 81 :
24 sc around. (24)
Round 82 :
(2 sc, dec) — repeat 6 times. (18)
Round 83 :
18 sc around. (18)
Round 84 :
(1 sc, dec) — repeat 6 times. (12)
Round 85 :
6 dec around. (6) Cut yarn, fasten off, and weave in the tail securely.
There's something quietly magical about a toy that's also a creature — and this snail stacking toy absolutely delivers that magic. 🧶 The pastel rings, the spiraling green roof, those wide expressive eyes on their little stalks — every piece has its own personality, and putting them all together is genuinely satisfying. ✨ Whether this ends up center stage on a nursery shelf or in the hands of a little one who can't stop stacking and unstacking the rings, it's the kind of handmade piece that gets kept for years. Take your time with it, enjoy every color change, and know that you're making something really special. 🧵