About This Cute Bunny Comforter Amigurumi Pattern

Make one as a baby shower gift and watch everyone ask where you bought it — then smile and say you made it yourself. It's perfect for gifting and genuinely quick to finish.
Ideal for those with basic crocheting experience, featuring slightly more advanced stitches and techniques to expand your skills.
Fits nicely into a free afternoon — 2 to 5 hours of focused, enjoyable crocheting.
Playful characters full of personality, designed to spark imagination and become cherished playtime favorites.
Make one as a baby shower gift and watch everyone ask where you bought it — then smile and say you made it yourself. It's perfect for gifting and genuinely quick to finish.
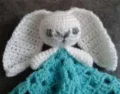
I have a soft spot for patterns that feel cozy to make AND cozy to give, and this bunny hits both. There's something almost meditative about working the granny square rounds — by the time I got to attaching the head and those little arms, I was already thinking about what color combo to try next. The whole thing comes together so neatly, and the yarn-embroidered face means it's safe for the tiniest babies. I've made a few of these now and they never stop making me happy.

I started making this bunny comforter on a whim one afternoon when I needed something to work on that wasn't too demanding — and honestly, I didn't expect to fall for it as hard as I did.
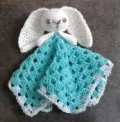
The granny square body is the part that surprised me most. I've made plenty of granny squares in my time, but working them knowing they're going to become a little bunny's dress just gave the whole thing a different energy. I chose a soft duck egg blue for the blanket and a creamy white for the bunny, and the combination was so sweet I nearly kept it for myself.
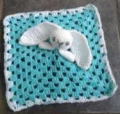
One thing I'd really recommend: don't rush the head stuffing. I know it feels like a small detail, but the difference between a firmly stuffed head and a floppy one is massive once everything is assembled. Pack it in properly before you close up Round 14 — you want that head to sit up proud in the center of the blanket.
For a color twist, try making the bunny in a warm oatmeal or pale pink and the blanket in a deeper dusty rose or sage green. It gives the whole comforter a slightly more grown-up, heirloom feel that works beautifully as a gift for a second or third baby when the nursery already has all the rainbow gear.
The ears are my favorite part to finish. Folding them in half and sewing that little top seam is so satisfying — suddenly it goes from a flat crocheted rectangle to an actual bunny ear. Make a second one and sew them both on slightly angled toward each other at the top of the head for the most natural look.
This one is a keeper. I've already got two more planned.
There's something so special about making a comforter for a little one — and this bunny is exactly the kind of project you'll want to keep in your rotation. She's got floppy ears, the sweetest little arms, and a granny square blanket body that's genuinely fun to crochet. You'll work through a handful of distinct sections, each one satisfying in its own way, and by the end you'll have something that feels genuinely handmade and full of heart. This pattern uses US terminology and works up quickly with a 5mm hook — the kind of make that actually gets finished.
The blanket body is a granny square. Start by chaining 4, then join with a sl st into the first ch to create a small ring. The ch3 at the start of each round counts as your first dc throughout.
Ch3 (counts as first dc), work 2dc into the ring, *ch2, 3dc into the ring*, rep from * twice more, ch2, then sl st to the top of the starting ch3. You'll have 4 groups of 3dc with ch2 corner spaces between them.
Ch3, work 2dc into the same sp, *ch1, then into the next ch2 corner sp work 3dc, ch2, 3dc. Rep from * all the way around. Your final corner should end with 3dc, ch2, then sl st to the top of the starting ch3.
Ch3, 2dc into the same sp, ch1, *work 3dc, ch1 into each ch sp across to the next corner sp. Into the corner sp work 3dc, ch2, 3dc, ch1. Rep from * all the way around. End the final corner with 3dc, ch2, sl st to the top of the starting ch3.
Round 3 is the growth round. You will repeat Round 3 nine more times (for a total of 10 repetitions of the Round 3 pattern after the initial Round 3). Each repeat grows the square outward by one more cluster per side.
Rep Round 3 (square grows by one cluster per side).
Rep Round 3.
Rep Round 3.
Rep Round 3.
Rep Round 3.
Rep Round 3.
Rep Round 3.
Rep Round 3.
Rep Round 3. This is the final round of the blanket square. Fasten off and weave in ends.
The head is worked in continuous spirals — do not join at the end of each round and do not turn. Place a stitch marker in the first stitch of each new round and move it up as you go.
Ch2, work 6sc into the ch furthest from your hook. Place stitch marker in first st. (6sc)
Work 2sc into every sc around. (12sc)
*2sc in next sc, sc in next sc; rep from * around. (18sc)
*2sc in next sc, sc in each of next 2sc; rep from * around. (24sc)
*2sc in next sc, sc in each of next 3sc; rep from * around. (30sc)
Sc in each st around. (30sc)
Sc in each st around. (30sc)
Sc in each st around. (30sc)
Sc in each st around. (30sc)
Sc in each st around. (30sc)
*Sc2tog, sc in each of next 3sc; rep from * around. (24sc)
*Sc2tog, sc in each of next 2sc; rep from * around. (18sc)
*Sc2tog, sc in next sc; rep from * around. (12sc)
Stuff the head firmly now, before closing. The more firmly packed it is, the better it will hold its round shape once attached to the blanket.
Sc2tog around. (6sc) Fasten off leaving a long yarn tail — you'll use this to sew the head to the center of the blanket.
The turning ch1 does not count as a stitch throughout the ears. Work rows back and forth.
Starting at the base of the ear, ch2, work 3sc into the 2nd ch from hook, ch1, turn. (3sc)
Sc in each st across, ch1, turn. (3sc)
2sc in first sc, sc in next sc, 2sc in last sc, ch1, turn. (5sc)
Sc in each st across, ch1, turn. (5sc)
Sc in each st across, ch1, turn. (5sc)
2sc in first st, sc in each st to last st, 2sc in last st, ch1, turn. (7sc)
Sc in each sc across, ch1, turn. (7sc)
Sc in each sc across, ch1, turn. (7sc)
Sc in each sc across, ch1, turn. (7sc)
Sc in each sc across, ch1, turn. (7sc)
Sc in each sc across, ch1, turn. (7sc)
Sc in each sc across, ch1, turn. (7sc)
Sc in each sc across, ch1, turn. (7sc)
Sc in each sc across, ch1, turn. (7sc)
Sc in each sc across, ch1, turn. (7sc)
Sc in each sc across, ch1, turn. (7sc)
Sc in each sc across, ch1, turn. (7sc)
Sc in each sc across, ch1, turn. (7sc)
Sc2tog, sc in each st across to last 2 sts, sc2tog, ch1, turn. (5sc)
Sc in each sc across, ch1, turn. (5sc)
Sc2tog, sc in next st, sc2tog, ch1. DO NOT TURN. (3sc)
Ear edging: Work 21sc down the side of the ear, then 3sc across the opposite side of the starting ch, then 21sc up the remaining side of the ear. Ch1 and join with a sl st to the first sc of Row 21. Leave a long tail for sewing and fasten off.
Fold each ear in half lengthwise so the long sides meet, then sew the top of Row 21 closed. Make two ears total.
Arms are worked in continuous spirals. Do not join at the end of rounds. Place a stitch marker in the first st and move it up each round.
Ch2, work 5sc into the ch furthest from your hook. Place stitch marker in first st. (6sc)
Work 2sc into every sc around. (12sc)
Sc in each st around. (12sc)
Sc in each st around. (12sc)
Sc2tog, sc in next 2 sts around. (9sc)
Sc in each st around. (9sc)
Sc in each st around. (9sc)
Sc in each st around. (9sc)
Sc in each st around. (9sc) Do not stuff. Sew the open end closed and fasten off, leaving a long tail for attaching to the blanket.
Whether this bunny ends up in a nursery, a gift bag, or your own keepsake collection, she's the kind of make that stays with you. 🧶 There's real joy in finishing each section — the granny square, the round little head, those floppy folded ears — and watching it all come together into something so genuinely sweet. I hope she brings you as much happiness to make as she will to whoever receives her. Happy crocheting! ✨
The pattern is written for light/worsted weight (8ply) yarn with a 5mm hook. You can go up to a true worsted or even a bulky for a larger, chunkier comforter — just know the finished size will increase noticeably and you'll need more yarn than the 15g per color listed.
The pattern doesn't give a finished size measurement, but a 12-round granny square in worsted weight on a 5mm hook typically works out to around 25–30cm (10–12 inches) square. Exact size depends on your personal tension.
Yes — the pattern specifically calls for yarn-embroidered facial features instead of plastic safety eyes, which makes it much safer for babies. Just make sure your stuffing is secured well inside the head and all yarn tails are woven in thoroughly before gifting.
The granny square section is beginner-friendly on its own, but the rest of the pattern — working in spirals, shaping the head, constructing the ears — does require some confidence with basic techniques. If you've made a few amigurumi before, you'll be totally fine.
This is a note-worthy quirk in the source: the instruction says to work 5sc into the chain, but the count in brackets reads 6sc. This appears to be because the starting chain itself acts as the 6th stitch in some interpretations. Try working 6sc total into the chain and check your count at the end of Round 2 — you should have 12sc, which confirms the 6sc start.
Absolutely — any flat square of roughly the same dimensions will work as the body. A solid dc grid, a simple shell stitch square, or even a flat sc square would all work. Just aim for a similar finished size so the bunny head stays proportional to the blanket.
