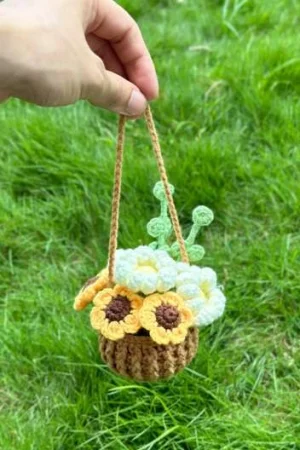
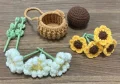
This little hanging planter is one of those projects that makes people stop and ask, 'Wait — you made that?' It's a tiny crocheted pot filled with fluffy white daisies, golden sunflowers, and delicate eucalyptus stems, all dangling from a braided chain. You'll love how each piece comes together — the textured basket, the puffy petals, the wire-wrapped greenery. It's the kind of handmade car accessory that brings a smile every single time you climb in.
Progress Tracker
0% Complete
— 1. Daisy Flower — Pistil & Peduncle (make 2: one in green, one in yellow) :
Info :
Make 2 pieces total — one using green yarn and one using yellow yarn. These form the center and stem base of the daisy.
Round 1 :
Start with a MR, work 6 SC into the ring. (6 sts)
Round 2 :
Work 1 INC in each of the 6 sts around. (12 sts)
Round 3 :
SC in each st around — no increases. (12 sts)
Info :
These two pieces are joined seamlessly before working the petals — connect them together and then begin the petal crochet directly from the joined piece.
— 2. Daisy Flower — Petals (white) :
Info :
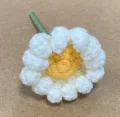
Work all 12 petals as a seamless piece joined to the pistil/peduncle. Begin each petal the same way: ch 8, then working back into the 2nd ch from the hook, work 7 HDC, then sl st into the next st on the center piece. Repeat this petal sequence 12 times in total. Begin adding cotton stuffing to the center starting from the 9th petal onward.
Info :
Once all 12 petals are complete, wrap yarn around the joined stems to secure and neaten the base of the flower.
— 3. Yellow Flower — Pistil & Peduncle (make 2: one in green, one in brown) :
Info :
Make 2 pieces — one in green yarn and one in brown yarn. These form the raised center and stem base of the yellow sunflower.
Round 1 :
Start with a MR, work 6 SC into the ring. (6 sts)
Round 2 :
Work 1 INC in each of the 6 sts around. (12 sts)
Info :
Join the two pieces together seamlessly before beginning the petal round.
— 4. Yellow Flower — Petals (yellow) :
Info :
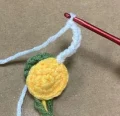
Work all 6 petals as a seamless piece joined to the pistil. Each petal is made as follows: ch 2, work 3 HDC into one st, then ch 2, sl st into the next st. Repeat this 6 times total. Begin adding stuffing from the 4th petal onward.
— 5. Eucalyptus Stems (make 2 complete stems) :
Info :
You will need 6 crocheted leaf pieces per stem: 4 smaller leaves and 2 larger leaves. Work them as flat magic ring circles, leaving a long yarn tail on each for wrapping around the wire.
Round 1 (Large Leaf — make 2) :
Start with a MR, work 8 SC into the ring. (8 sts) Cut yarn and leave a long tail for wire-wrapping.
Round 1 (Small Leaf — make 4) :
Start with a MR, work 6 SC into the ring. (6 sts) Cut yarn and leave a long tail for wire-wrapping.
Info :
To assemble each eucalyptus stem: take the 2 large leaf pieces (8 SC each) and glue or hold them back-to-back at the top of the wire. Then wrap yarn around the wire working downward, attaching each of the 4 smaller leaves at intervals along the stem as you go. The result should look like a small sprig with pairs of round leaves.
— 6. Plant Pot :
Info :
Switch to a 3.0mm hook for this section. Work in continuous rounds from the base upward.
Round 1 :
Starting with a MR, work 8 SC into the ring. (8 sts)
Round 2 :
Work 1 INC in each st around. (16 sts)
Round 3 :
Work (1 SC, 1 INC) repeated 8 times. (24 sts)
Round 4 :
Work (2 SC, 1 INC) repeated 8 times. (32 sts)
Round 5 :
Work (3 SC, 1 INC) repeated 8 times. (40 sts)
Round 6 :
Working in BLO only, work 40 DC around. (40 sts)
Round 7 :
Alternate 1 FPDC and 1 BPDC all the way around to end. (40 sts)
Round 8 :
Alternate 1 FPDC and 1 BPDC all the way around to end. (40 sts)
Round 9 :
Alternate 1 FPDC and 1 BPDC all the way around to end. (40 sts)
Round 10 :
Work 40 SC around. (40 sts)
Round 11 :
Work 40 sl st around the top edge.
Info :
After completing Round 11, continue working ch 70 to form the hanging cord. Do not cut yet — this chain becomes the strap used to hang the planter.
— 7. The Soil — Type 1 (crocheted ball) :
Round 1 :
Start with a MR, work 8 SC into the ring. (8 sts)
Round 2 :
Work 1 INC in every st around. (16 sts)
Round 3 :
Work (1 SC, 1 INC) repeated 8 times. (24 sts)
Round 4 :
Work (2 SC, 1 INC) repeated 8 times. (32 sts)
Round 5 :
SC in every st around. (32 sts)
Round 6 :
SC in every st around. (32 sts)
Round 7 :
SC in every st around. (32 sts)
Round 8 :
SC in every st around. (32 sts)
Round 9 :
SC in every st around. (32 sts)
Round 10 :
Work (2 SC, 1 DEC) repeated 8 times. (24 sts)
Round 11 :
Work (1 SC, 1 DEC) repeated 8 times. (16 sts)
Info :
Add cotton stuffing firmly at this point before continuing to close.
Round 12 :
Work 8 DEC across. (8 sts)
Info :
Cut yarn leaving a long tail. Thread through remaining stitches, pull tight to close the hole, and weave in the end securely.
— 8. The Soil — Type 2 (foam alternative) :
Info :
As an alternative to the crocheted soil ball, cut a piece of foam to match the inner diameter of the pot. Press it in snugly so it sits flat at the top. This gives a firm base to insert the flower stems into without any crochet work needed.
Whether this is the first little crochet accessory you've ever made or the fifteenth one lined up for gifts, there's something really special about finishing this one. You've built a whole tiny garden from scratch — every petal, every leaf, every little round of that textured pot. Hang it somewhere it'll catch the light and make you smile on the ordinary days. 🌼 Tag your finished piece and share it with your crafting community — handmade things deserve to be seen. Happy crocheting! 🧶✨