There is something truly magical about a bouquet that stays in bloom all year round. This pattern helps you create stunningly realistic lilies that look like they were just plucked from a high-end florist. You will love the process of watching flat petals transform into sculptural masterpieces with the help of simple wire techniques and a touch of artistic shading. It is a wonderful way to bring a permanent splash of nature into your home.
Progress Tracker
0% Complete
— 1. Petal A :
Foundation :
Start with a slip knot leaving a 3-inch tail and ch 26.
Round 1 :
Starting in the 2nd ch from your hook, work 1 sc in the first 3 ch. Work 1 hdc in the next 3 ch, then 1 dc in each of the next 8 ch. Follow this with 1 hdc in the next 8 ch and 1 sc in the next 2 ch. In the last ch, work (1 sc, ch 1, 2-sc inc). Rotate to work along the bottom of the chain: 1 sc in the next 2 ch, 1 hdc in the next 8 ch, 1 dc in the next 8 ch, 1 hdc in the next 3 ch, and 1 sc in the last 3 ch. Sl st into the turning ch.
Round 2 :
Ch 1, 1 sc in next 2 sts, 1 hdc in next 2 sts. Repeat [1 dc in next 2 sts, 2-dc inc in next st] 3 times. Work 1 dc in next 3 sts, 1 hdc in next 4 sts, and 1 sc in next 5 sts. In the ch-1 space at the tip, work (1 sc, ch 1, 2-sc inc). Rotate to the other side: 1 sc in next 5 sts, 1 hdc in next 4 sts, 1 dc in next 3 sts. Repeat [2-dc inc in next st, 1 dc in next 2 sts] 3 times. Finish with 1 hdc in next 2 sts, 1 sc in next 2 sts, and a sl st into the turning ch.
Round 3 :
Ch 3 and secure your 0.46mm wire through the loop on the hook. Working around the wire for the whole round, sc in the 2nd ch from hook and the next ch. Work 1 hdc in the next 13 sts and 1 sc in the next 16 sts. In the ch-1 space at the tip, work (1 sc, 1 hdc, ch 2, 1 sc). Down the other side, work 1 sc in next 16 sts, 1 hdc in next 13 sts, and 1 sc in the last 2 sts. Sl st into the turning ch, cut yarn and wire leaving 3-inch tails.
— 2. Petal B :
Foundation :
Start with a slip knot leaving a 3-inch tail and ch 28.
Round 1 :
Beginning in the 2nd ch from hook, work 1 sc in the first 3 ch. Work 1 hdc in next 3 ch, 1 dc in next 9 ch, 1 hdc in next 9 ch, and 1 sc in next 2 ch. In the last ch, work (1 sc, ch 1, 1 sc). Rotate to work back: 1 sc in next 2 ch, 1 hdc in next 9 ch, 1 dc in next 9 ch, 1 hdc in next 3 ch, and 1 sc in the last 3 ch. Sl st to finish.
Round 2 :
Ch 1, 1 sc in next 2 sts, 1 hdc in next 2 sts. Repeat [1 dc in next 2 sts, 2-dc inc in next st] 3 times. Work 1 dc in next 3 sts, 1 hdc in next 5 sts, and 1 sc in next 6 sts. At the tip ch-1 space, work (1 sc, ch 1, 1 sc). Down the other side: 1 sc in next 6 sts, 1 hdc in next 5 sts, 1 dc in next 3 sts. Repeat [2-dc inc in next st, 1 dc in next 2 sts] 3 times. Finish with 1 hdc in next 2 sts, 1 sc in next 2 sts, and a sl st.
Round 3 :
Ch 3 and insert your 0.46mm wire. Working over the wire, hdc in the 2nd ch from hook and the next ch. Work 1 hdc in the next 15 sts and 1 sc in the next 16 sts. In the tip space, work (1 sc, 1 hdc, ch 2, 1 sc). Down the opposite side, work 1 sc in next 16 sts, 1 hdc in next 15 sts, and 1 hdc in the last 2 sts. Sl st and leave 3-inch tails for both yarn and wire.
— 3. Leaf :
Foundation :
Create a slip knot with a 3-inch tail and ch 35.
Round 1 :
In the 2nd ch from hook, work 1 sc in the next 3 ch. Work 1 hdc in next 3 ch, 1 dc in next 15 ch, 1 hdc in next 10 ch, and 1 sc in next 2 ch. At the end, work (1 sc, ch 1, 1 sc). On the other side: 1 sc in next 2 ch, 1 hdc in next 10 ch, 1 dc in next 15 ch, 1 hdc in next 3 ch, and 1 sc in the last 3 ch. Sl st.
Round 2 :
Ch 1, 1 sc in next 2 sts, 1 hdc in next 2 sts, 1 dc in next 3 sts. Repeat [1 tr in next 3 sts, 2-tr inc in next st] 2 times. Work 1 tr in next 3 sts, 1 dc in next 8 sts, 1 hdc in next 4 sts, and 1 sc in next 4 sts. At the tip, work (1 sc, ch 1, 1 sc). Down the other side: 1 sc in next 4 sts, 1 hdc in next 4 sts, 1 dc in next 8 sts. Repeat [1 tr in next 3 sts, 2-tr inc in next st] 2 times. Finish with 1 tr in next 3 sts, 1 dc in next 3 sts, 1 hdc in next 2 sts, 1 sc in next 2 sts, and a sl st.
Round 3 :
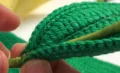
Ch 1 and insert your 0.46mm wire. Working around the wire, work 1 sc in the next 37 sts. In the tip space, work (1 sc, 1 hdc, ch 2, 1 sc). Work 1 sc in the remaining 37 sts. Sl st and leave 3-inch tails.
— 4. Stigma :
Foundation :
Start with a slip knot leaving a 3-inch tail and ch 3.
Row 1 :
Work 1 sc in the 2nd ch from the hook, then 1 sl st in the next ch. Ch 2, work 1 sc in the 2nd ch from the hook, and sl st back into the same ch as the first sl st. Ch 2 again, work 1 sc in the 2nd ch from the hook, and sl st into that same base ch once more. Cut your yarn, leaving a 15-inch tail, and pull it through to secure.
— 5. Stamen :
Info :
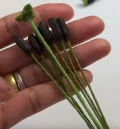
For each stamen, take an 11-inch piece of 0.46mm wire. Wrap brown floral tape around the center several times until it has some volume. Fold the wire in half so the tape is at the bend. Wrap more brown tape around the head about 7 times, then switch to green floral tape and wrap all the way down the stem. Repeat this to make 6 stamens.
— 6. Assembly Preparation :
Info :
If using acrylic yarn, briefly pass each piece over a candle flame to remove fuzz. Pinch the tips of the petals and leaves while they are warm to create a sharp point. Use a green crayon to rub color onto the bottom third of each petal on the 'right side' to add depth.
I really hope you enjoy bringing these lilies to life as much as I did! There is something so rewarding about seeing a handful of yarn and wire transform into a realistic bloom. Whether you make a single stem for a bud vase or a full, lush arrangement, these flowers are bound to be a conversation starter in your home. Don't forget to take your time with the shaping—it's that final pinch of the petals that really makes the magic happen. I can't wait to see your finished bouquets blooming in all sorts of colors! Happy crafting and enjoy every stitch. 🧶✨