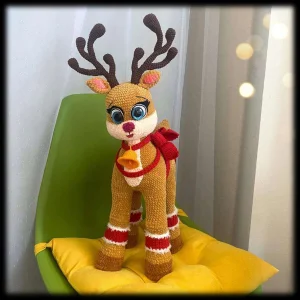
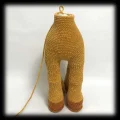
There is something truly magical about bringing a woodland creature to life with your own two hands. This deer isn't just a toy; she's a graceful character with a slender neck, impressive antlers, and a gaze that feels full of wonder. You will love the tactile experience of working with plush velvet yarn, and the satisfaction of seeing her stand tall on her own is unmatched. It is a substantial project that rewards your focus with a stunning, heirloom-quality piece.
Progress Tracker
0% Complete
— 1. Forelegs (Make 2) :
Info :
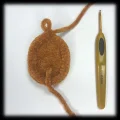
Start with brown velvet yarn and your 2.5mm hook.
Round 1 :
ch8, then 2sc in the 2nd ch from hook. Work 5sc, then 4sc in the last ch. Turn to work along the bottom of the chain: 5sc, 2sc in the final ch. (18)
Round 2 :
2inc, 5sc, 4inc, 5sc, 2inc (26)
Round 3 :
(1sc, 1inc) x 2, 5sc, (1sc, 1inc) x 4, 5sc, (1sc, 1inc) x 2 (34)
Round 5 :
34sc in blo (34)
Round 6 :
16sc, 1dec, 15sc, 1inc (34)
Round 7 :
15sc, 1dec, 16sc, 1inc (34)
Round 8 :
14sc, 1dec, 17sc, 1inc (34)
Colour Change :
Switch to honey-colored velvet yarn.
Round 9 :
(15sc, 1dec) x 2 in blo (32)
Round 11 :
(14sc, 1dec) x 2 (30)
Round 12 :
(13sc, 1dec) x 2 (28)
Round 13 :
(12sc, 1dec) x 2 (26)
Round 14 :
(11sc, 1dec) x 2 (24)
Info :
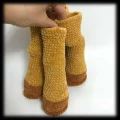
Go back to the unworked loops of Round 4 and work rev sc all the way around the hoof edge. Fasten off and hide the tail.
Info :
Begin stuffing the leg firmly. Ensure your stitch marker stays centered at the back.
Round 24 :
9sc, 7inc, 8sc (31)
Round 26 :
9sc, 7dec, 8sc (24)
Round 36 :
(11sc, 1inc) x 2 (26)
Round 37 :
(12sc, 1inc) x 2 (28)
Round 38 :
(13sc, 1inc) x 2 (30)
Info :
Finish stuffing and fasten off. Repeat for the second front leg.
— 2. Hind Legs (Make 2) :
Round 1-23 :
Work these exactly as you did for the forelegs.
Round 24 :
10sc, 3inc, 11sc (27)
Round 25 :
10sc, (1sc, 1inc) x 3, 9sc, 1dec (29)
Round 26 :
1dec, 8sc, (2sc, 1inc) x 3, 8sc, 1dec (30)
Round 27 :
1dec, 26sc, 1dec (28)
Round 28 :
1dec, 26sc (27)
Round 34 :
1inc, 26sc (28)
Round 35 :
1sc, 1inc, 26sc (29)
Round 36 :
2sc, 1inc, 26sc (30)
Info :
Fasten off and stuff. Repeat for the second hind leg.
— 3. Connecting Piece :
Info :
Use honey velvet yarn and the 2.5mm hook.
Round 1 :
ch8, 2sc in 2nd ch from hook, 5sc, 4sc in last ch. Rotate: 5sc, 2sc in last ch. (18)
Round 2 :
2inc, 5sc, 4inc, 5sc, 2inc (26)
Round 3 :
(1sc, 1inc) x 2, 5sc, (1sc, 1inc) x 4, 5sc, (1sc, 1inc) x 2 (34)
Round 4 :
(2sc, 1inc) x 2, 5sc, (2sc, 1inc) x 4, 5sc, (2sc, 1inc) x 2 (42)
Round 5 :
(3sc, 1inc) x 2, 5sc, (3sc, 1inc) x 4, 5sc, (3sc, 1inc) x 2 (50)
— 4. Joining & Main Body :
Round 6 :
Join the legs to the connector: 4sc on back, 24sc around left hind leg, 7sc on side, 24sc around left foreleg, 6sc on chest, 24sc around right foreleg, 7sc on side, 24sc around right hind leg, 2sc on back. (122)
Round 7 :
(59sc, 1dec) x 2 (120)
Round 8 :
(18sc, 1dec) x 6 (114)
Round 21 :
37sc, ch20, skip to the opposite side and join with sl st, 23sc. (80 total for the back/bottom opening)
— 5. Closing the Back :
Info :
Continue working on the 80 stitches at the back/bottom section.
Round 22 :
(8sc, 1dec) x 8 (72)
Round 23 :
(7sc, 1dec) x 8 (64)
Round 24 :
(6sc, 1dec) x 8 (56)
Round 25 :
(5sc, 1dec) x 8 (48)
Round 26 :
(4sc, 1dec) x 8 (40)
Round 27 :
(3sc, 1dec) x 8 (32)
Round 28 :
(2sc, 1dec) x 8 (24)
Round 29 :
(1sc, 1dec) x 8 (16)
Info :
Tighten the opening, cut the yarn, and weave in the end.
— 6. Neck & Head :
Info :
Return to the front opening (74 stitches) to work the neck.
Round 22 :
(35sc, 1dec) x 2 (72)
Round 23 :
(16sc, 1dec) x 4 (68)
Round 24 :
(15sc, 1dec) x 4 (64)
Round 25 :
(14sc, 1dec) x 4 (60)
Round 26 :
(13sc, 1dec) x 4 (56)
Round 27 :
(12sc, 1dec) x 4 (52)
Round 28 :
(11sc, 1dec) x 4 (48)
Round 29 :
(10sc, 1dec) x 4 (44)
Round 30 :
(9sc, 1dec) x 4 (40)
Round 31 :
(8sc, 1dec) x 4 (36)
Colour Change :
Switch to powder pink velvet yarn.
Round 39 :
(8sc, 1inc) x 4 (40)
Round 40 :
(4sc, 1inc) x 8 (48)
Round 41 :
(5sc, 1inc) x 8 (56)
Round 42 :
(6sc, 1inc) x 8 (64)
Round 43 :
(7sc, 1inc) x 8 (72)
Round 44 :
(8sc, 1inc) x 8 (80)
Round 50 :
22sc, (1sc, 1dec) x 12, 22sc (68)
Colour Change :
Switch back to honey velvet yarn.
Round 62 :
(15sc, 1dec) x 4 (64)
Round 63 :
(6sc, 1dec) x 8 (56)
Round 64 :
(5sc, 1dec) x 8 (48)
Round 65 :
(4sc, 1dec) x 8 (40)
Round 66 :
(3sc, 1dec) x 8 (32)
Round 67 :
(2sc, 1dec) x 8 (24)
Round 68 :
(1sc, 1dec) x 8 (16)
Info :
Draw the thread tight and weave in the end.
— 7. Eyes (Make 2) :
Info :
Use white cotton-acrylic yarn and the 1.75mm hook.
Round 3 :
(1sc, 1inc) x 8 (24)
Round 4 :
(2sc, 1inc) x 8 (32)
Round 5 :
Switch to black yarn and work 32sl st into the flo. (32)
— 8. Muzzle :
Round 1 :
Using powder pink velvet, ch8, 2sc in 2nd ch, 5sc, 4sc in last ch. Rotate: 5sc, 2sc in last ch. (18)
Round 2 :
2inc, 5sc, 4inc, 5sc, 2inc (26)
Round 3 :
(1sc, 1inc) x 2, 5sc, (1sc, 1inc) x 4, 5sc, (1sc, 1inc) x 2 (34)
— 9. Nose :
Round 1 :
Using burgundy velvet, ch4, 2sc in 2nd ch, 1sc, 4sc in last ch. Rotate: 1sc, 2sc in last ch. (10)
— 10. Horn Parts (Make 2 sets) :
Info :
Use brown cotton-acrylic yarn and the 1.75mm hook.
Part 1 - Round 1-2 :
8sc in mr (8), then 8inc (16).
Part 1 - Round 3-4 :
16sc (16)
Part 1 - Round 5-8 :
Decrease rounds: (6sc, 1dec) x 2, then (5sc, 1dec) x 2, then (4sc, 1dec) x 2, then (3sc, 1dec) x 2. (8)
Part 1 - Round 9-13 :
8sc (8). Fasten off.
Part 2 - Round 1-8 :
Repeat steps for Part 1 through Round 8. (8)
Part 2 - Round 9-19 :
8sc (8). Fasten off.
Part 3 - Round 1-2 :
8sc in mr (8), then 8inc (16).
Part 3 - Round 3 :
(1sc, 1inc) x 8 (24)
Part 3 - Round 4-5 :
24sc (24)
Part 3 - Round 6-13 :
Work decrease pairs: (10sc, 1dec) x 2, (9sc, 1dec) x 2, (8sc, 1dec) x 2, (7sc, 1dec) x 2, (6sc, 1dec) x 2, (5sc, 1dec) x 2, (4sc, 1dec) x 2, (3sc, 1dec) x 2. (8)
Part 3 - Round 14-20 :
8sc (8). Do not cut yarn.
— 11. Horn Assembly :
Step 1 - Round 1 :
Connect Part 1 and Part 3: 8sc around Part 1, 8sc around Part 3. (16)
Step 1 - Round 2-5 :
Work decrease rounds until you have 8 stitches left. (8)
Step 1 - Round 6-10 :
8sc (8)
Step 2 - Round 1 :
Connect the resulting piece to Part 2: 8sc around Part 2, 8sc around result. (16)
Step 2 - Round 2-5 :
Work decrease rounds until you have 8 stitches left. (8)
Step 2 - Round 6-7 :
8sc (8)
Step 3 - Round 1 :
Connect back to the first part as instructed: 8sc on Part 1, 8sc on result. (16)
Step 3 - Round 2-3 :
14sc, then 12sc using decreases. (12)
Step 3 - Round 4-7 :
12sc (12)
Step 3 - Round 8-9 :
14sc, then 16sc using increases. (16)
— 12. Ears (Make 2) :
Round 1-3 :
With honey velvet: 4sc in mr, 4inc, then (1sc, 1inc) x 4. (12)
Round 4 :
2sc honey, 1inc coral, (2sc, 1inc) x 3 honey. (16)
Round 5 :
2sc honey, 2sc coral, 12sc honey. (16)
Round 6-8 :
1sc honey, 4sc coral, 11sc honey. (16)
Round 9 :
1sc honey, 2dec coral, 11sc honey. (14)
Info :
Flatten and sc the edges together, fold in half and sc again to shape. (3-4 stitches)
— 13. Breast :
Row 1 :
With powder pink velvet, ch6, 1sc in 2nd ch, 4sc. (5)
Row 2-9 :
ch1, turn, 4sc. (5)
Row 10 :
ch1, turn, 1inc, 1sc, 1inc, 1sc. (7)
Row 11-12 :
ch1, turn, 6sc. (7)
Row 13 :
ch1, turn, 1inc, 3sc, 1inc, 1sc. (9)
Row 14-16 :
ch1, turn, 8sc. (9)
Row 17-21 :
Work decrease rows until you have 3 stitches left. Fasten off.
— 14. Tail :
Round 1-6 :
With honey velvet, work standard increases starting from 6sc in mr until you reach 36 stitches. (36)
Round 10-19 :
Work decrease rounds (10sc, 1dec) x 3, then (9sc, 1dec) x 3, etc., until 6 stitches remain.
Round 20 :
3dec (3). Fasten off.
— 15. Bell :
Round 1-3 :
With orange cotton, 8sc in mr, 8inc, then (1sc, 1inc) x 8. (24)
Round 4 :
24sc (24) for 5 rounds.
Round 5-7 :
Work increase rounds (5sc, 1inc) x 4, then (6sc, 1inc) x 4, then (7sc, 1inc) x 4. (36)
Round 8 :
rev sc around the edge. Fasten off.
I truly hope you enjoy every minute of crafting this graceful forest deer! It is a project that requires patience and a bit of focus, but the end result is so incredibly rewarding. Whether she’s standing on a shelf or being hugged by a little one, she brings a touch of woodland magic wherever she goes. Don't forget to take a photo of your finished friend—I would love to see how yours turned out! Happy stitching! 🧶✨🦌